About This Citrus Tote Bag Crochet Pattern

This bag makes a gorgeous handmade gift — functional, eye-catching, and personal in a way that a store-bought bag never quite manages to be.
Ideal for those with basic crocheting experience, featuring slightly more advanced stitches and techniques to expand your skills.
Takes 5-7 hours, making it an enjoyable project to finish over a couple of days.
An elegant detail to elevate any look, combining traditional techniques with contemporary design sensibilities.
This bag makes a gorgeous handmade gift — functional, eye-catching, and personal in a way that a store-bought bag never quite manages to be.
I have a soft spot for any pattern where the individual pieces look almost too pretty to assemble — and these citrus squares are exactly that. Every single one feels like a little win. The embroidery step is something I wasn't expecting to love, but stitching those white lines through the center to create the citrus segments is genuinely meditative. The moment you join the first few squares and see the citrus motifs nestling up against each other, that's it — you're hooked for the whole project.


I'll be honest — when I first saw the citrus granny square concept, I thought it was going to be one of those patterns that looks incredible in photos and then is kind of a letdown once you start making it. I was completely wrong.
Each square takes maybe 15 to 20 minutes once you've done the first couple and have the rhythm down. The rounds move quickly, and the color changes give you these natural little pause points — finish a round, cut your yarn, exhale, start the next color. It almost gamifies the making process in the best way.
The embroidery is the part I'd been mentally skipping over when I read through the pattern initially, and it turned out to be my favorite step. You just weave white yarn through the center in eight directions and suddenly it looks exactly like a real citrus slice. It's one of those crafting moments that feels almost disproportionately satisfying for how simple it actually is.
For joining, I'd strongly recommend pinning your squares out in the final configuration before you start seaming. The L-shape arrangement can look confusing on paper but makes total sense once you have the physical squares laid out on your floor. I use painters tape on my blocking mat to mark the final shape so I know exactly where each square lands.
On yarn: I used a soft acrylic for my first version and it works perfectly — the structure is good and the colors stay vivid. If you want something a bit more relaxed and drapey for a beach bag feel, a cotton blend works beautifully here too. Just know that cotton bags tend to stretch a little with use, so size up your squares slightly if that concerns you.
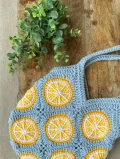
This cheerful tote bag is the kind of project that makes everyone around you ask, "Wait, you made that?" Built from citrus-inspired granny squares joined together, the finished bag has this bright, market-day energy that's hard to resist. You'll work through five rounds per square, finishing with a bit of embroidery that really brings the citrus slices to life. The straps come together in two parts — a flat border section plus a two-round loop — and the whole thing folds and seams into a proper, sturdy bag. It's a satisfying make from start to finish, and yours to carry all summer long.
Before starting, make one test square to check your gauge. If the finished square has wavy edges, go down a hook size. If the square curls up into a bowl shape, go up a hook size. A slight bow is normal — the square should relax flat once it's stretched. This square can represent any citrus variety by swapping color families.
Color: Light Yellow. Start with a magic ring, then ch 2 (this counts as your first dc). Work 11 dc into the magic ring. Pull the ring closed snugly. Join to the top of the starting ch 2 with a sl st. (12 stitches total)
Color: Light Yellow (continued). Ch 2 and work 1 dc in the same stitch as the join. Then work 2 dc into each remaining dc around until you arrive back at the start. Close the round with a sl st into the top of the beginning ch 2. (24 stitches total) Cut the light yellow yarn leaving a 6-inch tail. Pull the tail through the slip stitch and tug to secure.
New color: White. Create a slip knot and place it on your hook. Join to the last stitch of Round 2 with a sl st, then ch 1. Work 2 sc into the next stitch. Work 1 sc into the stitch after that. Continue alternating between 2 sc and 1 sc all the way around. Close with a sl st to the beginning ch 1. (36 stitches total) Cut the white yarn with a 6-inch tail and pull it through the slip stitch to fasten off.
New color: Dark Yellow. Create a slip knot and place it on your hook. Join to the last stitch of Round 3 with a sl st, then ch 1. Work 1 sc in every stitch around. Finish with a sl st to the beginning ch 1. (36 stitches total) Cut the dark yellow yarn with a 6-inch tail and pull it through the slip stitch to fasten off.
New color: Light Blue. Create a slip knot and place it on your hook. Join to the last stitch of Round 4 with a sl st, then ch 2. Work 1 dc in the next stitch. Then work 1 hdc in each of the next 4 stitches, followed by 1 dc in each of the next 2 stitches. For the first corner, work 2 edc, ch 1, then 2 edc all in the same stitch. *Next, work 1 dc in each of the next 2 stitches, 1 hdc in each of the next 4 stitches, and 1 dc in each of the next 2 stitches. For the next corner, work 2 edc, ch 2, 2 edc all in the same stitch.* Repeat from * two more times to complete all four corners. Close with a sl st into the beginning ch 2. (Note: the first corner uses ch 1; the remaining three corners each use ch 2.) Cut the light blue yarn with a 6-inch tail and pull it through the slip stitch to fasten off.
Embroidery: Cut a piece of white yarn approximately 14 inches long. Anchor one end on the wrong side of the square near the center. Thread the other end onto your yarn needle and bring it up through the center of the square, then push it back down between the white and dark yellow rounds. Continue this back-and-forth weaving — always coming up through the center and going down between the white and dark yellow rounds — at the four corners, the top, the bottom, and both sides, creating eight evenly spaced spoke-like lines that mimic citrus segments. Tie off the working yarn on the wrong side when all lines are placed. Weave in all remaining tails.
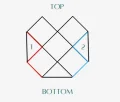
You will join 11 squares in an L-shaped or cross configuration (see pattern diagram). Place two squares with right sides facing each other. Make a slip knot, place it on your hook, and insert the hook through the corners of both squares simultaneously. Work a sl st to join, then ch 1. Continue by working 1 sc in each stitch along the side of the square, inserting your hook through both layers with each stitch. Continue joining squares in this way until 11 are connected in the main panel configuration. The remaining 2 squares form the side panels of the bag.
Once all 11 squares are joined and the 2 side squares are in position, fold the panel in half so the top and bottom align. Stitch along the side seams (indicated by the red and blue lines in the pattern diagram) to close the bag. The two folded side squares become the gussets of the bag.
Lay the bag flat with the right side facing out. You will work the flat strap border section first. This is worked back and forth in rows, not in the round. Repeat Part One on both the front and back of the bag opening.
Color: Light Blue. Make a slip knot and place it on your hook. Join with a sl st to the ch-1 corner space on the right side of the bag opening. Work 1 dc in each of the next 10 stitches. Next, work dc6tog, inserting your hook across 6 positions: the 2 edc and ch-1 from the first square's corner, plus the ch-1 and 2 edc from the adjacent square's corner. Then work 1 dc in each of the next 11 stitches (ending in the ch-1 corner space). Ch 2 and turn.
Color: Light Blue (continued). Skip the first stitch (the ch 2 counts as your first dc). Work 1 dc in each of the next 8 stitches. Work dc5tog across the next 5 positions. Work 1 dc in each of the next 9 stitches. To finish, ch 1 and cut the yarn leaving a 6-inch tail. Pull the tail through the last loop and fasten off. Flip the bag over and repeat Part One (Rows 1 and 2) on the other side.
In Part Two, the strap loops and the top border of the bag's middle section are all worked in one continuous round. Designate one side of the bag as Side A and the other as Side B. Number the four top squares 1 through 4 (squares 1 and 2 on Side A, squares 3 and 4 on Side B). The ch-1 corner spaces from the Part One rows count as stitches in this round — the pattern notes when to work into these spaces specifically.
Color: Light Blue. Make a slip knot and place it on your hook. With Side A facing up, join with a sl st to the ch-1 corner space at the top of granny square 1 (starting here rather than at the top corner of the Part One rows gives the straps better structural stability). Work 1 dc in each of the next 10 stitches. Work dc6tog across the corner positions linking squares 1 and 2 (including the ch-1 spaces). You are now working across Side B. On granny square 4, work 1 dc in each of the next 11 stitches (ending in the ch-1 corner space). Work 2 dc in each row end from Part One (4 rows = 4 dc total). Ch 60 for the first strap. Work 2 dc in each row end from Part One on granny square 3 (4 dc total). Work 1 dc in each of the next 11 stitches across square 3 (the first dc goes in the ch-1 forming the first corner). Work dc6tog across the corner positions linking squares 3 and 4 (including ch-1 spaces). You have now returned to Side A. On granny square 2, work 1 dc in each of the next 11 stitches (ending in the ch-1 corner space). Work 2 dc in each row end from Part One (4 dc total). Ch 60 for the second strap. Work 2 dc in each row end from Part One on square 1 (4 dc total). Close with a sl st to join the round. Ch 2.
Note: Making the first dc after each ch-60 strap can feel awkward. Try holding the loop on the hook in place before your first yarn over so the chain doesn't twist when you begin working into it.
Color: Light Blue (continued). Skip the first stitch (the ch 2 counts as your first dc). Work 1 dc in each of the next 8 stitches. **Work dc5tog. Then work 1 dc in each of the next 13 stitches. Work 1 dc in each chain stitch across the 60-chain strap (60 dc). Work 1 dc in each of the next 13 stitches.** Repeat the section between ** one more time across the second strap. To finish the round, work 1 dc in each of the remaining 4 stitches, then join with a sl st. Cut the yarn leaving a 6-inch tail, pull it through the last loop, and fasten off.
Turn the bag inside out. Using a tapestry needle, weave in all remaining yarn tails securely. Turn right side out to finish.
There's something really special about carrying a bag you crocheted yourself — and this one gets so many looks. 🍋 Each little citrus square is its own small achievement, and watching all 13 of them come together into an actual usable tote is one of those crafting moments that just sticks with you. Whether you go classic lemon yellow, switch things up with lime greens, or try a pink grapefruit palette, the construction stays the same and the results are always gorgeous. 🧶 This is the kind of project that reminds you why you fell in love with crochet in the first place — practical, beautiful, and completely made by your own two hands. Happy making! ✨
The finished size depends on your gauge, which is why a test square is so important. Each granny square should measure approximately the same size once blocked — the pattern doesn't specify a finished bag dimension, so if you need a particular size, adjust your hook up or down and re-test your square first.
You can, but the pattern is written for medium weight (Category 4) yarn. Going up to bulky will make each square noticeably larger and the bag overall more oversized and slouchy. Going down to DK weight will make a smaller, slightly more structured bag. Either way, your test square will tell you if the fabric feels right.
Before embroidery it looks like a blue-bordered granny square with a yellow and white center circle. The white embroidery lines you stitch in afterward are what create the citrus segment effect — without them the circles look like abstract rounds rather than actual fruit slices.
The pattern doesn't include a lining — the bag is worked in crochet only. If you plan to carry small items that might poke through the stitch gaps, you can easily hand-sew a simple fabric lining into the finished bag as an optional step.
Simply swap the light yellow in Rounds 1 and 2 for bright green (lime) or light orange (orange or grapefruit), keep white for Round 3, then use a darker shade of your chosen fruit color for Round 4. The blue outer border in Round 5 works with any fruit color, or you could try a neutral cream for a different look.
Yes — slow down and count each insertion point before you pull through. You are inserting into 2 edc, 1 ch-1 from the first square, then 1 ch-1 and 2 edc from the next square — 6 total. Using a slightly smaller hook to pick up each loop can help, and going slowly on the final pull-through keeps the decrease tidy.
