About This Classic Hero Spiderman Amigurumi Pattern
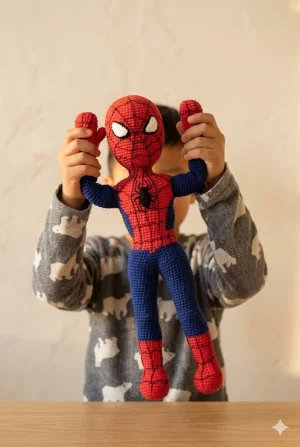
This hero makes a spectacular gift for the comic lover in your life. Standing at 15 inches tall, he is the perfect size for hugging or standing guard on a bedroom shelf.
Ideal for those with basic crocheting experience, featuring slightly more advanced stitches and techniques to expand your skills.
Requires 8-10 hours, ideal for a full day of immersive crocheting.
Playful characters full of personality, designed to spark imagination and become cherished playtime favorites.
This hero makes a spectacular gift for the comic lover in your life. Standing at 15 inches tall, he is the perfect size for hugging or standing guard on a bedroom shelf.
I really enjoyed how the legs and body flow together seamlessly. It feels so satisfying to see the suit colors line up perfectly as you work through the rounds. Plus, the chin shaping is such a clever little detail that gives the mask a much more realistic profile!
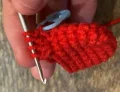
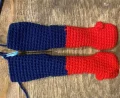
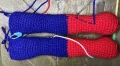
When I first saw this Spiderman design, I knew it was going to be a project that required a bit of patience, but oh my goodness, the result is so worth it! There’s something so nostalgic about working with these classic primary colors. It reminds me of Sunday morning cartoons. One thing I’ve learned while making amigurumi of this size is that your tension is your best friend. Because we're working with a smaller hook to keep the fabric tight, your hands might need a little break every few rounds—don't forget to stretch!
The webbing is usually the part that intimidates people, but I actually found it quite meditative. I used a set of pins to map out the 'spokes' on the head first, which helped me keep everything symmetrical. If you're nervous about the embroidery, just remember that even in the comics, the webbing isn't always perfectly straight! It gives him character. I decided to use a slightly darker blue for my version, and it gave him a really cool modern movie look. I can't wait to see how yours turns out—he’s definitely going to be the star of the shelf!
You're going to love bringing this iconic web-slinger to life! It's a substantial project that results in a tall, poseable hero that any comic fan would cherish. The detail on the suit, from the color-blocking to the intricate webbing, makes it a real standout piece in any collection. Get your hooks ready for a fun challenge that yields a truly impressive finished toy.
Work in continuous spirals using Red yarn. Switch to Blue at Round 22.
ch 7, turn (7)
5 sc, 1 tc, 4 sc, 1 inc (14)
1 inc, 4 sc, 3 inc, 4 sc, 2 inc (20)
20 sc (20)
1 bo (ch1 & 5 dc in same st), 19 sc (20)
2 dec, 5 sc, 2 dec, 7 sc (16)
1 dec, 5 sc, 1 dec, 7 sc (14)
14 sc (14)
Begin stuffing the hand lightly at this stage.
1 inc, 13 sc (15)
15 sc (15)
1 inc, 14 sc (16)
16 sc (16)
Switch to Blue yarn: BLO 16 sc (16)
1 inc, 15 sc (17)
17 sc (17)
2 sc, 6 slst, 5 sc, 2 hdc-inc (for elbow), 2 sc (19)
14 sc, 2 hdc, 3 sc (19)
19 sc (19)
1 inc, 18 sc (20)
20 sc (20)
8 sc, 1 dec, 10 sc (19)
19 sc (19)
Stuff fully and fasten off. Repeat for the second arm.
Work in spirals with Red yarn. Switch to Blue at Round 25.
ch 10, turn (10)
8 sc, 1 tc, 7 sc, 1 inc (20)
1 inc, 7 sc, 3 inc, 7 sc, 2 inc (26)
1 sc, 1 inc, 7 sc, (1 sc, 1 inc) repeat 3 times, 7 sc, (1 sc, 1 inc) repeat 2 times (32)
BLO 32 sc (32)
32 sc (32)
10 sc, 6 dec, 10 sc (26)
8 sc, 5 dec, 8 sc (21)
7 sc, 3 dec, 8 sc (18)
18 sc (18)
1 inc, 17 sc (19)
19 sc (19)
1 inc, 18 sc (20)
20 sc (20)
1 inc, 19 sc (21)
21 sc (21)
1 inc, 20 sc (22)
Switch to Blue: BLO 22 sc (22)
22 sc (22)
4 sc, 2 dec, 14 sc (20)
12 sc, 5 inc (knee shaping), 3 sc (25)
25 sc (25)
12 sc, 1 dec, 6 sc, 1 dec, 3 sc (23)
13 sc, 3 dec, 4 sc (20)
20 sc (20)
4 sc, 1 inc, 15 sc (21)
5 sc, 1 inc, 15 sc (22)
6 sc, 1 inc, 15 sc (23)
7 sc, 1 inc, 15 sc (24)
8 sc, 1 inc, 15 sc (25)
9 sc, 1 inc, 15 sc (26)
26 sc (26)
2 sc, 1 dec, 22 sc (25)
7 sc (07)
Fasten off and stuff fully. Prepare second leg.
Using Blue yarn: join legs with ch 2, 25 sc on left leg, FLO 2 sc on ch, 25 sc on right leg, 2 sc on ch (54)
54 sc (54)
23 sc, 1 dec, 2 inc, 1 dec, 25 sc (54)
4 sc, 2 inc, 16 sc, 1 dec, 4 sc, 1 dec, 16 sc, 2 inc, 6 sc (56)
5 sc, 2 inc, 16 sc, 1 dec, 4 sc, 1 dec, 16 sc, 2 inc, 7 sc (58)
24 sc, 1 dec, 4 sc, 1 dec, 26 sc (56)
3 sc, 1 dec, 4 sc, 1 dec, 12 sc, 1 dec, 4 sc, 1 dec, 12 sc, 1 dec, 4 sc, 1 dec, 5 sc (50)
4 sc, 1 dec, 14 sc, 1 dec, 4 sc, 1 dec, 14 sc, 1 dec, 6 sc (46)
46 sc (46)
Blue: 11 sc, 1 dec, 9 sc. Red: 2 sc. Blue: 9 sc, 1 dec, 11 sc (44)
Red: 9 sc, 1 dec, 9 sc, 1 dec (red & blue loops), 1 dec (red & blue loops), 9 sc, 1 dec, 9 sc (40)
(4 sc, 1 dec, 4 sc) repeat 4 times (36)
36 sc (36)
36 sc, move marker to next stitch (36)
9 sc, 1 inc, 16 sc, 1 inc, 9 sc (38)
6 sc Red, 8 sc Blue, 10 sc Red, 8 sc Blue, 6 sc Red (38)
6 sc Red, (4 sc Blue, 1 inc Blue, 3 sc Blue), (4 sc Red, 1 inc Red, 5 sc Red), (3 sc Blue, 1 inc Blue, 4 sc Blue), 6 sc Red (41)
6 sc Red, 9 sc Blue, 11 sc Red, 9 sc Blue, 6 sc Red (41)
6 sc Red, (4 sc Blue, 1 inc Blue, 4 sc Blue), 11 sc Red, (4 sc Blue, 1 inc Blue, 4 sc Blue), 6 sc Red (43)
6 sc Red, 10 sc Blue, 11 sc Red, 10 sc Blue, 6 sc Red (43)
6 sc Red, 10 sc Blue, (1 inc Red, 9 sc Red, 1 inc Red), 10 sc Blue, 6 sc Red (45)
6 sc Red, 10 sc Blue, 13 sc Red, 10 sc Blue, 6 sc Red (45)
7 sc Red, 8 sc Blue, 15 sc Red, 8 sc Blue, 7 sc Red (45)
8 sc Red, 6 sc Blue, 17 sc Red, 6 sc Blue, 8 sc Red (45)
8 sc Red, (3 sc Blue, join left hand 19 sc, 2 sc Blue), 19 sc Red, (2 sc Blue, join right hand 19 sc, 3 sc Blue), 8 sc Red (83)
9 sc Red, (1 sc Blue, 1 dec Blue, 8 sc Blue), 1 sc Red, (8 sc Blue, 1 dec Blue), 21 sc Red, (1 dec Blue, 8 sc Blue), 1 sc Red, (8 sc Blue, 1 dec Blue, 1 sc Blue), 9 sc Red (79)
9 sc Red, 1 dec Red, 7 sc Blue, 3 sc Red, 7 sc Blue, 1 dec Red, 19 sc Red, 1 dec Red, 7 sc Blue, 3 sc Red, 7 sc Blue, 1 dec Red, 9 sc Red (75)
9 sc Red, 1 dec Red, 2 sc Blue, 7 sc Red, 2 sc Blue, 2 sc Red, 1 dec Red, 19 sc Red, 2 sc Red, 1 dec Red, 2 sc Blue, 7 sc Red, 2 sc Blue, 2 sc Red, 1 dec Red, 9 sc Red (71)
Switch to Red yarn for the remainder of the project.
9 sc, 1 dec, 13 sc, 1 dec, 19 sc, 1 dec, 13 sc, 1 dec, 9 sc (67)
8 sc, 1 dec, 12 sc, 1 dec, 18 sc, 1 dec, 12 sc, 1 dec, 9 sc (63)
(4 sc, 1 dec, 3 sc) repeat 7 times (56)
(3 sc, 1 dec, 3 sc) repeat 7 times (49)
(3 sc, 1 dec, 2 sc) repeat 7 times (42)
(5 sc, 1 dec) repeat 6 times (36)
(2 sc, 1 dec, 2 sc) repeat 6 times (30)
(3 sc, 1 dec) repeat 6 times (24)
24 sc (24)
3 sc, move marker to back center. 7 sc, 1 inc, 1 sc, 1 inc, 1 sc, ch 5, turn, 3 sc on ch, then back on main round: 1 sc, 1 inc, 1 sc, 1 inc, 9 sc (36)
8 sc, 1 inc, 1 sc, 1 inc, 1 sc, 1 inc, 2 sc, 4 sc in same hole at center of ch, 2 sc, 1 inc, 1 dec, 1 inc, 1 sc, 1 inc, 9 sc (41)
15 sc, 1 inc, 3 sc, 2 inc (chin center), 3 sc, 1 inc, 16 sc (45)
16 sc, 1 inc, 10 sc, 1 inc, 17 sc (47)
47 sc (47)
4 sc, (3 sc, 1 dec, 3 sc) repeat 5 times, 3 sc (42)
(5 sc, 1 dec) repeat 6 times (36)
(2 sc, 1 dec, 2 sc) repeat 6 times (30)
(3 sc, 1 dec) repeat 6 times (24)
(1 sc, 1 dec, 1 sc) repeat 6 times (18)
(1 sc, 1 dec) repeat 6 times (12)
6 dec (6)
Fasten off and sew the chin extension to the neck area.
Make two using White yarn and a 1.0mm hook. Work in rows.
MR with 6 sc (6)
3 inc, 1 sc, ch 1, turn (7)
1 inc, 2 sc, 1 inc, 2 sc, 1 inc, ch 1, turn (10)
1 inc, 3 sc, 1 inc, 4 sc, 1 inc, ch 1, turn (13)
1 inc, 4 sc, 1 inc, 6 sc, 1 inc (16)
9 sc along the bottom edge, switch to Black yarn (9)
Black: Left eye - 4 hdc, 15 sc, 7 slst. Right eye - 10 sc, 4 hdc, 7 slst, 5 sc (26)
Use Black yarn and 1.0mm hook. Work in rows.
ch 2, turn (2)
1 inc, ch 1, turn (2)
2 inc, ch 1, turn (4)
4 sc, ch 1, turn (4)
1 inc, 2 sc, 1 inc, ch 1, turn (6)
6 sc, ch 1, turn (6)
1 dec, 2 sc, 1 dec, ch 1, turn (4)
2 dec, ch 1, turn (2)
2 inc, ch 1, turn (4)
4 sc, ch 1, turn (4)
2 dec (2)
There is nothing quite like the feeling of finishing a big project like this hero. From the very first stitch of his boots to the final embroidery on his mask, every round adds a bit more personality. I hope you enjoy the process of watching him grow! Once he's finished, he's sturdy enough for play but detailed enough to look amazing on display. Don't forget to share your photos with the community—I'd love to see your version of our favorite web-slinger! Happy crocheting! 🧶✨🕷️
I recommend cutting the yarn at each change and tying it off securely on the inside. This prevents 'floats' from pulling the fabric tight and keeps the color blocks looking crisp.
You can, but the large white crocheted eyes are a signature part of this character's look. If you use safety eyes, the webbing will need to be adjusted to fit around them.
Yes, because of his long, slim proportions, he is more of a soft 'cuddle' style toy. If you want him to pose, you could carefully insert a wire armature before stuffing.
It's optional, but it's what truly transforms the red and blue shapes into the iconic hero. Even just a few lines on the mask will make a huge difference!
