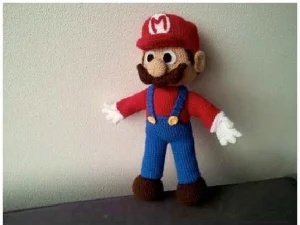
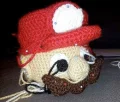
Get ready to jump into a world of creativity with this classic plumber amigurumi! There’s something so satisfying about seeing those familiar red and blue colors come together on your hook. This pattern is designed to capture every little detail that makes this character so beloved, from his round nose to his puffy gloves. Whether you're a long-time fan of the games or just looking for a fun, substantial project to sink your teeth into, you're going to love the process of building this hero piece by piece.
Progress Tracker
0% Complete
— 1. Head :
Round 2 :
inc1sc in every st (12)
Round 3 :
Repeat 6x (1sc, inc1sc) (18)
Round 4 :
Repeat 6x (2sc, inc1sc) (24)
Round 5 :
Repeat 6x (3sc, inc1sc) (30)
Info :
sc 2, then reposition your stitch marker to this new spot. Do not finish the rest of the current round; start the next step from here.
Round 7 :
Repeat 6x (4sc, inc1sc) (36)
Round 8 :
Repeat 6x (5sc, inc1sc) (42)
Round 9 :
Repeat 6x (6sc, inc1sc) (48)
Info :
7sc, inc1sc, 7sc, inc1sc. Move your stitch marker to this location and stop the round here.
Round 11 :
Repeat 5x (9sc, inc1sc) (55)
Round 12 :
Repeat 5x (10sc, inc1sc) (60)
Round 13 :
Repeat 5x (11sc, inc1sc) (65)
Round 14-25 :
sc in every st around (65)
Round 26 :
Repeat 5x (11sc, sc2tog) (60)
Round 27 :
Repeat 5x (10sc, sc2tog) (55)
Info :
sc 5 and shift your stitch marker to this point. Continue from here without finishing the round.
Round 29 :
Repeat 5x (9sc, sc2tog) (50)
Info :
6sc, sc2tog, 6sc, sc2tog, 4sc. Shift your stitch marker to this point and stop the round.
Round 31 :
Repeat 6x (6sc, sc2tog) (42)
Round 32 :
Repeat 6x (5sc, sc2tog) (36)
Round 33 :
Repeat 6x (4sc, sc2tog) (30)
Info :
sc 3 and move your stitch marker to this spot. Do not finish the round.
Round 35 :
Stuff the head firmly with fiberfill.
Round 36 :
Repeat 6x (3sc, sc2tog) (24)
Round 37 :
Repeat 6x (2sc, sc2tog) (18)
Round 38 :
Add more stuffing to the head.
Round 39 :
Repeat 6x (1sc, sc2tog) (12)
Round 40 :
sc2tog around (6)
Round 41 :
sc3tog, sc2tog, then fasten off.
— 2. Ears :
Round 2 :
inc1sc in every st (12)
Round 3 :
Repeat 6x (1sc, inc1sc) (18)
Round 4 :
1sc, inc1sc, 1sc, inc1sc, 1sc, 13slst (18)
Round 5 :
8sc, 1slst and fasten off.
Info :
Create 2 ears in total.
— 3. Nose :
Round 2 :
inc1sc in every st (12)
Round 3 :
Repeat 6x (1sc, inc1sc) (18)
Round 4-6 :
sc in every st (18)
Round 7 :
1slst, then repeat (slst2tog) around (12)
Round 8 :
1slst and fasten off, then stuff with fiberfill.
— 4. Hair :
Row 2-5 :
sc in every st, ch1 and turn at the end of each row (30)
Row 6 :
skip 2st, 8dc into the next st, skip 2st, slst into next st. Repeat this sequence until you reach the end.
Info :
Fasten off and set aside.
— 5. Sideburns :
Row 2 :
Work into the 2nd ch from the hook: 7sc, ch1, turn (7)
Row 3 :
6sc and fasten off.
— 6. Eyeballs & Pupils :
Round 2 (White) :
inc1sc in every st (12)
Round 3 (White) :
inc1sc, 1slst and fasten off. Make 2.
Round 2 (Black) :
1slst and fasten off. Make 2.
— 7. Hat - Part One (Brim) :
Round 2 :
inc1sc in every st, ch1, turn (8)
Row 3 :
Repeat 4x (1sc, inc1sc), ch1, turn (12)
Row 4 :
Repeat 4x (2sc, inc1sc), ch1, turn (16)
Row 5 :
Repeat 4x (3sc, inc1sc), ch1, turn (20)
Row 6 :
Repeat 4x (4sc, inc1sc), ch1, turn (24)
Row 7 :
Repeat 4x (5sc, inc1sc), ch1, turn (28)
Row 8-9 :
sc in every st, ch1, turn (28)
Row 10 :
Repeat 4x (5sc, sc2tog), ch1, turn (24)
Row 11 :
Repeat 4x (4sc, sc2tog), ch1, turn (20)
Row 12 :
Repeat 4x (3sc, sc2tog), ch1, turn (16)
Row 13 :
Repeat 4x (2sc, sc2tog), ch1, turn (12)
Row 14 :
Repeat 4x (1sc, sc2tog), ch1, turn (8)
Row 15 :
Repeat 4x (sc2tog), ch1, turn (4)
Row 16 :
sc2tog, sc2tog, ch1, turn (2)
Row 17 :
1slst and fasten off.
— 8. Hat - Part Two (Main Body) :
Round 1 :
ch60, join with slst to form a circle (60)
Round 2-7 :
sc in every st (60)
Round 8 :
30sc, repeat 5x (5sc, inc1sc) (65)
Round 9 :
30sc, repeat 5x (6sc, inc1sc) (70)
Round 10 :
Repeat 3x (8sc, sc2tog), then 40sc (67)
Round 11 :
Repeat 3x (7sc, sc2tog), then 40sc (64)
Round 12 :
Repeat 8x (6sc, sc2tog) (54)
Round 13 :
Repeat 8x (5sc, sc2tog) (48)
Round 14 :
Repeat 3x (4sc, sc2tog), repeat 3x (8sc, sc2tog) (42)
Round 15 :
Repeat 3x (3sc, sc2tog), repeat 3x (7sc, sc2tog) (36)
Round 16 :
Repeat 3x (2sc, sc2tog), repeat 3x (6sc, sc2tog) (30)
Round 17 :
Repeat 3x (1sc, sc2tog), repeat 3x (5sc, sc2tog) (24)
Round 18 :
Repeat 3x (sc2tog), repeat 3x (4sc, sc2tog) (18)
Round 19 :
3sc, repeat 3x (3sc, sc2tog) (15)
Round 20 :
1sc, repeat 7x (sc2tog) (8)
Round 21 :
4sc, sc2tog, sc2tog (6)
Round 22 :
sc3tog, sc2tog, fasten off.
— 9. Hat Logo & Moustache :
Logo Round 1 :
MR6 in white (6)
Logo Round 2 :
inc1sc in every st (12)
Logo Round 3 :
Repeat 6x (1sc, inc1sc) (18)
Logo Round 4 :
Repeat 6x (2sc, inc1sc) (24)
Logo Round 5 :
1slst and fasten off.
Moustache Row 1 :
ch21 in brown, turn.
Moustache Row 2 :
Starting in 2nd ch: 19sc, inc2sc in the final stitch, turn (22)
Moustache Row 3 :
Work along the opposite side of the chain: 19sc, inc2sc (44 total)
Moustache Round 4 :
Now in spirals: 19sc, repeat 3x (inc1sc), 19sc, repeat 3x (inc1sc) (50)
Moustache Round 5-10 :
Continue with the specific skip-and-dc shell sequence as described in the reference to create the bushy texture, then fasten off after 35sc.
— 10. Arms & Hands :
Arm Round 1 :
ch20 in red, join with slst (20)
Arm Round 2-26 :
sc in each st (20)
Arm Round 27-28 :
Change to white: sc in each st (20)
Hand Round 1 :
MR10 in beige (10)
Hand Round 2 :
Repeat 5x (1sc, inc1sc) (15)
Hand Round 3-4 :
sc in each st (15)
Hand Round 5 :
Repeat 5x (2sc, inc1sc) (20)
Hand Round 6 :
sc in each st (20)
Hand Round 7 :
skip 6st, 1sc. Reposition marker here (14)
Hand Round 8 :
Repeat 4x (2sc, inc1sc), 2sc (18)
Hand Round 9 :
Flatten hand: 2sc, skip 12st, 4sc (6)
Hand Round 10-11 :
sc in each st (6)
Hand Round 12 :
sc2tog around (3), slst and fasten off.
Info :
Follow the cast-on instructions for the remaining three fingers and thumb as detailed in the reference, making 2 hands total.
— 11. Belly & Buttons :
Round 1 :
ch50 in red, join with slst (50)
Round 2-20 :
sc in each st (50)
Round 21 :
Repeat 10x (3sc, sc2tog) (40)
Round 22 :
Repeat 10x (2sc, sc2tog) (30)
Round 23 :
Repeat 10x (1sc, sc2tog) (20)
Info :
Fasten off with a long tail for sewing. Stuff the belly firmly.
Buttons :
MR6 in yellow, slst and fasten off. Make 2.
— 12. Shoes :
Round 1 :
ch5 in brown, turn.
Round 2 :
Starting in 2nd ch: 3sc, inc2sc, turn work to bottom: 3sc, inc2sc (12)
Round 3 :
Repeat 2x (4sc, inc1sc in next 2st) (16)
Round 4 :
4sc, 4x(inc1sc), 4sc, 4x(inc1sc) (24)
Round 5 :
4sc, 4x(1sc, inc1sc), 4sc, 4x(1sc, inc1sc) (32)
Round 6 :
4sc, 4x(2sc, inc1sc), 4sc, 4x(2sc, inc1sc) (40)
Round 7 :
4sc, 4x(3sc, inc1sc), 4sc, 4x(3sc, inc1sc) (48)
Round 8-12 :
sc in every st (48)
Round 13 :
4sc, repeat 4x (3sc, sc2tog), 24sc (44)
Round 14 :
sc in every st (44)
Round 15 :
4sc, repeat 4x (2sc, sc2tog), 24sc (40)
Round 16 :
sc in every st (40)
Round 17 :
4sc, repeat 4x (1sc, sc2tog), 4sc, repeat 4x (3sc, sc2tog) (32)
Round 18 :
16sc, repeat 4x (1sc, sc2tog) (20)
Round 19 :
Stuff shoe, then 4sc, repeat 2x (sc2tog), 4sc, repeat 4x (sc2tog) (14)
Round 20 :
sc2tog around (7), stuff again and sew the oval gap shut.
— 13. Pants & Braces :
Round 1 :
ch25 in blue, join with slst (25)
Round 2-20 :
sc in every st (25). Make two legs.
Round 21 :
Join legs: sc 25 on leg one, then sc 25 on leg two (50)
Round 22-34 :
sc in every st (50)
Row 35 :
For the bib: 8sc, 1slst, turn.
Row 36-38 :
Work across the back loops only for shaping as detailed in the reference, then fasten off.
Braces :
Cast on 3sc at the back waist, work 34 rows of sc for each strap, and fasten off.
I am so proud of you for finishing this legendary project! There is something truly magical about turning a few skeins of yarn into a character as iconic as Mario. I hope he brings a huge smile to whoever receives him—even if that person is you! Remember, the beauty of handmade items lies in those tiny unique details you added along the way. Thank you for letting me be a part of your crafting journey today. Keep those hooks moving, stay inspired, and I’ll be right here waiting to see what amazing thing you decide to create next. Happy crocheting! 🧶✨🍄