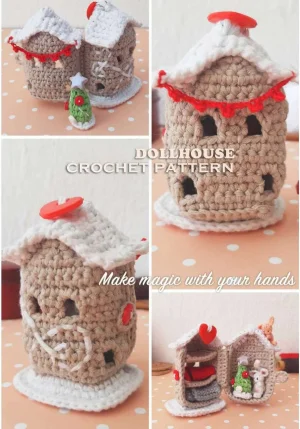
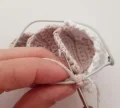
This tiny dollhouse is pure magic! It’s a foldable pocket-sized home complete with furniture and a tiny bunny resident. You'll love the clever way it fits together using a wire frame for stability. It's the perfect little world to gift or keep on your desk for a bit of whimsy.
Progress Tracker
0% Complete
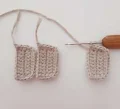
— 1. Dollhouse Part 1 - Floors (Make 3) :
Round 1 :
Start with a foundation chain of 9. sc in the 2nd ch from the hook and in each ch across. (8)
Round 2 :
ch 1, turn, sc 8. (8)
Round 3 :
ch 1, turn, sc 8. (8)
Round 4 :
ch 1, turn, sc 8. (8)
Trim :
ch 1, sc 4 along the side edge, 2 sc into the corner, sc 6 along the bottom, 2 sc into the next corner, sc 4 along the final side. (18)
— 2. Dollhouse Part 1 - Walls :
Round 1 :
ch 1, work 18 sc through the BLO of the floor edge. (18)
Round 2-4 (Wall Section 1) :
ch 1, turn, sc 2. (2)
Round 2 (Window Section 2) :
ch 4, skip 2 stitches from the base, sc 10. (10)
Round 3 (Window Section 2) :
ch 1, turn, sc 9, sc 1 into the chain space. (10)
Round 4 (Window Section 2) :
sl st into the chain loop, turn, sc 10. (10)
Round 2 (Wall Section 3) :
ch 4, skip 2 stitches from the base, sc 2. (2)
Round 3 (Wall Section 3) :
ch 1, turn, sc 1, sc 1 into the chain space. (2)
Round 4 (Wall Section 3) :
sl st into the chain loop, turn, sc 2. (2)
Round 5 :
ch 1, turn, sc 2, 2 sc into the chain space, sc 10, 2 sc into the chain space, sc 2. (18)
Round 6 :
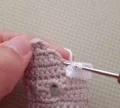
Turn and grab your 1st floor detail. ch 1, work 18 sc through the BLO of the walls and the BLO of the floor to join. (18)
Round 7 :
ch 1, turn, sc 18. (18)
Round 8-10 (Wall Section 1) :
ch 1, turn, sc 6. (6)
Round 8 (Window Section 2) :
ch 4, skip 2 stitches, sc 2. (2)
Round 9 (Window Section 2) :
ch 1, turn, sc 1, sc 1 into the chain space. (2)
Round 10 (Window Section 2) :
sl st into the chain loop, turn, sc 2. (2)
Round 8 (Wall Section 3) :
ch 4, skip 2 stitches, sc 6. (6)
Round 9 (Wall Section 3) :
ch 1, turn, sc 5, sc 1 into the chain space. (6)
Round 10 (Wall Section 3) :
sl st into the chain loop, turn, sc 6. (6)
Round 11 :
ch 1, turn, sc 6, 2 sc into the chain space, sc 2, 2 sc into the chain space, sc 6. (18)
Round 12 :
Turn and grab your 2nd floor detail. ch 1, work 18 sc through the BLO of the walls and the BLO of the floor to join. (18)
— 3. Dollhouse Part 1 - Attic :
Round 1 :
ch 1, turn, 5 sl st, ch 1, sc 8. (8)
Round 2 :
ch 1, turn, dec, sc 4, dec. (6)
Round 3 :
ch 1, turn, dec, sc 2, dec. (4)
Round 4 :
ch 1, turn, 2 dec. (2)
Round 5 :
ch 1, turn, dec, ch 1, 5 sl st down the side of the attic, 5 sl st across the top of the wall. (1)
— 4. Dollhouse Part 1 - Roof :
Round 1 :
Using white yarn, make a foundation chain of 7. sc in the 2nd ch and across. (6)
Round 2 :
ch 1, work sc 4 through the wall and roof together, sc 1 through the wall, roof, and attic border, sc 1. (6)
Round 3 :
ch 1, turn, sc 1, sc 1 into the attic stitch, sc 4. (6)
Round 4 :
ch 1, turn, sc 4, sc 1 into the attic stitch, sc 1. (6)
Round 5 :
ch 1, turn, sc 1, sc 1 into the attic stitch, sc 4. (6)
Round 6 :
ch 1, turn, sc 4, sc 1 into the attic stitch, sc 1. (6)
Round 7 :
ch 1, turn, sc 1, sc 1 into the attic stitch, sc 4. (6)
Round 8 :
ch 1, turn, sc 4, sc 1 into the attic stitch, sc 1. (6)
Round 9 :
ch 1, turn, sc 1, sc 1 into the attic stitch, sc 4. (6)
Round 10 :
ch 1, turn, sc 4, sc 1 into the attic stitch, sc 1. (6)
Round 11 :
ch 1, turn, sc 1, sc 1 into the attic stitch, sc 4. (6)
Round 12 :
ch 1, turn, sc 4, sc 1 into the attic stitch, sc 1. (6)
Round 13 :
ch 1, turn, sc 1, sc 5 through the final wall stitches. (6)
Round 14 :
ch 1, turn, sc 6. (6)
Round 15 :
ch 1, turn, 6 sl st, ch 1, 2 sl st along the front roof border. (6)
— 5. Dollhouse Part 2 - Floors (Make 2) :
Round 1 :
ch 9, sc in the 2nd ch and across. (8)
Round 2 :
ch 1, turn, sc 8. (8)
Trim :
ch 1, sc 2 along the side, 2 sc in the corner, sc 6 along the bottom, 2 sc in the corner, sc 2 along the side. (14)
— 6. Dollhouse Part 2 - Walls :
Round 1 :
ch 1, work 14 sc through the BLO of the floor edge. (14)
Round 2-4 (Wall Section 1) :
ch 1, turn, sc 2. (2)
Round 2 (Window Section 2) :
ch 4, skip 2 stitches, sc 6. (6)
Round 3 (Window Section 2) :
ch 1, turn, sc 5, sc 1 into the chain space. (6)
Round 4 (Window Section 2) :
sl st into the chain loop, turn, sc 6. (6)
Round 2 (Wall Section 3) :
ch 4, skip 2 stitches, sc 2. (2)
Round 3 (Wall Section 3) :
ch 1, turn, sc 1, sc 1 into the chain space. (2)
Round 4 (Wall Section 3) :
sl st into the chain loop, turn, sc 2. (2)
Round 5 :
ch 1, turn, sc 2, 2 sc into the chain space, sc 6, 2 sc into the chain space, sc 2. (14)
Round 6 :
ch 1, turn, sc 14. (14)
Round 7 :
ch 1, turn, sc 14. (14)
Round 8-10 (Wall Section 1) :
ch 1, turn, sc 4. (4)
Round 8 (Window Section 2) :
ch 4, skip 2 stitches, sc 2. (2)
Round 9 (Window Section 2) :
ch 1, turn, sc 1, sc 1 into the chain space. (2)
Round 10 (Window Section 2) :
sl st into the chain loop, turn, sc 2. (2)
Round 8 (Wall Section 3) :
ch 4, skip 2 stitches, sc 4. (4)
Round 9 (Wall Section 3) :
ch 1, turn, sc 3, sc 1 into the chain space. (4)
Round 10 (Wall Section 3) :
sl st into the chain loop, turn, sc 4. (4)
Round 11 :
ch 1, turn, sc 4, 2 sc into the chain space, sc 2, 2 sc into the chain space, sc 4. (14)
Round 12 :
ch 1, turn, sc 14. (14)
— 7. Dollhouse Part 2 - Attic & Roof :
Round 1 (Attic) :
ch 1, turn, 3 sl st, ch 1, sc 8. (8)
Round 2 (Attic) :
ch 1, turn, dec, sc 4, dec. (6)
Round 3 (Attic) :
ch 1, turn, dec, sc 2, dec. (4)
Round 4 (Attic) :
ch 1, turn, 2 dec. (2)
Round 5 (Attic) :
ch 1, turn, dec, ch 1, 5 sl st down, 3 sl st along wall top. (1)
Round 1 (Roof) :
Using white yarn, ch 5, sc in 2nd ch and across. (4)
Round 2 (Roof) :
ch 1, sc 2 through wall and roof, sc 1 through wall/roof/attic, sc 1. (4)
Round 3-12 (Roof) :
Repeat the alternating attic-join pattern used for Part 1 roof. (4)
Round 13-15 (Roof) :
Complete the roof edge as done in Part 1. (4)
— 8. Ground Section :
Round 1 :
Join white yarn to the FLO of the floor detail. sc 28. (28)
Round 2 :
1 inc, 8 sc, 2 inc, 2 sc, 2 inc, 8 sc, 2 inc, 2 sc, 1 inc. (36)
Round 3 :
1 inc, 10 sc, 2 inc, 4 sc, 2 inc, 10 sc, 2 inc, 4 sc, 1 inc. (44)
Round 4 :
1 inc, 2 sc, 1 hdc, 6 dc, 1 hdc, 2 sc, sl st. (14)
— 9. Christmas Tree :
Round 1-2 :
Using green yarn, sc 10 in a spiral. (10)
Round 3 :
[dec, sc 3] repeat twice. (8)
Round 4 :
[dec, sc 2] repeat twice. (6)
Round 5 :
[dec, sc] repeat twice. (4)
Round 6 :
2 sl st into the opposite stitches to close. (2)
Base :
Join white yarn to the foundation chain. ch 1, [inc, sc] repeat 5 times. (15)
— 10. Micro Bunny :
Round 1 :
Work 6 sc into a mr. (6)
Round 3-6 :
sc in each stitch. (12)
Round 7 :
ch 5, sc 2 starting from 2nd ch for first arm, sc 5 along body, ch 5, sc 2 for second arm, sc 7 along body. (12)
Round 8-12 :
sc in each stitch, skipping the arms. (12)
Round 13 :
sc 6, then work 2 popcorn-stitch legs using 5 dc each, joining to the body with sl st. (12)
Tail :
Join yarn to the back, ch 2, dc, ch 2, sl st into the same spot. (1)
Ears :
Join yarn to the head, ch 3, 3 dc in one spot, ch 3, turn, 3 dc dec, ch 2, turn, 4 sl st down the ear. (1)
I truly hope you enjoy every second of creating this tiny world. There’s something so special about finishing a project that feels like a real, miniature heirloom. Whether you keep it as a desk companion or gift it to someone who loves all things small, it’s sure to bring a smile. Don't forget to share your photos — I love seeing how everyone decorates their tiny homes! Happy stitching, and may your micro bunny be the first of many tiny residents. 🧶 🧵 ✨