🧢 Beautiful ✨ Detailed πŸ’ Adorable

Colourful Mini Dino Amigurumi Pattern

Colourful Mini Dino Amigurumi Pattern
3.9β˜…Rating
3-5 HoursTime Needed
2.3KMade This
βœ‚οΈ

Intermediate Level

Ideal for those with basic crocheting experience, featuring slightly more advanced stitches and techniques to expand your skills.

⏱️

Quick Craft

Fits nicely into a free afternoon β€” 2 to 5 hours of focused, enjoyable crocheting.

🐾

Pocket Pal

A mini friend to carry anywhere, providing comfort and companionship in a perfectly portable size.

About This Colourful Mini Dino Amigurumi Pattern

Colourful Mini Dino Amigurumi Pattern crochet pattern - detailed view

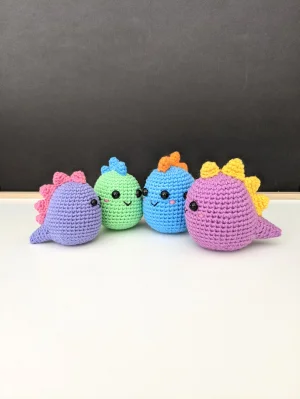
These make the sweetest handmade gifts for friends or excellent additions to a market stall. Because they use such a small amount of yarn, you can easily whip up a whole rainbow of them in just a few sessions.

Why You'll Love This Colourful Mini Dino Amigurumi Pattern

I personally love patterns that don't require a mountain of assembly, and the way the tail is constructed here is so satisfying. It's a great way to practice working into a chain gap, and seeing the shape come together without extra sewing is a total win!

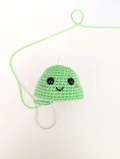
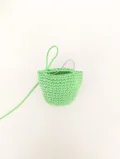
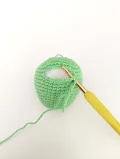
Colourful Mini Dino Amigurumi Pattern step 1 Colourful Mini Dino Amigurumi Pattern step 2 Colourful Mini Dino Amigurumi Pattern step 3 Colourful Mini Dino Amigurumi Pattern step 4

Switch Things Up

I’ve always had a soft spot for dinosaurs, but I wanted to create something that felt more like a modern plushie than a realistic reptile. This pattern is one of my favorites because it’s just so satisfying to work on. The way the tail grows right out of the body using that chain technique is such a 'lightbulb' moment for many crafters!

When I made my first one, I used a bright mint green with lavender spikes, and it looked so whimsical. If you're feeling adventurous, try using a variegated yarn for the bodyβ€”it creates a cool 'camo' or marbled effect that looks amazing on these little guys.

One tip I always tell my friends: when you're embroidering the mouth, keep the tension loose. If you pull the black thread too tight, it can sink into the stuffing and disappear. A gentle 'V' shape is all you need to give this dino its personality. I can't wait to see what colors you choose for your dino family!

Common Mistakes & How to Fix Them

βœ— When you reach Round 16 and create the chain for the tail, make sure your ch isn't twisted before you continue onto Round 17 or the tail will look warped.βœ— If you place the safety eyes too high or too low, the face proportions will look a bit offβ€”count carefully to ensure they sit between rounds 9 and 10.βœ— Be careful not to overstuff the very tip of the tail, as it makes it difficult to pull the final stitches closed neatly with your yarn needle.βœ— When sewing the spikes, it's easy for them to drift off-center; use pins to mark a straight line down the spine before you begin stitching them down.

Colourful Mini Dino Amigurumi Pattern

You're going to love how quickly these little guys work up! They are the perfect size for keychains, bag charms, or just a cute desk buddy to keep you company. I've designed this pattern so the head and body are worked in one piece, which means much less sewing for you at the end. Grab your favorite yarn scraps and let's bring some prehistoric magic to your crochet hook!

Intermediate 3-5 Hours

Materials Needed for Colourful Mini Dino Amigurumi Pattern

β€” Main Fabric

  • 01
    Approximately 25g of 8-ply DK weight cotton yarn in a main color for the head and body
  • 02
    A small amount of 8-ply DK weight cotton in a contrasting color for the back spikes
  • 03
    Black embroidery thread for adding the mouth detail
  • 04
    Pink embroidery thread for the tiny cheek accents

β€” Tools Required

  • 01
    3.0mm crochet hook
  • 02
    Pair of 8mm safety eyes
  • 03
    Polyester fiberfill stuffing
  • 04
    Yarn needle for assembly and embroidery
  • 05
    Stitch markers to track the start of each round

Progress Tracker

0% Complete

β€” 1. Head and Body :

Round 1 :

Begin by working 6 sc into a mr (6)

Round 2 :

Place 1 inc into every st around (12)

Round 3 :

Repeat a sequence of 1 sc followed by 1 inc 6 times (18)

Round 4 :

Repeat a sequence of 1 sc, 1 inc, then 1 sc 6 times (24)

Round 5 :

Repeat a sequence of 3 sc followed by 1 inc 6 times (30)

Round 6 :

Work 1 sc into every st around (30)

Round 7 :

Repeat a sequence of 7 sc, 1 inc, then 7 sc 2 times (32)

Round 8 :

Repeat a sequence of 15 sc followed by 1 inc 2 times (34)

Round 9 :

Repeat a sequence of 8 sc, 1 inc, then 8 sc 2 times (36)

Round 10 :

Work 1 sc into every st around (36)

Round 11 :

Repeat a sequence of 5 sc followed by 1 inc 6 times (42)

Round 12 :

Work 1 sc into every st around (42)

Round 13 :

Work 1 sc into every st around (42)

Round 14 :

Work 1 sc into every st around (42)

Round 15 :

Work 1 sc into every st around (42)

Info :

Insert safety eyes between Round 9 and Round 10, leaving about 6 sts between them. Embroider a small mouth centered between the eyes and add pink cheek stitches just to the outside of each eye.

Round 16 :

sc 34, then ch 8 and skip the next 8 sts to create the tail opening (42)

Info :

The tail will be worked into this chain and the skipped stitches later on.

Round 17 :

Work 1 sc into every st around, including the ch sts (42)

Round 18 :

Work 1 sc into every st around (42)

Round 19 :

Repeat a sequence of 5 sc followed by 1 dec 6 times (36)

Round 20 :

Repeat a sequence of 2 sc, 1 dec, then 2 sc 6 times (30)

Round 21 :

Repeat a sequence of 3 sc followed by 1 dec 6 times (24)

Round 22 :

Repeat a sequence of 1 sc, 1 dec, then 1 sc 6 times (18)

Info :

Add stuffing to the head and body firmly.

Round 23 :

Work 9 dec around (9)

Info :

Finish stuffing, then fasten off leaving a tail. Use a needle to weave through the front loops of the remaining sts and pull tight to close.

β€” 2. Tail :

Info :

Rejoin your yarn to the first skipped st of Round 16 with a standing sc. This counts as your first st.

Round 1 :

Work 1 sc into every st around the opening (16)

Round 2 :

Repeat a sequence of 3 sc, 1 dec, then 3 sc 2 times (14)

Round 3 :

Repeat a sequence of 5 sc followed by 1 dec 2 times (12)

Round 4 :

Repeat a sequence of 2 sc, 1 dec, then 2 sc 2 times (10)

Info :

Begin stuffing the tail.

Round 5 :

Repeat a sequence of 3 sc followed by 1 dec 2 times (8)

Round 6 :

Repeat a sequence of 1 sc, 1 dec, then 1 sc 2 times (6)

Round 7 :

Repeat a sequence of 1 sc followed by 1 dec 2 times (4)

Info :

Finish stuffing. Fasten off and use your yarn needle to pull the final sts closed neatly.

β€” 3. Small Spike (Make 1) :

Round 1 :

Work 4 sc into a mr (4)

Round 2 :

Repeat a sequence of 1 sc followed by 1 inc 2 times (6)

Round 3 :

Repeat a sequence of 1 sc, 1 inc, then 1 sc 2 times (8)

Info :

Fasten off, leaving a long yarn tail for sewing the spikes onto the body.

β€” 4. Medium Spike (Make 3) :

Round 1 :

Work 4 sc into a mr (4)

Round 2 :

Repeat a sequence of 1 sc followed by 1 inc 2 times (6)

Round 3 :

Repeat a sequence of 1 sc, 1 inc, then 1 sc 2 times (8)

Round 4 :

Repeat a sequence of 3 sc followed by 1 inc 2 times (10)

Info :

Fasten off. You don't need a long tail for these as you'll use the tail from the small spike.

β€” 5. Extra Small Spike (Optional) :

Round 1 :

Work 4 sc into a mr (4)

Round 2 :

Repeat a sequence of 1 sc followed by 1 inc 2 times (6)

Info :

Fasten off and secure the end.

Assembly Instructions

  • Place the small spike at the very top center of the head, covering rounds 1 through 3, and sew it down securely.
  • Arrange the three medium spikes in a straight line down the center of the dino's back, spacing them evenly toward the tail.
  • Using the long tail from the small spike, sew all the spikes onto the body in one continuous line for a cleaner look.
  • If you made the optional extra-small spike, attach it at the very end of the row, right where the back meets the tail.
  • Check that your facial embroidery is centered between the eyes and tie off any loose threads inside the body before closing.

Important Notes

  • πŸ’‘This project is worked in a continuous spiral, so don't join your rounds with a slip stitch unless the pattern says to.
  • πŸ’‘I recommend using the invisible decrease method to keep your stitches tight and prevent stuffing from showing through.
  • πŸ’‘When rejoining yarn for the tail, ensure you work into both the chain loops and the skipped stitches of Round 16 for a sturdy join.
  • πŸ’‘Stuff the head and body firmly to maintain that cute rounded shape, but avoid overstretching the stitches around the face.

I hope you have as much fun making this little dinosaur as I did! There's something so rewarding about finishing a project in just one sitting. Whether you’re making a whole herd for a nursery or just one to keep you company at your desk, these dinos are sure to bring a smile to anyone's face. Don't forget to play around with different color combosβ€”they look great in everything! Happy crocheting, and I can't wait to see your finished creations! 🧢 ✨

You ask,

we answer.

FAQs

Can I use safety eyes smaller than 8mm?

You certainly can! Using 6mm eyes will give the dino a more 'beady' look, while anything larger than 10mm might look a bit overwhelmed on such a small head.

Why is my tail looking crooked compared to the face?

This usually happens if your stitch tension changed or if your 'skip 8' section in Round 16 wasn't perfectly centered. Try to align the tail gap with the center back of the head before chaining.

Do I have to use cotton yarn for this project?

Not at all! Acrylic or a wool blend works fine, but cotton gives the best stitch definition for amigurumi and helps the dino hold its shape better without drooping.

The spikes are so small, how do I sew them on neatly?

The trick is to use plenty of pins! Secure all the spikes in a row first to make sure they are straight, then use a whip stitch around the base of each one.