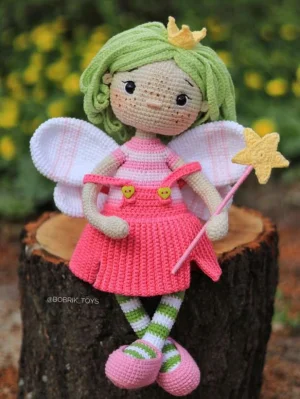
Meet Teya, a whimsical little sprite who brings a touch of magic wherever she goes. You'll love crafting her delicate wings and that tiny dragonfly friend! This project is a joy to work through, especially as you see her sweet personality come to life with every stitch. She's the perfect companion for anyone who still believes in forest magic and handmade treasures.
Progress Tracker
0% Complete
— 1. Head :
Info :
Using beige yarn, work from the bottom up. Keep your stitch marker centered at the back.
Round 1 :
6 sc into a MR (6)
Round 3 :
6 x (1 sc, inc) (18)
Round 4 :
6 x (2 sc, inc) (24)
Round 5 :
6 x (3 sc, inc) (30)
Round 6 :
6 x (4 sc, inc) (36)
Round 7 :
6 x (5 sc, inc) (42)
Round 8 :
6 x (6 sc, inc) (48)
Round 9 :
6 x (7 sc, inc) (54)
Round 10 :
6 x (8 sc, inc) (60)
Round 13 :
6 x (9 sc, inc) (66)
Info :
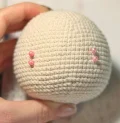
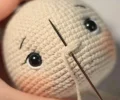
If using safety eyes, place them between rounds 19 and 20, leaving 14 stitches between them.
Round 26 :
6 x (9 sc, dec) (60)
Round 28 :
6 x (8 sc, dec) (54)
Info :
Begin stuffing the head firmly.
Round 29 :
6 x (7 sc, dec) (48)
Round 30 :
6 x (6 sc, dec) (42)
Round 31 :
6 x (5 sc, dec) (36)
Round 32 :
6 x (4 sc, dec) (30)
Round 33 :
6 x (3 sc, dec) (24)
Round 34 :
6 x (2 sc, dec) (18)
Info :
Fasten off but do not sew the opening shut.
— 2. Ears :
Round 1 :
In beige, make 6 sc into a MR, then sl st to finish (6)
Info :
Sew these to the head between rounds 19 and 21.
— 3. Hair Wig :
Info :
Use light green yarn for the wig base and strands.
Round 1 :
6 sc into a MR (6)
Round 2 :
6 x inc into blo (12)
Round 3 :
6 x (1 sc, inc) (18)
Round 4 :
6 x (2 sc, inc) into blo (24)
Round 5 :
6 x (3 sc, inc) (30)
Round 6 :
6 x (4 sc, inc) into blo (36)
Round 7 :
6 x (5 sc, inc) (42)
Round 8 :
6 x (6 sc, inc) into blo (48)
Round 9 :
6 x (7 sc, inc) (54)
Strands Layer 1 :
From current position: ch35, starting in 2nd ch from hook work 34 sc. sl st into next 2 stitches. Repeat around to create 27 strands.
Strands Layer 2 :
Work into Round 8: ch37, starting in 2nd ch from hook work 36 sc. sl st into next 2 stitches. Repeat around to create 21 strands.
Strands Layer 3 :
Work into Round 6: ch39, starting in 2nd ch from hook work 38 sc. sl st into next 2 stitches. Repeat around to create 15 strands.
Strands Layer 4 :
Work into Round 4: ch41, starting in 2nd ch from hook work 40 sc. sl st into next 2 stitches. Repeat around to create 10 strands.
Strands Layer 5 :
Work into Round 2: ch43, starting in 2nd ch from hook work 42 sc. sl st into next 2 stitches. Repeat around to create 6 strands.
— 4. Crown :
Round 1 :
In yellow, 17 sc, join with sl st (17)
Round 2 :
ch1, 17 sc, sl st (17)
Round 3 :
ch1, [skip 2, into 3rd st: (1 dc, ch1, 1 dc, ch1, 1 tr, ch4, sl st into first ch of chain-4, 1 tr, ch1, 1 dc, ch1, 1 dc, ch1), skip 2, sl st into 3rd st] repeat 3 times to make triangles.
— 5. Arms :
Round 1 :
In beige, 6 sc into a MR (6)
Round 4 :
4 x (2 sc, inc) (16)
Round 8 :
4 x (2 sc, dec) (12)
Colour Change :
Switch to pink yarn.
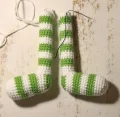
— 6. Legs (Part 1: Feet) :
Round 1 :
In white, 6 sc into a MR (6)
Round 3 :
6 x (1 sc, inc) (18)
Round 4 :
6 x (2 sc, inc) (24)
Colour Change :
Switch to green yarn.
Colour Change :
Switch to white yarn.
Colour Change :
Switch to green yarn.
Colour Change :
Switch to white yarn.
Round 19 :
8 sc, ch6, skip 6, sc into 7th st, 9 sc (24)
Colour Change :
Switch to green yarn.
Round 20 :
6 x (2 sc, dec) (18)
Round 21 :
6 x (1 sc, dec) (12)
Round 22 :
6 x dec, close opening and stuff the foot.
— 7. Legs (Part 2: Leg Tube) :
Info :
Join white yarn to the right side of the leg opening.
Setup :
6 sc around, 1 sc on side, 6 sc around, 1 sc on side (14)
Round 3 :
14 sc plus 3 extra stitches to shift the start point.
Colour Change :
Switch to green yarn.
Colour Change :
Switch to white yarn.
Colour Change :
Switch to green yarn.
Colour Change :
Switch to white yarn.
Colour Change :
Switch to green yarn.
Colour Change :
Switch to white yarn.
Colour Change :
Switch to green yarn.
Colour Change :
Switch to white yarn.
Info :
Stuff the legs firmly.
— 8. Body :
Setup :
Connect legs with white yarn: 14 sc on leg, 12 sc on chain, 14 sc on leg, 12 sc on chain (52)
Colour Change :
Switch to green yarn.
Round 2 :
6 sc, inc, 24 sc, inc, 20 sc (54)
Colour Change :
Switch to white yarn.
Colour Change :
Switch to green yarn.
Colour Change :
Switch to white yarn.
Colour Change :
Switch to green yarn.
Colour Change :
Switch to pink yarn (36).
Colour Change :
Switch to light pink yarn (74).
Round 21 :
6 x (7 sc, dec), then 1 sc to shift (48)
Colour Change :
Switch to pink yarn.
Round 25 :
6 x (6 sc, dec), then 1 sc to shift (42)
Colour Change :
Switch to light pink yarn.
Round 28 :
6 x (5 sc, dec), then 1 sc to shift (36)
Colour Change :
Switch to pink yarn.
Colour Change :
Switch to light pink yarn.
Round 32 :
3 sc, 6 sc through arm and body, 11 sc, 6 sc through arm and body, 10 sc (36)
Round 33 :
3 sc, 1 sc in join, 6 sc on arm, 1 sc in join, 11 sc, 1 sc in join, 6 sc on arm, 1 sc in join, 10 sc (40)
Colour Change :
Switch to pink yarn.
Round 36 :
8 x (3 sc, dec) (32)
Round 37 :
8 x (2 sc, dec), stuff body well (24)
Info :
Insert wire frame into arms and neck now.
Colour Change :
Switch to beige yarn.
Round 38 :
6 x (2 sc, dec) into blo (18)
— 9. Shoes :
Round 1 :
In pink (36): ch12, 10 sc, 3 sc in one st, 9 sc, inc (24)
Round 2 :
inc, 9 sc, 3 x inc, 9 sc, 2 x inc (30)
Round 3 :
1 sc, inc, 10 sc, inc, 2 x (1 sc, inc), 10 sc, inc, 1 sc, inc (36)
Round 4 :
2 sc, inc, 11 sc, inc, 2 x (2 sc, inc), 11 sc, inc, 2 sc, inc (42)
Round 5 :
42 sc into blo (42)
Round 12 :
12 sc, 5 x (1 sc, dec), 15 sc (37)
Round 13 :
5 sc, ch10, skip to marked st, sc to connect, 7 sc to finish.
— 10. Sundress :
Info :
Using dark pink yarn, work in flat rows for the belt and pleated skirt.
Row 1 :
ch49, 48 sc from 2nd ch (48)
Skirt Row 1 :
ch21, 20 sc from 2nd ch, sl st to belt, work into blo along the stripe.
Skirt Row 2-24 :
ch1, 20 sc into blo, sl st into belt, turn and work 20 sc back (20)
Note :
Source numbering jumps here—ensure you follow the slit placement carefully.
Skirt Row 28 :
12 sc, skip 8, ch9, 20 sc from 2nd ch (creates a skirt slit).
Skirt Row 27-50 :
ch1, 20 sc into blo, sl st into belt, turn and work 20 sc back (20)
Skirt Row 52 :
12 sc, skip 8, ch9, 20 sc from 2nd ch (creates second skirt slit).
Skirt Row 53-94 :
ch1, 20 sc into blo, sl st into belt, turn and work 20 sc back (20)
Bib Row 1-5 :
In middle of front: ch1, 11 sc (11)
Straps :
Make 2: ch33, 32 hdc from 2nd ch (32)
— 11. Wings (Big & Small) :
Info :
Make 2 big wings and 2 small wings in white, alternating with light pink stripes.
Big Round 1-7 :
Standard increases to 42 sc.
Big Round 8-10 :
42 sc (42)
Big Round 11 :
In light pink: 42 sc (42)
Big Round 12 :
Alternate: 1 sc light pink, 1 sc white around (42)
Big Round 13-17 :
Striped rounds of 42 sc in alternating pink and white.
Big Round 18-29 :
Standard decreases down to 18 sc.
Big Round 30 :
13 sc, skip 5, crochet 9 sc through both sides to close.
Small Round 1-5 :
Standard increases to 30 sc.
Small Round 6-8 :
30 sc (30)
Small Round 9-15 :
Striped rounds of 30 sc in pink and white.
Small Round 16-21 :
Standard decreases down to 18 sc.
Small Round 22 :
13 sc, skip 5, crochet 9 sc through both sides to close.
— 12. Magic Wand :
Round 1 :
In yellow: 8 sc in a MR, sl st (8)
Round 2 :
ch1, 8 x inc, sl st (16)
Round 3 :
ch6, from 2nd ch: sl st, sc, 2 dc, tr. skip 2 on base, sl st into 3rd st. Repeat 5 times for star points.
Assembly :
Make 2 stars, join with sl st around a 15cm stick wrapped in pink yarn.
— 13. Dragonfly :
Round 1-4 :
In light green, increase to 24 sc.
Round 8-11 :
Decrease to 12 sc, stuff head.
Round 12-22 :
Work body in alternating light and dark green stripes (18 sc).
Round 23-27 :
Decrease to 6 sc and close.
Antennas :
Attach yarn to Round 2, ch10, tie knot at tip.
Wings :
Make 4: ch10, 3 sc, 3 hdc, 2 dc, 3 dc in one st, then 2 dc, 3 hdc, 3 sc on other side.
Scarf :
In yellow: ch50, tie knots at ends.
Teya is finally ready to spread some magic! I hope you enjoyed every moment of creating her, from the tiny dragonfly wings to her little yellow crown. She is truly a labor of love and a piece that you can be proud to display or gift. Don't forget to share your finished fairy with our community—I can't wait to see the colors you chose for her sundress! Happy crafting, and may your hook always find the magic in every stitch! 🧶✨🧚♀️