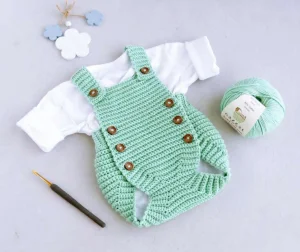
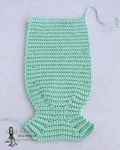
There is nothing quite as sweet as a handmade outfit for a new arrival, and this Tiny Tot romper is the perfect project to show off your love. Using the back loop only technique, you will create a wonderfully stretchy and textured fabric that looks professional while staying cozy. It is a joy to watch the shape come together, from the dainty bib to the practical buttoned sides. You will love how the soft cotton feels in your hands as you work through the rhythmic rows of this heirloom-quality piece.
Progress Tracker
0% Complete
— 1. Newborn Size - Bib & Front :
Info :
The ch 1 at the end of rows does not count as a stitch. Work all sc into the blo unless stated otherwise.
Row 1 :
ch 27, 1 sc in 2nd ch from hook, 1 sc in every remaining ch, ch 1, turn (26)
Row 2 :
1 sc in blo of every st, ch 1, turn (26)
Row 3 :
sc 6, inc 1, sc 12, inc 1, sc 6, ch 1, turn (28)
Row 4-5 :
1 sc in blo of every st, ch 1, turn (28)
Row 6 :
sc 6, inc 1, sc 14, inc 1, sc 6, ch 1, turn (30)
Row 7-19 :
1 sc in blo of every st, ch 1, turn (30)
Row 20 :
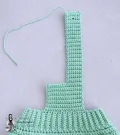
sc 3, ch 2, skip 2, sc 20, ch 2, skip 2, sc 3, ch 1, turn (30)
Row 21-27 :
1 sc in blo of every st, ch 1, turn (30)
Row 28 :
Repeat Row 20 to create the second set of buttonholes (30)
Row 29-35 :
1 sc in blo of every st, ch 1, turn (30)
Row 36 :
Repeat Row 20 to create the third set of buttonholes (30)
Row 37-42 :
1 sc in blo of every st, ch 1, turn (30)
— 2. Newborn Size - Leg Shaping & Back :
Row 43-48 :
sc 6, dec 1, sc across until 8 sts remain, dec 1, sc 6, ch 1, turn (18 sts remain after Row 48)
Row 49-51 :
1 sc in blo of every st, ch 1, turn (18)
Row 52-60 :
sc 6, inc 1, sc across until 7 sts remain, inc 1, sc 6, ch 1, turn (36 sts after Row 60)
Row 61-80 :
Continue increasing by 2 sts every row using the Row 52 method until you reach 76 sts (76)
Row 81-92 :
1 sc in blo of every st, ch 1, turn (76)
Row 93 :
sc 10, repeat (dec 1, sc 4) 10 times total, dec 1, sc 10, ch 1, turn (66)
Row 94 :
1 sc in blo of every st, ch 1, turn (66)
Row 95 :
sc 10, repeat (dec 1, sc 3) 10 times total, dec 1, sc 9, ch 1, turn (56)
Row 96 :
1 sc in blo of every st, ch 1, turn (56)
— 3. Size 0-3 Months - Bib & Front :
Row 1 :
ch 29, 1 sc in 2nd ch from hook, 1 sc in every remaining ch, ch 1, turn (28)
Row 2 :
1 sc in blo of every st, ch 1, turn (28)
Row 3 :
sc 6, inc 1, sc 14, inc 1, sc 6, ch 1, turn (30)
Row 4-5 :
1 sc in blo of every st, ch 1, turn (30)
Row 6 :
sc 6, inc 1, sc 16, inc 1, sc 6, ch 1, turn (32)
Row 7-21 :
1 sc in blo of every st, ch 1, turn (32)
Row 22 :
sc 3, ch 2, skip 2, sc 22, ch 2, skip 2, sc 3, ch 1, turn (32)
Row 23-30 :
1 sc in blo of every st, ch 1, turn (32)
Row 31 :
Repeat Row 22 for buttonholes (32)
Row 32-39 :
1 sc in blo of every st, ch 1, turn (32)
Row 40 :
Repeat Row 22 for buttonholes (32)
Row 41-47 :
1 sc in blo of every st, ch 1, turn (32)
— 4. Size 0-3 Months - Leg Shaping & Back :
Row 48-54 :
sc 6, dec 1, sc across until 8 sts remain, dec 1, sc 6, ch 1, turn (18 sts remain after Row 54)
Row 55-56 :
1 sc in blo of every st, ch 1, turn (18)
Row 57-65 :
sc 6, inc 1, sc across until 7 sts remain, inc 1, sc 6, ch 1, turn (36)
Row 66-91 :
Continue increasing by 2 sts every row using the Row 57 method until you reach 88 sts (88)
Row 92-100 :
1 sc in blo of every st, ch 1, turn (88)
Row 101 :
sc 8, repeat (dec 1, sc 8) 8 times total, ch 1, turn (80)
Row 102 :
1 sc in blo of every st, ch 1, turn (80)
Row 103 :
sc 8, repeat (dec 1, sc 7) 8 times total, ch 1, turn (72)
Row 104 :
1 sc in blo of every st, ch 1, turn (72)
— 5. Size 3-6 Months - Bib & Front :
Row 1 :
ch 31, 1 sc in 2nd ch from hook, 1 sc in every remaining ch, ch 1, turn (30)
Row 2 :
1 sc in blo of every st, ch 1, turn (30)
Row 3 :
sc 6, inc 1, sc 16, inc 1, sc 6, ch 1, turn (32)
Row 4-5 :
1 sc in blo of every st, ch 1, turn (32)
Row 6 :
sc 6, inc 1, sc 18, inc 1, sc 6, ch 1, turn (34)
Row 7-21 :
1 sc in blo of every st, ch 1, turn (34)
Row 22 :
sc 3, ch 2, skip 2, sc 24, ch 2, skip 2, sc 3, ch 1, turn (34)
Row 23-30 :
1 sc in blo of every st, ch 1, turn (34)
Row 31 :
Repeat Row 22 for buttonholes (34)
Row 32-39 :
1 sc in blo of every st, ch 1, turn (34)
Row 40 :
Repeat Row 22 for buttonholes (34)
Row 41-49 :
1 sc in blo of every st, ch 1, turn (34)
— 6. Size 3-6 Months - Leg Shaping & Back :
Row 50-57 :
sc 6, dec 1, sc across until 8 sts remain, dec 1, sc 6, ch 1, turn (18 sts remain after Row 57)
Row 58-60 :
1 sc in blo of every st, ch 1, turn (18)
Row 61-70 :
sc 6, inc 1, sc across until 7 sts remain, inc 1, sc 6, ch 1, turn (38)
Row 71-97 :
Continue increasing by 2 sts every row until you reach 92 sts (92)
Row 98-110 :
1 sc in blo of every st, ch 1, turn (92)
Row 111 :
sc 9, repeat (dec 1, sc 6) 10 times total, dec 1, sc 9, ch 1, turn (82)
Row 112 :
1 sc in blo of every st, ch 1, turn (82)
Row 113 :
sc 9, repeat (dec 1, sc 5) 10 times total, dec 1, sc 8, ch 1, turn (72)
Row 114 :
1 sc in blo of every st, ch 1, turn (72)
— 7. Size 6-9 Months - Bib & Front :
Row 1 :
ch 33, 1 sc in 2nd ch from hook, 1 sc in every remaining ch, ch 1, turn (32)
Row 2 :
1 sc in blo of every st, ch 1, turn (32)
Row 3 :
sc 6, inc 1, sc 18, inc 1, sc 6, ch 1, turn (34)
Row 4-5 :
1 sc in blo of every st, ch 1, turn (34)
Row 6 :
sc 6, inc 1, sc 20, inc 1, sc 6, ch 1, turn (36)
Row 7-8 :
1 sc in blo of every st, ch 1, turn (36)
Row 9 :
sc 6, inc 1, sc 22, inc 1, sc 6, ch 1, turn (38)
Row 10-26 :
1 sc in blo of every st, ch 1, turn (38)
Row 27 :
sc 3, ch 2, skip 2, sc 28, ch 2, skip 2, sc 3, ch 1, turn (38)
Row 28-35 :
1 sc in blo of every st, ch 1, turn (38)
Row 36 :
Repeat Row 27 for buttonholes (38)
Row 37-44 :
1 sc in blo of every st, ch 1, turn (38)
Row 45 :
Repeat Row 27 for buttonholes (38)
Row 46-54 :
1 sc in blo of every st, ch 1, turn (38)
— 8. Size 6-9 Months - Leg Shaping & Back :
Row 55-62 :
sc 6, dec 1, sc across until 8 sts remain, dec 1, sc 6, ch 1, turn (22 sts remain after Row 62)
Row 63-65 :
1 sc in blo of every st, ch 1, turn (22)
Row 66-75 :
sc 6, inc 1, sc across until 7 sts remain, inc 1, sc 6, ch 1, turn (42)
Row 76-100 :
Continue increasing by 2 sts every row until you reach 92 sts (92)
Row 101-115 :
1 sc in blo of every st, ch 1, turn (92)
Row 116 :
sc 10, repeat (dec 1, sc 8) 8 times total, dec 1, sc 10, ch 1, turn (84)
Row 117 :
1 sc in blo of every st, ch 1, turn (84)
Row 118 :
sc 10, repeat (dec 1, sc 7) 8 times total, dec 1, sc 9, ch 1, turn (76)
Row 119 :
1 sc in blo of every st, ch 1, turn (76)
— 9. Size 9-12 Months - Bib & Front :
Row 1 :
ch 35, 1 sc in 2nd ch from hook, 1 sc in every remaining ch, ch 1, turn (34)
Row 2 :
1 sc in blo of every st, ch 1, turn (34)
Row 3 :
sc 6, inc 1, sc 20, inc 1, sc 6, ch 1, turn (36)
Row 4-5 :
1 sc in blo of every st, ch 1, turn (36)
Row 6 :
sc 6, inc 1, sc 22, inc 1, sc 6, ch 1, turn (38)
Row 7-8 :
1 sc in blo of every st, ch 1, turn (38)
Row 9 :
sc 6, inc 1, sc 24, inc 1, sc 6, ch 1, turn (40)
Row 10-29 :
1 sc in blo of every st, ch 1, turn (40)
Row 30 :
sc 3, ch 2, skip 2, sc 30, ch 2, skip 2, sc 3, ch 1, turn (40)
Row 31-38 :
1 sc in blo of every st, ch 1, turn (40)
Row 39 :
Repeat Row 30 for buttonholes (40)
Row 40-47 :
1 sc in blo of every st, ch 1, turn (40)
Row 48 :
Repeat Row 30 for buttonholes (40)
Row 49-60 :
1 sc in blo of every st, ch 1, turn (40)
— 10. Size 9-12 Months - Leg Shaping & Back :
Row 61-69 :
sc 6, dec 1, sc across until 8 sts remain, dec 1, sc 6, ch 1, turn (22 sts remain after Row 69)
Row 70-72 :
1 sc in blo of every st, ch 1, turn (22)
Row 73-85 :
sc 6, inc 1, sc across until 7 sts remain, inc 1, sc 6, ch 1, turn (48)
Row 86-110 :
Continue increasing by 2 sts every row until you reach 98 sts (98)
Row 111-134 :
1 sc in blo of every st, ch 1, turn (98)
Row 135 :
sc 7, repeat (dec 1, sc 8) 10 times total, dec 1, sc 7, ch 1, turn (88)
— 11. Ribbed Edging (All Sizes) :
Info :
Switch to the 3mm hook. Work the ribbing along the leg openings.
Row 1 :
ch 9, 1 sc in 2nd ch, 1 sc in next 7 ch. sl st into next 2 sts of the body, turn (8)
Row 2 :
skip the sl sts, 1 sc in blo of the next 8 sts, ch 1, turn (8)
Row 3 :
1 sc in blo of the next 8 sts, sl st into next 2 sts of the body, turn (8)
Row 4-End :
Repeat Rows 2 and 3 until you have worked 56 (72, 72, 76, 88) rows total. Fasten off.
— 12. Straps (All Sizes) :
Info :
Use the 3mm hook. Locate the center 17 (17, 17, 21, 21) sts on the back panel.
Row 1 :
Join yarn with sl st to the first marked st, ch 1, 1 sc in each of the next 17 (17, 17, 21, 21) sts, ch 1, turn
Row 2-End :
Repeat Row 1 until you have worked 14 (14, 16, 20, 22) rows for the wide strap base.
Strap 1 :
Continue on the first 8 sts only. 1 sc in each of the next 8 sts, ch 1, turn.
Rows 2-33 :
Repeat Row 1 of the strap until it measures 33 (41, 38, 41, 45) rows total.
Row 34 :
sc 3, ch 2, skip 2, sc 3, ch 1, turn to create the strap buttonhole.
Row 35-37 :
1 sc in each of the next 8 sts, ch 1, turn. Fasten off and repeat for the second strap.
I honestly can't wait to see the colors you choose for your Tiny Tot romper! Whether you go for classic pastels or a bold, modern palette, this little outfit is going to be a showstopper. Don't forget to take your time with those buttonholes—they really pull the whole look together. If you run into any snags, just remember that every stitch is made with love. Happy crocheting, and may your finished piece bring lots of smiles to a very lucky little one! 🧶✨