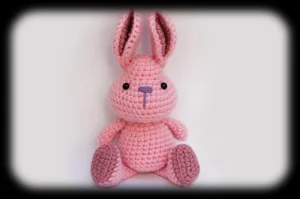
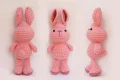
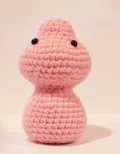
You are going to love watching this sweet little rabbit come to life under your crochet hook! With its classic pear-shaped body and uniquely layered ears, this project is as fun to assemble as it is to stitch. Whether you're making a new best friend for a little one or adding a touch of handmade charm to your own shelf, this pattern offers a relaxing and rewarding crafting experience you'll want to repeat in every color.
Progress Tracker
0% Complete
— 1. Head and Body :
Round 1 :
Start by creating a mr and working 6 sc into it (6)
Round 2 :
Work 2 sc into every st around (12)
Round 3 :
Work a sequence of 1 sc followed by 1 inc, repeating this 6 times total (18)
Round 4 :
Work 1 sc into every st around (18)
Round 5 :
Work 1 sc into every st around (18)
Round 6 :
Work 1 sc into every st around (18)
Round 7 :
Work a sequence of 2 sc followed by 1 inc, repeating this 6 times total (24)
Round 8 :
Work a sequence of 3 sc followed by 1 inc, repeating this 6 times total (30)
Round 9 :
Work a sequence of 4 sc followed by 1 inc, repeating this 6 times total (36)
Round 10 :
Work a sequence of 5 sc followed by 1 inc, repeating this 6 times total (42)
Round 11 :
Work 1 sc into every st around (42)
Round 12 :
Work 1 sc into every st around (42)
Info :
Insert the safety eyes at Round 8, leaving a gap of 8 stitches (or 7 holes) between them.
Round 13 :
Work a sequence of 5 sc followed by 1 sc2tog, repeating this 6 times total (36)
Round 14 :
Work a sequence of 4 sc followed by 1 sc2tog, repeating this 6 times total (30)
Round 15 :
Work a sequence of 3 sc followed by 1 sc2tog, repeating this 6 times total (24)
Round 16 :
Work a sequence of 2 sc followed by 1 sc2tog, repeating this 6 times total (18)
Round 17 :
Work 1 sc into every st around (18)
Round 18 :
Work a sequence of 4 sc followed by 1 sc2tog, repeating this 3 times total (15)
Round 19 :
Work a sequence of 2 sc followed by 1 inc, repeating this 5 times total (20)
Round 20 :
Work a sequence of 4 sc followed by 1 inc, repeating this 4 times total (24)
Info :
Begin stuffing the head firmly and shaping it as you go.
Round 21 :
Work a sequence of 3 sc followed by 1 inc, repeating this 6 times total (30)
Round 22 :
Work 1 sc into every st around (30)
Round 23 :
Work 1 sc into every st around (30)
Round 24 :
Work 1 sc into every st around (30)
Round 25 :
Work 1 sc into every st around (30)
Round 26 :
Work 1 sc into every st around (30)
Round 27 :
Work 1 sc into every st around (30)
Round 28 :
Work 1 sc into every st around (30)
Round 29 :
Work a sequence of 3 sc followed by 1 sc2tog, repeating this 6 times total (24)
Round 30 :
Work a sequence of 2 sc followed by 1 sc2tog, repeating this 6 times total (18)
Info :
Finish stuffing the body firmly, paying extra attention to the neck area so it stays upright.
Round 31 :
Work a sequence of 1 sc followed by 1 sc2tog, repeating this 6 times total (12)
Round 32 :
Work a sequence of 1 sc followed by 1 sc2tog, repeating this 4 times total (8)
Round 33 :
Finish with 1 sc2tog, then fasten off. Weave the yarn tail through the remaining stitches to pull the hole closed and hide the end inside the body.
— 2. Legs :
Info :
Start this section using the dark pink yarn.
Round 1 :
ch 6, then work 2 sc in the second ch from the hook. sc in the next 3 st, then 4 sc in the final ch. Rotate your work to the opposite side of the chain, sc in the next 3 st, and finish with 2 sc in the last ch (14)
Round 2 :
Work a sequence of 1 sc followed by 1 inc, repeating this 7 times total (21)
Round 3 :
Work 1 sc in the bl of every st around (21)
Colour Change :
Switch to light pink yarn.
Round 4 :
Work 1 sc into every st around (21)
Round 5 :
Work 7 sc, then 4 sc2tog, followed by 6 sc (17)
Round 6 :
Work 6 sc, then 3 sc2tog, followed by 5 sc (14)
Round 7 :
Work 1 sc2tog, then 10 sc, and finish with 1 sc2tog (12)
Info :
Stuff and shape the foot area, but do not add stuffing to the top of the leg.
Round 8 :
Work 1 sc2tog, then 8 sc, and finish with 1 sc2tog (10)
Round 9 :
Work 1 sc into every st around (10)
Round 10 :
Work 1 sc into every st around (10)
Round 11 :
Work 1 sc into every st around (10)
Round 12 :
Work 1 sc2tog, then 6 sc, and finish with 1 sc2tog (8)
Round 13 :
Work 1 sc into every st around (8)
Round 14 :
Press the top opening of the leg flat and work 1 sc through both layers across the top to close it. Fasten off and leave a tail for sewing.
— 3. Arms :
Round 1 :
Using light pink yarn, start with 6 sc in a mr (6)
Round 2 :
Work 2 sc into every st around (12)
Round 3 :
Work 1 sc into every st around (12)
Round 4 :
Work a sequence of 1 sc followed by 1 sc2tog, repeating this 4 times total (8)
Round 5 :
Work 1 sc into every st around (8)
Round 6 :
Work 1 sc into every st around (8)
Round 7 :
Work 1 sc into every st around (8)
Round 8 :
Work 1 sc into every st around (8)
Info :
Stuff the hand lightly, leaving the upper arm empty. sl st in the next st and fasten off with a long tail.
— 4. Ears :
Info :
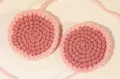
You will need to make 2 circles in dark pink and 2 circles in light pink using the steps below.
Round 1 :
Start with 6 sc in a mr (6)
Round 2 :
Work 2 sc into every st around (12)
Round 3 :
Work a sequence of 1 sc followed by 1 inc, repeating this 6 times total (18)
Round 4 :
Work a sequence of 2 sc followed by 1 inc, repeating this 6 times total (24)
Round 5 :
Work a sequence of 3 sc followed by 1 inc, repeating this 6 times total (30)
Info :
Fasten off the first piece and weave in the ends. After finishing the second piece, do not cut the yarn.
Joining :
Place one dark pink and one light pink circle together with wrong sides facing. Crochet around the edges through both layers using sc to join them. sl st in the next st and fasten off with a long tail.
— 5. Tail :
Round 1 :
Using light pink yarn, start with 6 sc in a mr (6)
Round 2 :
Work 2 sc into every st around (12)
Round 3 :
Work a sequence of 1 sc followed by 1 sc2tog, repeating this 4 times total (8)
Info :
Add a small amount of stuffing to the tail. sl st in the next st and fasten off with a long sewing tail.
Your new blushing bunny is ready to find its forever home! I hope you enjoyed every stitch of this project, from that first magic ring to the final assembly of those adorable folded ears. There’s nothing quite like the feeling of seeing a pile of crocheted parts finally turn into a character with a personality of its own. Whether this rabbit is destined for a gift box or a spot on your own shelf, it carries the care and time you put into every round. Don't forget to give it a little squeeze once it's finished—you've earned it! I'm so glad I could share this pattern with you. Happy crocheting! ✨