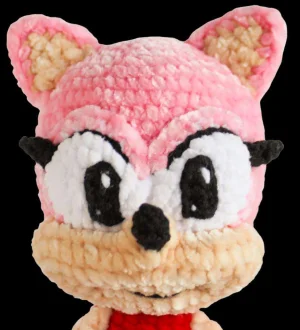
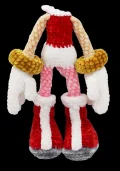
If you have been looking for a project that really shows off your skills, this spunky hedgehog is it! She is packed with personality, featuring her iconic red dress and that massive signature hammer. I have designed this to be an engaging challenge that results in a high-quality, professional-looking plushie that any gaming fan would treasure. You will love seeing her classic silhouette come together piece by piece.
Progress Tracker
0% Complete
— 1. Thumb (Make 2) :
Round 1 :
Using white yarn, 6 sc in MR (6)
Round 2-5 :
1 sc in every st (6)
Info :
Do not stuff. ch 1, fold the piece flat and sc the edges together using 3 sc. Cut and fasten.
— 2. Fingers (Make 4 per hand) :
Round 1 :
Using white yarn, 6 sc in MR (6)
Round 2-6 :
1 sc in every st (6)
Info :
Fasten off for the first three fingers. On the fourth finger, do not cut the yarn; we will use it to join all fingers together.
— 3. Arms and Hands :
Round 7 :
3 sc on finger 1, 3 sc on finger 2, 3 sc on finger 3, 6 sc on finger 4, 3 sc on finger 3, 3 sc on finger 2, 3 sc on finger 1 (24)
Round 8-12 :
1 sc in every st (24)
Round 13 (Left) :
1 sc, 3 sc through both the hand and the thumb piece, 20 sc (24)
Round 13 (Right) :
8 sc, 3 sc through both the hand and the thumb piece, 13 sc (24)
Round 14 :
(10 sc, dec) * 2 (22)
Round 15 :
(9 sc, dec) * 2 (20)
Round 16 :
(3 sc, dec) * 4 (16)
Round 17 :
(2 sc, dec) * 4 (12)
Colour Change :
Switch to ivory yarn and fasten off the white.
Round 18 :
(4 sc, dec) * 2 (10)
Round 19 :
(3 sc, dec) * 2 (8)
Round 20 :
(2 sc, dec) * 2 (6)
Info :
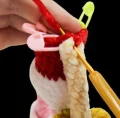
Stuff the palm lightly so it remains flat. Do not stuff the rest of the arm.
Round 21-30 :
1 sc in every st (6)
Info :
ch 1, fold the arm flat and join the top with 3 sc. Fasten off.
— 4. Bracelets (Make 2) :
Round 0 :
Using mustard yarn, ch 8 and join with ss to form a ring.
Round 1 :
ch 1, 8 sc worked into the chain (8)
Round 2-22 :
1 sc in every st (8)
Info :
Fasten off leaving a tail. Sew the ends together to form a donut shape, slide onto the arm and secure between rounds 15 and 16.
— 5. Tail :
Row 0 :
Using pink yarn, ch 3.
Row 1 :
Starting in 2nd ch from hook, 2 sc (2)
Row 2-4 :
ch 1, turn, 2 sc (2)
Row 5 :
ch 1, turn, skip 1 st, 1 sc (1)
Row 6-7 :
ch 1, turn, 1 sc (1)
Info :
Work a series of ss down the side of the piece to return to the base. Fasten off.
— 6. Legs (Make 2) :
Round 0 :
Using grey yarn, ch 12.
Round 1 :
Starting in 2nd ch, 10 sc, 5 sc in the last st. On the other side of the chain: 9 sc, inc (26)
Round 2 :
inc, 10 sc, 3 sc in one st, 1 sc, 3 sc in one st, 10 sc, 2 inc (33)
Round 3 :
1 sc, inc, 11 sc, 3 sc in one st, 3 sc, 3 sc in one st, 11 sc, (1 sc, inc) * 2 (40)
Round 4 :
2 sc, inc, 12 sc, 3 sc in one st, 5 sc, 3 sc in one st, 12 sc, (2 sc, inc) * 2 (47)
Colour Change :
Switch to red yarn but do not cut the grey thread yet.
Round 6 :
16 sc, dec3, 5 sc, dec3, 20 sc (43)
Info :
Switch back to grey yarn temporarily. Work 47 ss in the front loops of Round 4. Fasten off the grey.
Round 7 :
15 sc, dec3, 3 sc, dec3, 19 sc (39)
Round 8 :
14 sc, dec3, 1 sc, dec3, 18 sc (35)
Round 9 :
12 sc, dec3, 1 sc, dec3, 16 sc (31)
Round 10 :
10 sc, dec3, 1 sc, dec3, 14 sc (27)
Round 11 :
8 sc, dec3, 1 sc, dec3, 12 sc (23)
Round 12 :
6 sc, dec3, 1 sc, dec3, 10 sc (19)
Round 13 :
4 sc, dec3, 1 sc, dec3, 8 sc (15)
Info :
Stuff the foot firmly, ensuring the toe keeps its square shape.
Colour Change :
Switch to pink yarn. Keep the red thread on the outside for later.
Round 14 :
blo: (3 sc, dec) * 3 (12)
Round 15 :
(2 sc, dec) * 3 (9)
Round 16 :
3 sc, dec, 2 sc, dec (7)
Round 17-30 :
1 sc in every st (7)
— 7. Boot Upper Edge :
Info :
Return to the red yarn at Round 13 of the leg.
Round 2-4 :
1 sc in every st (15)
Colour Change :
Switch to white yarn and cut the red.
Round 5 :
flo: (4 sc, inc) * 3 (18)
Round 6 :
(5 sc, inc) * 3 (21)
Round 7 :
1 sc in every st (21)
— 8. Boot Front Stripe (Make 2) :
Row 0 :
Using white yarn, ch 18.
Row 1 :
Starting in 2nd ch, 17 sc (17)
Info :
Fasten off and sew vertically onto the front of the boot.
— 9. Body :
Round 31 :
Join legs with a white ch 3. 7 sc on left leg, 3 sc on ch, 7 sc on right leg, 3 sc on other side of ch (20)
Round 32 :
(1 sc, inc) * 10 (30)
Round 33 :
1 sc in every st (30)
Round 34 :
27 sc, 2 sc through both body and tail, 1 sc (30)
Round 35 :
(8 sc, dec) * 3 (27)
Round 36 :
(7 sc, dec) * 3 (24)
Round 37 :
(6 sc, dec) * 3 (21)
Colour Change :
Switch to red yarn.
Round 38 :
(5 sc, dec) * 3 (18)
Round 39 :
blo: 18 sc (18)
Round 40 :
1 sc in every st (18)
Round 41 :
(5 sc, inc) * 3 (21)
Round 42 :
1 sc in every st (21)
Round 43 :
(6 sc, inc) * 3 (24)
Round 44 :
1 sc in every st (24)
Round 45 :
(6 sc, dec) * 3 (21)
Round 46 :
(5 sc, dec) * 3 (18)
Round 47 :
4 sc, 3 sc through both body and arm, 6 sc, 3 sc through both body and other arm, 2 sc (18)
Round 48 :
Using white yarn, 18 sc (18)
— 10. Skirt :
Info :
Attach red yarn to the front loops of Round 38 of the body, holding the toy upside down.
Round 1 :
flo: (2 sc, inc) * 6 (24)
Round 2 :
(3 sc, inc) * 6 (30)
Round 3 :
(4 sc, inc) * 6 (36)
Round 4 :
(5 sc, inc) * 6 (42)
Round 5 :
(6 sc, inc) * 6 (48)
Round 6 :
(7 sc, inc) * 6 (54)
Round 7 :
(8 sc, inc) * 6 (60)
Round 8 :
(9 sc, inc) * 6 (66)
Colour Change :
Switch to white yarn.
Round 9 :
(10 sc, inc) * 6 (72)
Round 10 :
(11 sc, inc) * 6 (78)
— 11. Head :
Info :
Continue from the body using pink yarn.
Round 49 :
(1 sc, inc) * 9 (27)
Round 50 :
(2 sc, inc) * 9 (36)
Round 51 :
(5 sc, inc) * 6 (42)
Round 52 :
(6 sc, inc) * 6 (48)
Round 53-56 :
1 sc in every st (48)
Round 57 :
(15 sc, inc) * 3 (51)
Round 58 :
(16 sc, inc) * 3 (54)
Round 59-61 :
1 sc in every st (54)
Round 62 :
(17 sc, inc) * 3 (57)
Round 63 :
(18 sc, inc) * 3 (60)
Round 64 :
1 sc in every st (60)
Round 65 :
(8 sc, dec) * 6 (54)
Round 66 :
(7 sc, dec) * 6 (48)
Round 67 :
(6 sc, dec) * 6 (42)
Round 68 :
(5 sc, dec) * 6 (36)
Round 69 :
(4 sc, dec) * 6 (30)
Round 70 :
(3 sc, dec) * 6 (24)
Round 71 :
(2 sc, dec) * 6 (18)
Round 72 :
(1 sc, dec) * 6 (12)
Info :
Do not close the hole yet; it is needed for sculpting the face. Fasten off leaving a long tail.
— 12. Muzzle :
Round 0 :
Using ivory yarn, ch 14.
Round 1 :
Starting in 2nd ch, 12 sc, 3 sc in last st. On other side: 11 sc, inc (28)
Round 2 :
inc, 11 sc, 3 inc, 5 sc, 3 sc in one st, 5 sc, 2 inc (36)
Round 3 :
1 sc, inc, 11 sc, (1 sc, inc) * 3, 6 sc, 3 sc in one st, 6 sc, (1 sc, inc) * 2 (44)
Round 4-5 :
1 sc in every st (44)
Info :
Fold the piece and sew 3 ss across the top center to create a peaked shape. Turn inside out.
— 13. Nose :
Round 1 :
Using black semi-cotton, 6 sc in MR (6)
Round 2-3 :
1 sc in every st (6)
— 14. Eyes :
Round 0 :
Using white yarn, ch 5.
Round 1 :
Starting in 2nd ch, 3 sc, 3 sc in last st. On other side: 2 sc, inc (10)
Round 2 :
inc, 2 sc, 3 inc, 2 sc, 2 inc (16)
Round 3 :
1 sc, inc, 2 sc, (1 sc, inc) * 3, 2 sc, (1 sc, inc) * 2 (22)
Info :
Make two. Join them together with 3 ss in the center.
Eyelid :
Attach pink yarn to the outer edge and work 14 sc, 1 sc in center, 14 sc (29). Fasten off.
— 15. Prickles (Hair) :
Front Piece :
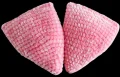
Work a cone shape increasing to 24 sc over 11 rounds. Rounds 12-14: dec, 9 sc, 2 inc, 9 sc, dec (24). Flatten and join with 12 sc.
Back Piece :
Work a cone shape increasing to 26 sc over 11 rounds. Rounds 12-23: 26 sc. Flatten and join with 13 sc.
Central Piece :
Work a cone shape increasing to 36 sc over 11 rounds. Rounds 12-19: 36 sc. Flatten and join with 18 sc.
— 16. Hammer :
Round 1-7 :
Using mustard yarn, increase from 8 sc to 56 sc.
Round 9 :
1 sc in every st (56)
Round 10 :
blo: 56 sc (56)
Round 11 :
(5 sc, dec) * 8 (48)
Round 12 :
Using grey yarn, (4 sc, dec) * 8 (40)
Round 13-26 :
Using red yarn, 1 sc in every st (40)
Round 27-37 :
Reverse the increase pattern using grey and mustard yarn to close the hammer head.
I am so incredibly proud of you for taking on this project! Amigurumi with this many parts is no small feat, but the payoff of seeing her stand there with her hammer is just the best feeling. I hope this pattern brings a little bit of gaming magic into your home and that you enjoyed the process of building her piece by piece. Don't forget to give her a little squeeze when she's all finished—she's as soft as she is spunky! I can't wait to see your finished versions. Keep on hooking and keep creating beautiful things! 🧶✨