About This Joe the Monkey Amigurumi Pattern
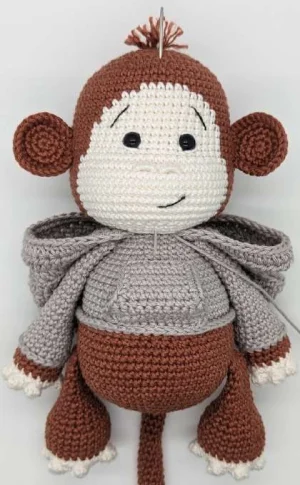
Joe makes a beautiful handmade gift — thoughtful enough for a baby shower or a birthday, and his trendy hoodie makes him a hit with kids and adults alike.
Ideal for those with basic crocheting experience, featuring slightly more advanced stitches and techniques to expand your skills.
Takes 5-7 hours, making it an enjoyable project to finish over a couple of days.
Playful characters full of personality, designed to spark imagination and become cherished playtime favorites.
Joe makes a beautiful handmade gift — thoughtful enough for a baby shower or a birthday, and his trendy hoodie makes him a hit with kids and adults alike.
I absolutely love how Joe's hoodie turned out; it adds such a modern, cozy vibe to a classic animal design. You'll enjoy the variety in this project, from the rhythmic rounds of the body to the fun texture of the bobble stitches on his paws.
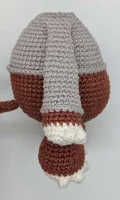
I have to admit, Joe is one of those projects that just makes me smile every time I look at him. There's something about a monkey in a hoodie that is just peak cute! When I was making my first Joe, I spent way too much time deciding which color hoodie he should have—I eventually went with a rusty ginger, and it looks so good against the dark brown fur!
One little tip I've learned while making these: when you're doing the bobble stitches for the toes and fingers, really give that yarn a tug before moving to the next sc. It makes the bobbles pop out much more prominently. Also, don't be afraid to get creative with his hair! I used the same brown as his body, but a little splash of a different color or even some fuzzy mohair would give him such a funny, wild look. He’s the perfect size for little hands to carry around, or just to sit on a shelf and keep you company while you work on your next project. I can't wait to see the colors you choose for his little outfit!
Meet Joe, the sweetest little monkey you'll ever hook! He's got so much personality, from his tiny embroidered nose to that cozy oversized hoodie. I've designed him to be the perfect companion for anyone who loves a bit of character in their crochet projects. You'll have a blast watching his little face come to life as you work through the color changes and assembly.
Using D, create a MR and work 5 sc (5)
Work 5 x inc (10)
Work 10 x inc (20)
(1 sc, inc) x 10 (30)
30 sc around for two rounds (30)
(1 sc, inc) x 15 (45)
45 sc around (45)
(3 sc, inc) x 11, then 1 sc (56)
56 sc around for two rounds (56)
Begin color changes here. Carry the unused yarn along or knot the ends inside.
D 25 sc, L 6 sc, D 25 sc (56)
D 23 sc, L 10 sc, D 23 sc (56)
D 22 sc, L 12 sc, D 22 sc (56)
D 21 sc, L 14 sc, D 21 sc for two rounds (56)
D ((6 sc, inc) x 2, 6 sc), L 16 sc, D (6 sc, (6 sc, inc) x 2) (60)
D 22 sc, L 16 sc, D 22 sc for four rounds (60)
D 21 sc, L (3 sc, inc) x 12, L 3 sc, D 21 sc (72)
Place 8mm safety eyes using the light face patch as a guide. Refer to the pattern photos for exact positioning relative to the color changes.
D 21 sc, L 30 sc, D 21 sc for seven rounds (72)
D (dec x 10, 1 sc), L dec x 15, D (1 sc, dec x 10) (37)
D 11 sc, L 15 sc, D 11 sc (37)
D (dec, 9 sc), L 15 sc, D (9 sc, dec) (35)
D dec x 5, L ((1 sc, dec) x 2, 3 sc, (dec, 1 sc) x 2), D dec x 5 (21)
Finish with a sl st and fasten off. Stuff the head firmly, shaping the muzzle area carefully.
Using D, work 6 sc into a MR (6)
6 x inc (12)
(1 sc, inc) x 6 (18)
(2 sc, inc) x 6 (24)
ch 1, turn your work, and sc in 22 st (22)
Fasten off leaving a long tail for sewing.
Using D, work 6 sc into a MR (6)
(1 sc, inc) x 3 (9)
9 sc around for thirty-eight rounds (9)
Do not stuff. Flatten the opening and work 4 sc through both layers to close.
Using L, work 6 sc into a MR (6)
6 x inc (12)
(1 sc, inc) x 6 (18)
(2 sc, inc) x 6 (24)
2 sc, 4 x BO, 2 sc, 4 x BO, 2 sc, 4 x BO, 13 sc, 5 x BO, 1 sc (24)
13 sc, 4 x BO, 2 sc, 4 x BO, 2 sc, 4 x BO, 3 sc, 5 x BO (24)
Work 23 sc in L, then change to D for the last st (24)
(7 sc, inc) x 3 (27)
27 sc around for two rounds (27)
(7 sc, dec) x 3 (24)
24 sc around (24)
(2 sc, dec) x 6 (18)
18 sc around (18)
(4 sc, dec) x 3 (15)
15 sc around for two rounds (15)
(3 sc, dec) x 3 (12)
12 sc around for two rounds (12)
(2 sc, dec) x 3 (9)
9 sc (9)
Work only 6 sc; leave the remaining stitches unworked (6)
Stuff only the foot. Flatten the top and crochet 4 sc across both layers to close.
Using L, work 6 sc into a MR (6)
6 x inc (12)
(1 sc, inc) x 6 (18)
1 sc, 4 x BO, 1 sc, 4 x BO, 1 sc, 4 x BO, 9 sc, 5 x BO, 2 sc (18)
9 sc, 4 x BO, 1 sc, 4 x BO, 1 sc, 4 x BO, 3 sc, 5 x BO (18)
Work 17 sc in L, then change to D for the last st (18)
18 sc around for three rounds (18)
Switch to hoodie color and work 18 sc in flo (18)
Work 18 sc in blo of Round 8 (18)
18 sc around for three rounds (18)
(4 sc, dec) x 3 (15)
15 sc around for four rounds (15)
(3 sc, dec) x 3 (12)
12 sc around for three rounds (12)
(2 sc, dec) x 3 (9)
9 sc around for four rounds (9)
Work 2 sc, leaving the rest unworked (2)
Stuff only the hand. Flatten the top and work 4 sc through both layers to seal.
Using D, work 6 sc into a MR (6)
6 x inc (12)
(1 sc, inc) x 6 (18)
1 sc, inc, (2 sc, inc) x 5, 1 sc (24)
(3 sc, inc) x 6 (30)
2 sc, inc, (4 sc, inc) x 5, 2 sc (36)
(5 sc, inc) x 6 (42)
3 sc, inc, (6 sc, inc) x 5, 3 sc (48)
(7 sc, inc) x 6 (54)
4 sc, inc, (8 sc, inc) x 5, 4 sc (60)
Work 54 sc, then join the tail by crocheting through both tail and body for 4 sc, followed by 2 sc (60)
60 sc around for two rounds (60)
9 sc, join right leg with 4 sc, 26 sc, join left leg with 4 sc, 17 sc (60)
60 sc around for three rounds (60)
18 sc, (dec, 1 sc) x 3, (1 sc, dec) x 3, 24 sc (54)
50 sc, then switch to hoodie color (50)
54 sc in flo (54)
54 sc in blo of Round 19 (54)
54 sc around for four rounds (54)
(7 sc, dec) x 6 (48)
48 sc around (48)
3 sc, dec, (6 sc, dec) x 5, 3 sc (42)
42 sc around (42)
(5 sc, dec) x 6 (36)
36 sc around (36)
2 sc, dec, (4 sc, dec) x 5, 2 sc (30)
8 sc, join right arm with 4 sc, 10 sc, join left arm with 4 sc, 4 sc (30)
(3 sc, dec) x 6 (24)
(6 sc, dec) x 3 (21)
Finish with a sl st and weave in ends. Stuff the body firmly.
In hoodie color, ch 12, then 1 tch (12)
12 sc, 1 tch (12)
dec, 8 sc, dec, 1 tch (10)
dec, 6 sc, dec, 1 tch (8)
8 sc, 1 tch for five rows (8)
8 sc (8)
Crochet around the entire edge of the pocket (approx 44 sc), making 3 sc in each corner for a rounded finish.
In hoodie color, work 8 sc into a MR (8)
8 x hdc inc (16)
(1 hdc, inc) x 8 (24)
(2 hdc, inc) x 8 (32)
(3 hdc, inc) x 8 (40)
(4 hdc, inc) x 8 (48)
(5 hdc, inc) x 8 (56)
(6 hdc, inc) x 8 (64)
64 hdc around for two rounds (64)
64 hdc, 1 tch (64)
Turn and work 59 hdc, 1 tch (59)
11 hdc, skip 6 st (ch 6 for ear hole), 25 hdc, skip 6 st (ch 6 for ear hole), 11 hdc, 1 tch (59)
59 hdc, 1 tch (59)
59 hdc (59)
Work a border of approx 20 sc along the inner edge of the face opening. Leave a long tail for sewing.
Work a double chain of 16 stitches. Knot the ends and leave a tail for attachment.
I hope you have as much fun making Joe as I did! There's nothing quite like finishing that last stitch and seeing your new little buddy looking back at you. Whether you’re keeping him for yourself or gifting him to someone special, Joe is sure to bring a lot of joy and a few smiles. Don't forget to share your finished photos with the community—I'd love to see what colors you chose for his hoodie! Happy crafting and enjoy every single stitch! 🧶🐒✨
Yes, but it will change the size of your monkey. If you use a heavier yarn like worsted weight, Joe will be larger, and you'll need to use a larger hook and bigger safety eyes to keep the proportions correct.
Make sure to push the bobbles out to the right side of the fabric as you work. When stuffing, add the fiberfill gently around the bobbles rather than packing it tightly directly against them.
Always pull through the last two loops of the previous stitch with the new color. This ensures the top of the stitch matches the color of the next stitch, creating a much cleaner vertical line.
In this specific design, the hoodie is sewn to the head and the head to the body for stability. However, you could choose not to sew the front edge of the hoodie down if you prefer a looser look.
