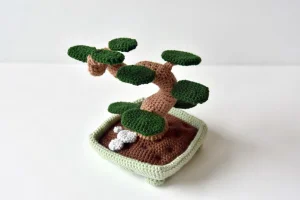
There's something almost meditative about crocheting a bonsai tree — each round of the trunk, each tiny leaf pad, each little stone placed just so. This pattern gives you a miniature living sculpture you can actually keep forever, no watering required. You'll work through a sculpted flower pot, a gnarled curving trunk, three sizes of leaf pads, matching branches, and a handful of tiny stones nestled in dark brown soil. The finished piece sits about 22cm tall and 25cm wide — substantial enough to be a real statement on a shelf or desk. Whether you make it for yourself or wrap it up as a gift, this one genuinely feels special when it's done.
Progress Tracker
0% Complete
— 1. Flower Pot (light green, worked in spirals) :
Info :
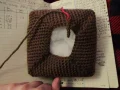
The flower pot is worked in spirals throughout. Use a stitch marker to track the beginning of each round. Pay close attention to inc1sc (2 sc in next st) vs inc2sc (3 sc in next st) — they look similar but produce different counts.
Round 1 :
Start with a magic ring and work 4 sc into it. (4)
Round 2 :
Work inc2sc into every stitch around. (12)
Round 3 :
Repeat 4 times: 1sc, inc2sc in next st, 1sc. (20)
Round 4 :
Repeat 4 times: 2sc, inc2sc in next st, 2sc. (28)
Round 5 :
Repeat 4 times: 3sc, inc2sc in next st, 3sc. (36)
Round 6 :
Repeat 4 times: 4sc, inc1sc in next st, 4sc. (40)
Round 7 :
Repeat 4 times: 5sc, inc1sc in next st, 4sc. (44)
Round 8 :
Repeat 4 times: 5sc, inc2sc in next st, 5sc. (52)
Round 9 :
Repeat 4 times: 6sc, inc1sc in next st, 6sc. (56)
Round 10 :
Repeat 4 times: 7sc, inc1sc in next st, 6sc. (60)
Round 11 :
Repeat 4 times: 7sc, inc2sc in next st, 7sc. (68)
Round 12 :
Repeat 4 times: 8sc, inc1sc in next st, 8sc. (72)
Round 13 :
Repeat 4 times: 9sc, inc1sc in next st, 8sc. (76)
Round 14 :
Repeat 4 times: 9sc, inc2sc in next st, 9sc. (84)
Round 15 :
Repeat 4 times: 10sc, inc1sc in next st, 10sc. (88)
Round 16 :
Repeat 4 times: 11sc, inc1sc in next st, 10sc. (92)
Round 17 :
Repeat 4 times: 11sc, inc2sc in next st, 11sc. (100)
Round 18 :
Repeat 4 times: 12sc, inc2sc in next st, 12sc. (108)
Round 19-23 :
Work 5 rounds of sc all the way around. (108)
Info :
After those 5 plain rounds, crochet 1sc and shift your stitch marker to this new point. This becomes your new round start — do not close or finish the current round before continuing.
Round 24 :
Repeat 4 times: 12sc, sc3tog, 12sc. (100)
Round 25-28 :
Work 4 rounds of sc all the way around. (100)
Info :
Crochet 1sc and shift your stitch marker to this new point again. Continue directly into the next round without finishing.
Round 29 :
Repeat 4 times: 11sc, sc3tog, 11sc. (92)
Round 30 :
Repeat 4 times: 11sc, sc2tog, 10sc. (88)
Round 31 :
Repeat 4 times: 10sc, sc2tog, 10sc. (84)
Round 32 :
Repeat 4 times: 9sc, sc3tog, 9sc. (76)
Round 33 :
Repeat 4 times: 9sc, sc2tog, 8sc. (72)
Round 34 :
Repeat 4 times: 8sc, sc2tog, 8sc. (68)
Round 35 :
Repeat 4 times: 7sc, sc3tog, 7sc. (60)
Round 36 :
Repeat 4 times: 7sc, sc2tog, 6sc. (56)
Round 37 :
Repeat 4 times: 6sc, sc2tog, 6sc. (52)
Round 38 :
Repeat 4 times: 5sc, sc3tog, 5sc. (44)
Round 39 :
Repeat 4 times: 5sc, sc2tog, 4sc. (40)
Round 40 :
Repeat 4 times: 4sc, sc2tog, 4sc. (36)
Round 41 :
Repeat 4 times: 3sc, sc3tog, 3sc. (28)
Round 42 :
Repeat 4 times: 2sc, sc3tog, 2sc. (20)
Round 43 :
Repeat 4 times: 1sc, sc3tog, 1sc. (12)
Round 44 :
Repeat 4 times: sc3tog. (4)
Info :
Work 1slst and fasten off. Do not add any stuffing to the flower pot. Position the final slip stitch directly over the magic ring from Round 1, then fold the pot into its finished shape.
— 2. Flower Pot Feet (light green, worked in spirals — make 4) :
Round 1 :
Start with a magic ring and work 6 sc into it. (6)
Round 2 :
Work inc1sc into every stitch around. (12)
Round 3 :
Work 1sc, then inc1sc in the following st. Repeat this sequence all the way around. (18)
Round 4 :
Work 1sc, then sc2tog. Repeat all the way around. (12)
Info :
Add a small amount of fiberfill — just a light fill, not too packed.
Round 5 :
Work sc2tog all the way around. (6)
Round 6 :
Sc3tog, skip the next stitch, work 1slst and fasten off. Make 4 feet in total. Position one foot under each corner of the pot, keeping them 8 rounds of sc away from the top rim of the pot on the outside.
— 3. Soil (dark brown, worked in spirals) :
Round 1 :
Start with a magic ring and work 4 sc. (4)
Round 2 :
Work inc2sc into every stitch around. (12)
Round 3 :
Repeat 4 times: 1sc, inc2sc in next st, 1sc. (20)
Round 4 :
Repeat 4 times: 2sc, inc2sc in next st, 2sc. (28)
Round 5 :
Repeat 4 times: 3sc, inc2sc in next st, 3sc. (36)
Round 6 :
Repeat 4 times: 4sc, inc1sc in next st, 4sc. (40)
Round 7 :
Repeat 4 times: 5sc, inc1sc in next st, 4sc. (44)
Round 8 :
Repeat 4 times: 5sc, inc2sc in next st, 5sc. (52)
Round 9 :
Repeat 4 times: 6sc, inc1sc in next st, 6sc. (56)
Round 10 :
Repeat 4 times: 7sc, inc1sc in next st, 6sc. (60)
Round 11 :
Repeat 4 times: 7sc, inc2sc in next st, 7sc. (68)
Round 12 :
Repeat 4 times: 8sc, inc1sc in next st, 8sc. (72)
Round 13 :
Repeat 4 times: 9sc, inc1sc in next st, 8sc. (76)
Round 14 :
Repeat 4 times: 9sc, inc2sc in next st, 9sc. (84)
Round 15 :
Repeat 4 times: 10sc, inc1sc in next st, 10sc. (88)
Round 16 :
Repeat 4 times: 11sc, inc1sc in next st, 10sc. (92)
Round 17 :
Repeat 4 times: 11sc, sc2tog, 10sc. (88)
Round 18 :
Repeat 4 times: 10sc, sc2tog, 10sc. (84)
Round 19 :
Repeat 4 times: 9sc, sc3tog, 9sc. (76)
Round 20 :
Repeat 4 times: 9sc, sc2tog, 8sc. (72)
Round 21 :
Repeat 4 times: 8sc, sc2tog, 8sc. (68)
Round 22 :
Repeat 4 times: 7sc, sc3tog, 7sc. (60)
Round 23 :
Repeat 4 times: 7sc, sc2tog, 6sc. (56)
Round 24 :
Repeat 4 times: 6sc, sc2tog, 6sc. (52)
Round 25 :
Repeat 4 times: 5sc, sc3tog, 5sc. (44)
Round 26 :
Repeat 4 times: 5sc, sc2tog, 4sc. (40)
Round 27 :
Repeat 4 times: 4sc, sc2tog, 4sc. (36)
Info :
Fill the soil disc with fiberfill at this point.
Round 28 :
Repeat 4 times: 3sc, sc3tog, 3sc. (28)
Round 29 :
Repeat 4 times: 2sc, sc3tog, 2sc. (20)
Info :
Add another round of fiberfill stuffing.
Round 30 :
Repeat 4 times: 1sc, sc3tog, 1sc. (12)
Info :
Stuff once more with fiberfill.
Round 31 :
Repeat 4 times: sc3tog. (4)
Info :
Work 1slst and fasten off. To create the natural textured look of soil: thread a long strand of dark brown yarn through the disc from top to bottom and back, then pull it snug so small dents form on the surface. Tie two flat knots to secure. Repeat this across the disc about 16 times, or to your liking — this both adds strength and gives the piece a realistic earthy appearance.
— 4. Tree Trunk (light brown, worked in spirals) :
Info :
The trunk is shaped using a mix of sc, hdc, and dc stitches — the taller stitches on one side create the natural curve of a bonsai trunk. Work in spirals unless a stitch marker reposition is indicated.
Round 1 :
Chain 30, then close the chain into a ring with 1slst. (30)
Round 2 :
Work 30sc around. (30)
Round 3 :
8sc, sc2tog. Repeat this sequence all the way around. (27)
Round 4 :
7sc, sc2tog. Repeat all the way around. (24)
Round 5 :
6sc, sc2tog. Repeat all the way around. (21)
Round 6 :
4sc, 3hdc, 7dc, 3hdc, 4sc. (21)
Round 7 :
4sc, 3hdc, 7dc, 3hdc, 4sc. (21)
Round 8 :
4sc, 3hdc, 7dc, 3hdc, 4sc. (21)
Round 9 :
4sc, 3hdc, 7dc, 3hdc, 4sc. (21)
Round 10 :
4sc, 3hdc, 7dc, 3hdc, 4sc. (21)
Round 11 :
10sc, sc2tog, 9sc. (20)
Round 12 :
9sc, sc2tog, 9sc. (19)
Round 13 :
8sc, sc2tog, 9sc. (18)
Info :
Work 10sc then shift your stitch marker to this new position. This becomes the new round start — continue directly without closing the round.
Round 14 :
3sc, 3hdc, 6dc, 3hdc, 3sc. (18)
Round 15 :
3sc, 3hdc, 6dc, 3hdc, 3sc. (18)
Round 16 :
3sc, 3hdc, 6dc, 3hdc, 3sc. (18)
Round 17 :
3sc, 3hdc, 6dc, 3hdc, 3sc. (18)
Round 18 :
3sc, 3hdc, 6dc, 3hdc, 3sc. (18)
Round 19 :
3sc, 3hdc, 6dc, 3hdc, 3sc. (18)
Round 20 :
3sc, 3hdc, 6dc, 3hdc, 3sc. (18)
Round 21 :
3sc, 3hdc, 6dc, 3hdc, 3sc. (18)
Round 22 :
3sc, 3hdc, 6dc, 3hdc, 3sc. (18)
Round 23 :
3sc, 3hdc, 6dc, 3hdc, 3sc. (18)
Round 24 :
3sc, 3hdc, 6dc, 3hdc, 3sc. (18)
Round 25 :
8sc, sc2tog, 8sc. (17)
Round 26 :
7sc, sc2tog, 8sc. (16)
Round 27 :
7sc, sc2tog, 7sc. (15)
Info :
Add fiberfill to the trunk at this point.
Round 28 :
7sc, sc2tog, 6sc. (14)
Info :
Work 7sc then shift your stitch marker to this new position. Continue without closing the round.
Round 29 :
2sc, 2hdc, 6dc, 2hdc, 2sc. (14)
Round 30 :
2sc, 2hdc, 6dc, 2hdc, 2sc. (14)
Round 31 :
2sc, 2hdc, 6dc, 2hdc, 2sc. (14)
Round 32 :
2sc, 2hdc, 6dc, 2hdc, 2sc. (14)
Round 33 :
2sc, 2hdc, 6dc, 2hdc, 2sc. (14)
Round 34 :
2sc, 2hdc, 2dc, dc2tog, 2dc, 2hdc, 2sc. (13)
Round 35 :
2sc, 2hdc, 5dc, 2hdc, 2sc. (13)
Info :
Add fiberfill to the trunk.
Round 36 :
2sc, 2hdc, 1dc, dc2tog, 2dc, 2hdc, 2sc. (12)
Round 37 :
2sc, 2hdc, 4dc, 2hdc, 2sc. (12)
Info :
Add fiberfill to the trunk.
Round 38 :
2sc, 2hdc, 4dc, 2hdc, 2sc. (12)
Round 39 :
2sc, 2hdc, 4dc, 2hdc, 2sc. (12)
Info :
Add fiberfill to the trunk.
Round 40 :
2sc, 2hdc, 1dc, dc2tog, 1dc, 2hdc, 2sc. (11)
Round 41 :
5sc, sc2tog, 4sc. (10)
Round 42 :
4sc, sc2tog, 4sc. (9)
Round 43 :
4sc, sc2tog, 3sc. (8)
Info :
Add fiberfill to the trunk.
Info :
Work 4sc then shift your stitch marker to this new position. Continue without closing the round.
Round 46 :
1sc, 1hdc, 4dc, 1hdc, 1sc. (8)
Round 47 :
2sc, 1hdc, 2dc, 1hdc, 2sc. (8)
Info :
Add fiberfill to the trunk.
Round 48 :
2sc, 1hdc, 2dc, 1hdc, 2sc. (8)
Round 49 :
2sc, 1hdc, 2dc, 1hdc, 2sc. (8)
Info :
Add fiberfill to the trunk.
Round 50 :
6sc, sc2tog. (7)
Round 51 :
5sc, sc2tog. (6)
Info :
Add fiberfill to the trunk.
Round 52 :
4sc, sc2tog. (5)
Round 53 :
3sc, sc2tog. (4)
Round 54 :
2sc, sc2tog. (3)
Info :
Work 1slst and fasten off. Add a little more fiberfill to the base of the trunk from the bottom if it needs it, then sew the trunk firmly onto the centre of the soil disc.
— 5. Stones (light grey, worked in spirals) :
Info :
Three different sized stones are made: A (largest), B (medium), and C (smallest). None of them are stuffed with fiberfill.
Stone A — Round 1 :
Start with a magic ring and work 6 sc. (6)
Stone A — Round 2 :
Work inc1sc into every stitch around. (12)
Stone A — Round 3 :
1sc, inc1sc in next st. Repeat this all the way around. (18)
Stone A — Round 4 :
1sc, sc2tog. Repeat all the way around. (12)
Stone A — Round 5 :
Sc2tog all the way around. (6)
Stone A — Round 6 :
Sc3tog, skip next st, work 1slst and fasten off. Do not stuff.
Stone B — Round 1 :
Start with a magic ring and work 6 sc. (6)
Stone B — Round 2 :
Work inc1sc into every stitch around. (12)
Stone B — Round 3 :
Sc2tog all the way around. (6)
Stone B — Round 4 :
Sc3tog, skip next st, work 1slst and fasten off. Do not stuff.
Stone C — Round 1 :
Start with a magic ring and work 6 sc. (6) Note: the source lists this as MR6=6 like the others but the following steps close it very quickly — this is the smallest, flattest stone.
Stone C — Round 2 :
Sc3tog, sc2tog, work 1slst and fasten off. Do not stuff.
Info :
Arrange all three stones on top of the soil beside the tree base. Stone A sits slightly overlapping Stone B; Stone C tucks in next to both A and B with a gap of 1–2 sc between them.
— 6. Leaves Type A — Dark Green, Worked Flat (make 2) :
Info :
Leaves start from a foundation chain and then transition into working in spirals from Round 3 onward. Do not stuff any leaves — flatten each one and sew the remaining hole shut when finished.
Row 2 :
Beginning in the 2nd chain from the hook: 3sc, inc2sc in the next st. (6)
Round 3 :
Work along the underside of the foundation chain: 3sc, inc2sc in the last ch st. You now have a 12-stitch oval and will continue in spirals from here. (12)
Round 4 :
3sc, then 3 times (inc1sc in next st), 3sc, then 3 times (inc1sc in next st). (18)
Round 5 :
3sc, then 3 times (1sc, inc1sc in next st), 3sc, then 3 times (1sc, inc1sc in next st). (24)
Round 6 :
3sc, then 3 times (2sc, inc1sc in next st), 3sc, then 3 times (2sc, inc1sc in next st). (30)
Round 7 :
3sc, then 3 times (3sc, inc1sc in next st), 3sc, then 3 times (3sc, inc1sc in next st). (36)
Round 8 :
3sc, then 3 times (3sc, sc2tog), 3sc, then 3 times (3sc, sc2tog). (30)
Round 9 :
3sc, then 3 times (2sc, sc2tog), 3sc, then 3 times (2sc, sc2tog). (24)
Round 10 :
3sc, then 3 times (1sc, sc2tog), 3sc, then 3 times (1sc, sc2tog). (18)
Round 11 :
3sc, then 3 times (sc2tog), 3sc, then 3 times (sc2tog). (12)
Round 12 :
3sc, sc3tog, 3sc, sc3tog. (8)
Info :
Work 1slst and fasten off. Flatten the leaf and sew the small remaining gap closed. Make 2 of these Type A leaves.
— 7. Leaves Type B — Dark Green, Worked Flat (make 4) :
Row 2 :
Beginning in the 2nd chain from the hook: 3sc, inc2sc in the next st. (6)
Round 3 :
Along the underside of the foundation chain: 3sc, inc2sc in the last ch st. You now have a 12-stitch oval — continue in spirals. (12)
Round 4 :
3sc, then 3 times (inc1sc in next st), 3sc, then 3 times (inc1sc in next st). (18)
Round 5 :
3sc, then 3 times (1sc, inc1sc in next st), 3sc, then 3 times (1sc, inc1sc in next st). (24)
Round 6 :
3sc, then 3 times (2sc, inc1sc in next st), 3sc, then 3 times (2sc, inc1sc in next st). (30)
Round 7 :
3sc, then 3 times (2sc, sc2tog), 3sc, then 3 times (2sc, sc2tog). (24)
Round 8 :
3sc, then 3 times (1sc, sc2tog), 3sc, then 3 times (1sc, sc2tog). (18)
Round 9 :
3sc, then 3 times (sc2tog), 3sc, then 3 times (sc2tog). (12)
Round 10 :
3sc, sc3tog, 3sc, sc3tog. (8)
Info :
Work 1slst and fasten off. Flatten and sew the remaining gap closed. Make 4 of these Type B leaves.
— 8. Leaves Type C — Dark Green, Worked Flat (make 3) :
Row 2 :
Beginning in the 2nd chain from the hook: 3sc, inc2sc in the next st. (6)
Round 3 :
Along the underside of the foundation chain: 3sc, inc2sc in the last ch st. Continue in spirals. (12)
Round 4 :
3sc, then 3 times (inc1sc in next st), 3sc, then 3 times (inc1sc in next st). (18)
Round 5 :
3sc, then 3 times (1sc, inc1sc in next st), 3sc, then 3 times (1sc, inc1sc in next st). (24)
Round 6 :
3sc, then 3 times (1sc, sc2tog), 3sc, then 3 times (1sc, sc2tog). (18)
Round 7 :
3sc, then 3 times (sc2tog), 3sc, then 3 times (sc2tog). (12)
Round 8 :
3sc, sc3tog, 3sc, sc3tog. (8)
Info :
Work 1slst and fasten off. Flatten and sew the remaining gap closed. Make 3 of these Type C leaves.
— 9. Branches Type A — Light Brown, Worked in Spirals (make 2) :
Round 1 :
Start with a magic ring and work 6 sc. (6)
Round 2 :
4sc, sc2tog. (5)
Round 3 :
3sc, sc2tog. (4)
Round 4-8 :
Work 5 rounds of sc. (4)
Round 9 :
2sc, sc2tog. (3)
Info :
Work 1slst and fasten off. Do not stuff. Make 2 Type A branches.
— 10. Branches Type B — Light Brown, Worked in Spirals (make 4) :
Round 1 :
Start with a magic ring and work 6 sc. (6)
Round 2 :
4sc, sc2tog. (5)
Round 3 :
3sc, sc2tog. (4)
Round 4-7 :
Work 4 rounds of sc. (4)
Round 8 :
2sc, sc2tog. (3)
Info :
Work 1slst and fasten off. Do not stuff. Make 4 Type B branches.
— 11. Branches Type C — Light Brown, Worked in Spirals (make 3) :
Round 1 :
Start with a magic ring and work 5 sc. (5)
Round 2 :
3sc, sc2tog. (4)
Round 3-6 :
Work 4 rounds of sc. (4)
Round 7 :
2sc, sc2tog. (3)
Info :
Work 1slst and fasten off. Do not stuff. Make 3 Type C branches.
And that's your crochet bonsai tree — all done! 🌳 From the curving trunk to the layered leaf pads in three sizes, every piece of this project comes together into something that genuinely looks like it took years of patience to grow. It's the kind of handmade piece that sits on a shelf and makes people stop and look twice. Whether you keep it for yourself or give it as a gift, I hope you loved every round of making it. Take a photo before you put it down — you've earned it! 🧶✨