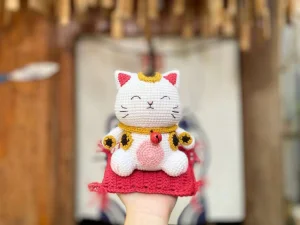
Bring a touch of prosperity and joy to your crochet collection with this charming little lucky cat! Designed with love, this sweet amigurumi project features traditional details like a tiny collar, a golden bell, and a cozy red pillow to sit on. It is a wonderful, heartwarming piece to craft for yourself or to share as a meaningful handmade gift that carries wishes of good fortune.
Progress Tracker
0% Complete
— 1. Head :
Round 1 :
Work 8 sc into a magic ring (8)
Round 2 :
Work 1 inc in each of the next 8 stitches (16)
Round 3 :
Repeat (1 sc, 1 inc) 8 times (24)
Round 4 :
Repeat (2 sc, 1 inc) 8 times (32)
Round 5 :
Repeat (3 sc, 1 inc) 8 times (40)
Round 6 :
Repeat (4 sc, 1 inc) 8 times (48)
Round 7 :
Repeat (5 sc, 1 inc) 8 times (56)
Round 8 :
Work 1 sc in each of the next 56 stitches (56)
Round 9 :
Repeat (6 sc, 1 inc) 8 times (64)
Round 10-14 :
Work 1 sc in each of the next 64 stitches (64)
Round 15 :
Work 26 sc, place a stitch marker, work 12 sc, place another stitch marker, work 26 sc (64)
Round 16 :
Work 1 sc in each of the next 64 stitches (64)
Round 17 :
Work 9 sc, repeat (1 sc, 1 inc) 8 times, work 14 sc, repeat (1 sc, 1 inc) 8 times, work 9 sc (80)
Round 18-22 :
Work 1 sc in each of the next 80 stitches (80)
Round 23 :
Repeat (8 sc, 1 dec) 8 times (72)
Round 24 :
Repeat (7 sc, 1 dec) 8 times (64)
Round 25 :
Repeat (6 sc, 1 dec) 8 times (56)
Round 26 :
Working in BLO, repeat (2 sc, 1 dec) 14 times (42)
Info :
Fasten off, leaving a long yarn tail for sewing. Firmly stuff the head with fiberfill. For the facial details, split your black yarn into thinner strands to embroider the eyes on Round 15 at the marked points, the mouth between Rounds 17 and 19, and the whiskers between Rounds 18 and 21. Use pink yarn to embroider the nose.
— 2. Body :
Info :
Start by making a chain of 11. You will work around both sides of this chain.
Round 1 :
Skip the first chain, work 9 sc down one side, work 3 sc in the last stitch, then rotate and work 8 sc along the opposite side of the chain, ending with 1 inc (22)
Round 2 :
Work 1 inc, 8 sc, 3 inc, 8 sc, 2 inc (28)
Round 3 :
Work 1 sc, 1 inc, 8 sc, repeat (1 inc, 1 sc) 3 times, work 8 sc, repeat (1 inc, 1 sc) 2 times (34)
Round 4 :
Work 1 inc, 10 sc, repeat (2 sc, 1 inc) 3 times, work 8 sc, repeat (2 sc, 1 inc) 2 times (40)
Round 5 :
Repeat (4 sc, 1 inc) 8 times (48)
Round 6 :
Work 1 sc in each of the next 48 stitches (48)
Round 7 :
Repeat (5 sc, 1 inc) 8 times (56)
Round 8 :
Work 1 sc in each of the next 56 stitches (56)
Round 9 :
Repeat (13 sc, 1 inc) 4 times (60)
Round 10-18 :
Work 1 sc in each of the next 60 stitches (60)
Round 19 :
Repeat (13 sc, 1 dec) 4 times (56)
Round 20 :
Work 1 sc in each of the next 56 stitches (56)
Round 21 :
Repeat (12 sc, 1 dec) 4 times (52)
Round 22 :
Repeat (11 sc, 1 dec) 4 times (48)
Round 23 :
Repeat (6 sc, 1 dec) 6 times (42)
Info :
Fasten off, leaving a long tail for sewing. Stuff the body firmly with fiberfill.
— 3. Arms (Make 2) :
Round 1 :
Work 8 sc into a magic ring (8)
Round 2 :
Work 1 inc in each of the next 8 stitches (16)
Round 3-4 :
Work 1 sc in each of the next 16 stitches (16)
Round 5 :
Repeat (6 sc, 1 dec) 2 times (14)
Round 6-7 :
Work 1 sc in each of the next 14 stitches (14)
Round 8 :
Repeat (5 sc, 1 dec) 2 times (12)
Round 9-12 :
Work 1 sc in each of the next 12 stitches (12)
Info :
Stuff the arms with fiberfill. Flatten the top opening and fold it, then work 6 sc through both layers to close. Fasten off, leaving a long tail for sewing.
— 4. Ears (Make 2) :
Info :
Use white yarn for the white text instructions and red yarn for the red text instructions to create the inner ear detail.
Round 1 :
Using white yarn, work 4 sc into a magic ring (4)
Round 2 :
Using white yarn, work 4 inc (8)
Round 3 :
Using white yarn, repeat (1 sc, 1 inc) 4 times (12)
Round 4 :
Using white yarn, work 2 sc, 1 inc, then switch to red yarn for 2 sc, 1 inc, then switch back to white yarn and repeat (2 sc, 1 inc) 2 times (16)
Round 5 :
Using white yarn, work 3 sc, 1 inc, 2 sc, then switch to red yarn for 1 sc, 1 inc, then switch back to white yarn and repeat (3 sc, 1 inc) 2 times (20)
Round 6 :
Using white yarn, work 4 sc, 1 inc, 2 sc, then switch to red yarn for 2 sc, 1 inc, then switch back to white yarn and repeat (4 sc, 1 inc) 2 times (24)
Round 7 :
Using white yarn, work 5 sc, 1 inc, 2 sc, then switch to red yarn for 3 sc, 1 inc, then switch back to white yarn and repeat (5 sc, 1 inc) 2 times (28)
Round 8 :
Using white yarn, work 9 sc, then switch to red yarn for 5 sc, then switch back to white yarn for 14 sc (28)
Info :
Stuff the ears lightly. Fasten off, leaving a long tail for sewing.
— 5. Legs (Make 2) :
Round 1 :
Work 6 sc into a magic ring (6)
Round 3 :
Repeat (1 sc, 1 inc) 6 times (18)
Round 4 :
Repeat (2 sc, 1 inc) 6 times (24)
Round 5 :
Repeat (3 sc, 1 inc) 6 times (30)
Round 6-8 :
Work 1 sc in each of the next 30 stitches (30)
Round 9 :
Repeat (3 sc, 1 dec) 6 times (24)
Info :
Stuff the legs firmly. Fasten off, leaving a long tail for sewing.
— 6. Belly :
Round 1 :
Using pink yarn, work 6 sc into a magic ring (6)
Round 3 :
Repeat (1 sc, 1 inc) 6 times (18)
Round 4 :
Repeat (2 sc, 1 inc) 6 times (24)
Round 5 :
Repeat (3 sc, 1 inc) 6 times (30)
Info :
Fasten off, leaving a long tail for sewing.
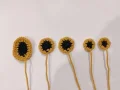
— 7. Hand Spots (Make 2) :
Round 1 :
Using black yarn, work 6 sc into a magic ring, then slst to join (6)
Round 2 :
Switch to honey gold yarn, ch 1, work 6 inc, then slst to join (12)
Info :
Fasten off, leaving a long tail for sewing.
— 8. Body Spots (Make 2) :
Round 1 :
Using black yarn, work 6 sc into a magic ring (6)
Round 2 :
Ch 1, work 6 inc, then slst to join (12)
Round 3 :
Switch to honey gold yarn, ch 1, repeat (1 sc, 1 inc) 6 times, then slst to join (18)
Info :
Fasten off, leaving a long tail for sewing.
— 9. Head Spot :
Round 1 :
Using black yarn, ch 5, start in the 2nd chain from hook: work 3 sc, 1 3sc-inc, 2 sc, 1 inc, then slst to join (10)
Round 2 :
Ch 1, work 1 inc, 2 sc, 3 inc, 2 sc, 2 inc, then slst to join (16)
Round 3 :
Switch to honey gold yarn, ch 1, work 1 sc, 1 inc, 2 sc, repeat (1 sc, 1 inc) 3 times, work 2 sc, repeat (1 sc, 1 inc) 2 times, then slst to join (22)
Note :
The PDF pattern contains a second round labeled '3' which increases the count to 28. This is treated as Round 4.
Round 4 :
Ch 1, work 2 sc, 1 inc, 2 sc, repeat (2 sc, 1 inc) 3 times, work 2 sc, repeat (2 sc, 1 inc) 2 times, then slst to join (28)
Info :
Fasten off, leaving a long tail for sewing.
— 10. Collar :
Row 1 :
Using honey gold yarn, make a chain of 62. Starting in the 7th chain from the hook, work 55 sc (55)
Info :
Fasten off and weave in the loose ends. Sew the wooden button and the metal bell to the collar, then wrap it around the cat's neck.
— 11. Tail :
Round 1 :
Using white yarn, work 6 sc into a magic ring (6)
Round 3-9 :
Work 1 sc in each of the next 12 stitches (12)
Info :
Do not stuff the tail. Flatten the top opening and work 6 sc through both opposing layers to close. Fasten off, leaving a long tail for sewing. Attach to the body on Round 6.
— 12. Pillow :
Row 1 :
Using red yarn, make a chain of 40. Starting in the 3rd chain from the hook, work 38 dc, then turn (38)
Row 2-13 :
Ch 2, work 38 dc, then turn (38)
Row 14 :
Ch 2, work 38 dc (38)
Info :
Fasten off, leaving a long tail of about 40cm for seaming. Fold the piece and sew the sides together, stuffing with fiberfill before closing. To make the 4 corner tassels: Cut 20 strands of red yarn, each about 10cm long. Use 5 strands per corner, threading them through the corner with a needle, knotting securely, and unraveling the strands for a fringed look.
I hope you have the absolute best time bringing this sweet little Lucky Cat to life! It is such a rewarding project to work on, and that moment when you slip the collar and bell around its neck is pure magic. Once your kitty is resting cozy on its tasseled red pillow, it will be ready to bring loads of good luck and smiles to your home. Happy crocheting, my lovely friends! 🧶✨