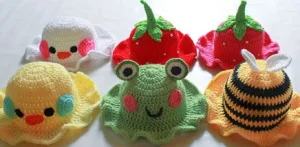
I am so excited to share these whimsical bucket hats with you! Whether you want to turn your little one into a tiny chick or rock a strawberry look yourself, these designs are all about bringing a bit of handmade joy to sunny days. They're inspired by those adorable clay rings and plushies we all love, making them the perfect playful accessory for any age. You'll love how quickly these work up and how much personality you can pack into every stitch.
Progress Tracker
0% Complete
— 1. Hat Base — Small (Newborn) :
Info :
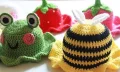
The ch-2 at the start of rounds does not count as a stitch. For the bee version, change colors as follows: Rounds 1-3 Yellow, Round 4 Black, Round 5 Yellow, Round 6 Black, Round 7 Yellow, Round 8 Black, Round 9 Yellow, Round 10 Black. Work the brim in Yellow.
Round 1 :
ch 2, work 13 dc into a magic ring. Close with a sl st to the first dc. (13)
Round 2 :
ch 2, work 1 dc inc into every st around. Join with a sl st. (26)
Round 3 :
ch 2, [1 dc inc, 1 dc] repeat 13 times. Join with a sl st. (39)
Round 4 :
ch 2, 1 dc, [1 dc inc, 2 dc] repeat 12 times, then 1 dc inc and 1 dc in the last st. Join with a sl st. (52)
Round 5 :
ch 2, 1 dc in every st around. Join with a sl st. (52)
Round 6-11 :
Repeat Round 5 for a total of 6 more rounds. (52)
Round 12 :
ch 2, [In flo: 1 dc inc, 2 dc] repeat around. (No fixed stitch count)
Round 13 :
ch 2, [1 dc inc, 2 dc] repeat until the end of the round. Join with a sl st.
Round 14 :
ch 2, [1 dc, 1 dc inc] repeat until the end of the round. Join, fasten off, and weave in ends.
— 2. Hat Base — Medium (1-3 Years) :
Info :
The ch-2 at the start of rounds does not count as a stitch. For the bee version, change colors as follows: Rounds 1-4 Yellow, Round 5 Black, Round 6 Yellow, Round 7 Black, Round 8 Yellow, Round 9 Black, Round 10 Yellow, Round 11 Black, Round 12 Yellow. Work the brim in Yellow.
Round 1 :
ch 2, work 13 dc into a magic ring. Close with a sl st to the first dc. (13)
Round 2 :
ch 2, work 1 dc inc into every st around. Join with a sl st. (26)
Round 3 :
ch 2, [1 dc inc, 1 dc] repeat 13 times. Join with a sl st. (39)
Round 4 :
ch 2, 1 dc, [1 dc inc, 2 dc] repeat 12 times, then 1 dc inc and 1 dc in the last st. Join with a sl st. (52)
Round 5 :
ch 2, [1 dc inc, 3 dc] repeat 13 times. Join with a sl st. (65)
Round 6 :
ch 2, 1 dc in every st around. Join with a sl st. (65)
Round 7-13 :
Repeat Round 6 for a total of 7 more rounds. (65)
Round 14 :
ch 2, [In flo: 1 dc inc, 2 dc] repeat around. (No fixed stitch count)
Round 15 :
ch 2, [1 dc inc, 2 dc] repeat until the end of the round. Join with a sl st.
Round 16 :
ch 2, [1 dc, 1 dc inc] repeat until the end of the round. Join, fasten off, and weave in ends.
— 3. Hat Base — Large (Adult) :
Info :
Note: If you have a smaller adult head, start with 12 dc in Round 1 and remove one repeat from each increase round. For the bee version, change colors as follows: Rounds 1-3 Yellow, Rounds 4-5 Black, Rounds 6-7 Yellow, Rounds 8-9 Black, Rounds 10-11 Yellow, Rounds 12-13 Black. Work the brim in Yellow.
Round 1 :
ch 2, work 13 dc into a magic ring. Close with a sl st to the first dc. (13)
Round 2 :
ch 2, work 1 dc inc into every st around. Join with a sl st. (26)
Round 3 :
ch 2, [1 dc inc, 1 dc] repeat 13 times. Join with a sl st. (39)
Round 4 :
ch 2, 1 dc, [1 dc inc, 2 dc] repeat 12 times, then 1 dc inc and 1 dc in the last st. Join with a sl st. (52)
Round 5 :
ch 2, [1 dc inc, 3 dc] repeat 13 times. Join with a sl st. (65)
Round 6 :
ch 2, 2 dc, [1 dc inc, 4 dc] repeat 12 times, then 1 dc inc and 2 dc in the last st. Join with a sl st. (78)
Round 7 :
ch 2, 1 dc in every st around. Join with a sl st. (78)
Round 8-14 :
Repeat Round 7 for a total of 7 more rounds. (78)
Round 15 :
ch 2, [In flo: 1 dc inc, 2 dc] repeat around. (No fixed stitch count)
Round 16 :
ch 2, [1 dc inc, 2 dc] repeat until the end of the round. Join with a sl st.
Round 17 :
ch 2, [1 dc, 1 dc inc] repeat until the end of the round. Join, fasten off, and weave in ends.
— 4. Chick Details — Small :
Beak Round 1 :
ch 4, 1 sc inc in 2nd ch from hook, 1 sc, 3 sc in last ch. Rotate to work other side of ch: 1 sc, 1 sc in same space as first inc. pm (8)
Beak Round 2 :
1 sc inc, 3 sc, 1 sc inc, 3 sc. pm (10)
Beak Round 3 :
1 sc inc, 5 sc, 1 sc inc, 3 sc. pm (12)
Beak Round 4 :
4 sc, sl st and fasten off with a long tail. Flatten piece to sew.
Eyes Round 1 :
Make 2. Magic ring, ch 1, 8 sc into ring. pm (8)
Eyes Round 2 :
1 sc inc in each st. Join and leave tail. (16)
Cheeks Round 1 :
Make 2. Magic ring, ch 1, 8 sc into ring. pm (8)
Cheeks Round 2 :
[1 sc inc, 1 sc] repeat 4 times. pm (12)
Cheeks Round 3 :
[1 sc inc, 1 sc] repeat 6 times. pm (18)
Cheeks Round 4 :
[2 sc, 1 sc inc] repeat 6 times. pm (24)
— 5. Chick Details — Medium :
Beak Round 1 :
ch 6, 1 sc inc in 2nd ch from hook, 3 sc, 3 sc in last ch. Rotate to work other side of ch: 3 sc, 1 sc in same space as first inc. pm (12)
Beak Round 2 :
1 sc inc, 5 sc, 1 sc inc, 5 sc. pm (14)
Beak Round 3 :
1 sc inc, 7 sc, 1 sc inc, 5 sc. pm (16)
Beak Round 4 :
1 sc inc, 8 sc, 1 sc inc, 6 sc. pm (18)
Beak Round 5 :
1 sc, sl st and fasten off with a long tail. Flatten piece to sew.
Eyes Round 1 :
Make 2. Magic ring, ch 1, 8 sc into ring. pm (8)
Eyes Round 2 :
1 sc inc in each st. Join and leave tail. (16)
Cheeks Round 1 :
Make 2. Magic ring, ch 1, 8 sc into ring. pm (8)
Cheeks Round 2 :
[1 sc inc, 1 sc] repeat 4 times. pm (12)
Cheeks Round 3 :
[1 sc inc, 1 sc] repeat 6 times. pm (18)
Cheeks Round 4 :
[2 sc, 1 sc inc] repeat 6 times. pm (24)
Cheeks Round 5 :
1 sc in each st around. pm (24)
— 6. Chick Details — Large :
Beak Round 1 :
ch 8, 1 sc inc in 2nd ch from hook, 5 sc, 3 sc in last ch. Rotate to work other side of ch: 5 sc, 1 sc in same space as first inc. pm (16)
Beak Round 2 :
1 sc inc, 7 sc, 1 sc inc, 7 sc. pm (18)
Beak Round 3 :
1 sc inc, 9 sc, 1 sc inc, 7 sc. pm (20)
Beak Round 4 :
2 sc, 1 sc inc, 9 sc, 1 sc inc, 7 sc. pm (22)
Beak Round 5 :
2 sc, sl st and fasten off with a long tail. Flatten piece to sew.
Eyes Round 1 :
Make 2. Magic ring, ch 1, 8 sc into ring. pm (8)
Eyes Round 2 :
1 sc inc in each st. pm (16)
Eyes Round 3 :
[1 sc inc, 1 sc] repeat 8 times. Join and leave tail. (24)
Cheeks Round 1 :
Make 2. Magic ring, ch 1, 8 sc into ring. pm (8)
Cheeks Round 2 :
[1 sc inc, 1 sc] repeat 4 times. pm (12)
Cheeks Round 3 :
[1 sc inc, 1 sc] repeat 6 times. pm (18)
Cheeks Round 4 :
[2 sc, 1 sc inc] repeat 6 times. pm (24)
Cheeks Round 5 :
1 sc in each st around. pm (24)
Note :
Stitch count at end of Round 6 appears to be inconsistent in the source — verify before continuing.
Cheeks Round 6 :
[1 sc inc, 1 sc] repeat 12 times. pm (38)
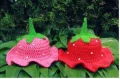
— 7. Strawberry Stem :
Leaf Round 1 :
ch 10, sl st to first ch to form a ring. [ch 8, 1 sc in 2nd ch, 1 hdc, 2 dc, 1 sc, sl st into first ch of ch-8. sl st into next 2 ch of original ring] repeat 5 times. (75)
Leaf Round 2 :
Work around each leaf: [sl st, 1 sc, 1 hdc, 3 sc, sl st into top ch, ch 3, sl st into same ch, sl st into next 7 st down the left side, sl st into previous round's sl st] repeat 5 times. Fasten off.
Stem Round 1 :
Join yarn to center of leaf ring. ch 1, 10 sc. pm (10)
Stem Round 2 :
1 sc in each st around. pm (10)
Stem Round 3 :
1 sc dec, 3 sc, 1 sc dec, 3 sc. pm (8)
Stem Round 4 :
1 sc in each st around. (8)
Stem Round 5 :
1 sc dec, 2 sc, 1 sc dec, 2 sc. pm (6)
Stem Round 6-8 :
1 sc in each st around. (6)
Stem Round 9 :
1 sc dec, 1 sc, 1 sc dec, 1 sc. pm (4)
Stem Round 10 :
1 sc dec, ch 3, sl st down the ch, sl st dec across last 2 st. Fasten off.
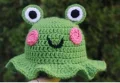
— 8. Animal Feature Circles :
Round 1 :
Magic ring, ch 1, 8 sc. pm (8). Use for small frog pupil.
Round 2 :
1 sc inc in each st. pm (16). Use for small frog iris, medium frog pupil, or small frog cheeks.
Round 3 :
[1 sc inc, 1 sc] repeat 8 times. pm (24). Use for small frog eye back, medium frog iris, medium/large frog cheeks, or large frog pupil.
Round 4 :
[1 sc inc, 2 sc] repeat 8 times. pm (32). Use for small bee wings, medium frog eye back, or large frog iris.
Round 5 :
[1 sc inc, 3 sc] repeat 8 times. pm (40). Use for large frog eye back or medium/large bee wings.
I honestly can't wait to see which character you choose to make first! These hats are such a fun way to practice your shaping and assembly skills while creating something that's guaranteed to get a few 'awws' when worn out and about. Remember to take your time with the facial features—that's where the personality really comes to life! If you're feeling adventurous, try mixing and matching the colors for a totally unique look. Happy hooking, and I hope your new summertime cutie brings a huge smile to your face! 🧶✨