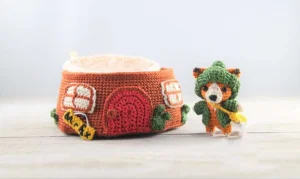
This tiny woodland fox and his cozy stump home are honestly the cutest things I've ever seen. You're going to love working with fine thread to bring this miniature world to life. It's a detailed project, but the result is a pocket-sized masterpiece that fits right in the palm of your hand. Prepare to be charmed by every tiny stitch!
Progress Tracker
0% Complete
— 1. Fox Head :
Round 1 :
Using Color A, start with 8 sc into a MR (8)
Round 2 :
Work 1 inc into every st around (16)
Round 3 :
Repeat a sequence of 1 sc followed by 1 inc 8 times (24)
Round 4 :
sc in each st around (24)
Round 5 :
sc in each st around (24)
Round 6 :
sc in 4 st, inc in the next 4 st, sc in 8 st, inc in the next 4 st, sc in the final 4 st (32)
Round 7 :
sc in each st around (32)
Round 8 :
sc in each st around (32)
Round 9 :
sc in each st around (32)
Round 10 :
Repeat a sequence of 2 sc followed by 1 dec 8 times (24)
Round 11 :
Repeat a sequence of 1 sc followed by 1 dec 8 times (16)
Info :
Begin stuffing the head firmly now, adding more as you close the next round.
Round 12 :
Work 8 dec around (8)
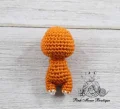
— 2. Fox Body :
Round 13 :
Continue from the head: Repeat a sequence of 1 sc followed by 1 inc 4 times (12)
Round 14 :
Repeat a sequence of 2 sc followed by 1 inc 4 times (16)
Round 15 :
sc in 3 st, ch 2 and skip 3 st, sc in 5 st, ch 2 and skip 3 st, sc in the last 2 st (14)
Round 16 :
Working in the BLO of the chains and both loops of the other stitches: Repeat a sequence of 6 sc followed by 1 inc twice (16)
Round 17 :
Repeat a sequence of 3 sc followed by 1 inc 4 times (20)
Round 18 :
sc in each st around (20)
Round 19 :
sc in each st around (20)
Round 20 :
sc in each st around (20)
Info :
Stuff the body. Mark the middle 6 stitches (3 front, 3 back) to leave 7 stitches on each side for the legs.
— 3. Fox Legs :
Round 1 :
sc until the first marker, join to the opposite side st to form a small circle, then sc around the 7 st (7)
Round 2 :
sc in each st around (7)
Round 3 :
sc in each st around (7)
Colour Change :
Switch to Color B (Natural)
Round 4 :
sc in each st around (7)
Info :
Fasten off and repeat for the second leg. Stuff lightly and sew the 6 middle stitches between the legs closed.
— 4. Fox Arms :
Round 1 :
Join Color A to the armhole spaces left in Round 15. sc in the 2 ch and 3 skipped st (5)
Round 2 :
sc in each st around (5)
Round 3 :
sc in each st around (5)
Round 4 :
sc in each st around (5)
Colour Change :
Switch to Color B (Natural)
Round 5 :
sc in each st around (5)
Round 6 :
sc in each st around (5)
Info :
Fasten off and secure. These arms do not require stuffing.
— 5. Fox Tail :
Round 1 :
With Color B, start with 6 sc in a MR (6)
Round 2 :
Repeat (1 sc, 1 inc) 3 times (9)
Round 3 :
Repeat (2 sc, 1 inc) 3 times (12)
Colour Change :
Switch to Color A
Round 4 :
sc in each st around (12)
Round 5 :
sc in each st around (12)
Round 6 :
sc in each st around (12)
Round 7 :
Repeat (2 sc, 1 dec) 3 times (9)
Info :
Add a small amount of stuffing.
Round 8 :
Repeat (1 sc, 1 dec) 3 times (6)
— 6. Fox Muzzle :
Round 1 :
With Color B, start with 8 sc in a MR, sl st to join and ch 1 (8)
Round 2 :
Repeat (1 sc, 1 inc) 4 times (12)
Round 3 :
sl st in 5 st, (1 hdc, 1 dc) in next st, 1 dc in next st, (1 dc, 1 hdc) in next st, sl st in last 5 st (14)
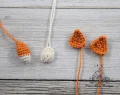
— 7. Fox Ears :
Row 1 :
With Color A, ch 6. sc in 2nd ch from hook and across, ch 1 and turn (5)
Row 2 :
dec, 1 sc, dec, ch 1 and turn (3)
Row 3 :
sc in each st, ch 1 and turn (3)
Row 4 :
sc3tog, ch 1 and turn (1)
Info :
sc around the entire ear edge, placing 2 sc in the bottom corners. Join at the top with a sl st.
— 8. Fox Jacket :
Row 1 :
With Jalapeno, ch 13. Work 2 sc in 2nd ch from hook and 2 sc in every ch across, ch 1 and turn (24)
Row 2 :
4 sc, ch 2, skip 5 st, 6 sc, ch 2, skip 5 st, 4 sc, ch 1 and turn (18)
Row 3 :
sc in each sc and BLO of each ch, ch 1 and turn (18)
Row 4 :
Repeat (2 sc, 1 inc) 6 times, turn without chaining (24)
Row 5 :
sl st across the entire row and fasten off.
— 9. Jacket Sleeves :
Round 1 :
Join Jalapeno to an armhole. sc in each ch, st, and the extra corner spaces. Add a 10th st where joined, sl st and ch 1 (10)
Round 2 :
sc in each st around, sl st and ch 1 (10)
Round 3 :
sc in each st around, sl st to join and fasten off (10)
— 10. Hat Back Piece :
Row 1 :
With Jalapeno, ch 13. sc in 2nd ch and across, ch 1 and turn (12)
Row 2 :
sc in each st, ch 1 and turn (12)
Row 3 :
sc, dec, 6 sc, dec, sc, ch 1 and turn (10)
Row 4 :
sc, dec, 4 sc, dec, sc, ch 1 and turn (8)
Row 5 :
sc, dec, 2 sc, dec, sc, ch 1 and turn (6)
Row 6 :
sc in each st, ch 1 and turn (6)
Row 7 :
sc, 2 dec, sc, ch 1 and turn (4)
Row 8 :
2 dec, ch 1 and turn (2)
Row 9 :
sc in each st, ch 1 and turn (2)
Row 10 :
sc in each st and fasten off.
— 11. Hat Front Piece :
Row 1 :
With Jalapeno, ch 17. sc in 2nd ch and across, ch 1 and turn (16)
Row 2 :
sc in each st, ch 1 and turn (16)
Row 3 :
sc, dec, 10 sc, dec, sc, ch 1 and turn (14)
Row 4 :
sc, 2 dec, 4 sc, 2 dec, sc, ch 1 and turn (10)
Row 5 :
sc in each st, ch 1 and turn (10)
Row 6 :
sc, dec, 4 sc, dec, sc, ch 1 and turn (8)
Row 7 :
sc, dec, 2 sc, dec, sc, ch 1 and turn (6)
Row 8 :
sc, 2 dec, sc, ch 1 and turn (4)
Row 9 :
2 dec and fasten off (2)
— 12. Hat Brim :
Row 1-18 :
ch 5. hdc in BLO of 2nd ch and across (3). ch 2 and turn after each row until you have 18 rows. Fasten off.
— 13. Hat Pom-Pom :
Round 1 :
With Jalapeno, 6 sc in a MR, sl st and ch 1 (6)
Round 2 :
6 inc, sl st and ch 1 (12)
Round 3 :
sc in each st, sl st and ch 1 (12)
Round 4 :
sc in each st, sl st and ch 1 (12)
Round 5 :
6 dec, sl st to join and fasten off (6)
— 14. Messenger Bag :
Round 1 :
With Canary, ch 6. 4 sc, 3 sc in last ch. Rotate to work other side: 3 sc, 2 sc in last ch, sl st and ch 1 (12)
Round 2 :
sc in each st, sl st and ch 1 (12)
Round 3 :
sc in each st, sl st and ch 1 (12)
Round 4 :
sc in each st, sl st to join. ch 16 for the handle and join to the other side.
— 15. House Inside Base & Wall :
Round 1-13 :
With Natural, make 2 flat circles: 8 sc in MR, then increase by 8 st each round until you have 104 st. Fasten off the first circle; keep the second circle attached.
Round 14 :
Hold circles together. sc through BLO of bottom circle and both loops of top circle, inserting plastic support halfway through (104)
Round 15 :
sc in each st around (104)
Round 16-28 :
sc in each st around (104). Fasten off after Round 28.
— 16. House Outside Wall Layer :
Round 14 :
Join Natural to the FLO left on Round 14 of the base. sc in each loop around (104)
Round 15-27 :
sc in each st around (104)
Round 28 :
Work in BLO: sc in each st around (104)
Round 29 :
sc in each st around (104)
Round 30 :
Insert side plastic support. sl st through BLO of outside wall and FLO of inside wall to join them.
— 17. House Rim :
Round 1 :
Join Copper to FLO of Round 27 of the wall. sc in each st, sl st and ch 1 (104)
Round 2-4 :
sc in each st around, sl st and ch 1 (104)
Round 5 :
Repeat (12 sc, 1 inc) 8 times, sl st to join and fasten off (112)
— 18. Tree Stump Body :
Round 1-18 :
With Copper, make a flat circle starting with 8 sc in MR and increasing by 8 st each round until you reach 144 st.
Round 19 :
2 hdc, then repeat (12 sc, 2 hdc, 2 dc, 2 hdc) 7 times, then 12 sc, 2 hdc, 2 dc. sl st, ch 1 and turn (144)
Round 20 :
In BLO, sc in each st around (144)
Round 21 :
Repeat (16 sc, 1 dec) 8 times, inserting base support halfway (136)
Round 22 :
Repeat (15 sc, 1 dec) 8 times (128)
Round 23 :
Repeat (14 sc, 1 dec) 8 times (120)
Round 24-28 :
sc in each st around (120)
Round 29 :
Repeat (13 sc, 1 dec) 8 times (112)
Round 30-38 :
sc in each st around (112)
Round 39 :
Insert the inside wall assembly. sl st through BLO of stump and FLO of inside wall to join. Fasten off.
— 19. Roof :
Round 1-14 :
With Natural, make 2 flat circles starting with 8 sc in MR and increasing to 112 st. Fasten off the first.
Round 15 :
Hold circles together. sl st through BLO of one and FLO of the other for 111 st. In the last st, ch 5, sc in 2nd ch and next 3 ch to make a stem. sl st to finish.
— 20. Door & Doorknob :
Row 1 :
With Serrano, ch 5. 3 sc, 5 sc in last ch, 3 sc on other side, ch 1 and turn (11)
Row 2 :
3 sc, 5 inc, 3 sc, ch 1 and turn (16)
Row 3 :
3 sc, (1 sc, 1 inc) x 5, 3 sc, ch 1 and turn (21)
Row 4 :
3 sc, (2 sc, 1 inc) x 5, 3 sc, ch 1 and turn (26)
Row 5 :
3 sc, (3 sc, 1 inc) x 5, 3 sc, ch 1 and turn (31)
Row 6 :
3 sc, (4 sc, 1 inc) x 5, 3 sc. Do not turn. sc across the bottom of the door (11)
Info :
sl st around the top and sides of the door with Copper thread. For the doorknob, work 5 sc in a MR with Copper and join.
— 21. Windows :
Row 1-4 :
With Natural, ch 12. hdc across (10) for 4 rows, turning with ch 2. Surface sl st with Copper around edges and across the middle to form window panes.
— 22. Grass & Sign :
Grass :
ch 7 with Jalapeno. sc in 2nd ch and across (6). Make several pieces.
Sign Row 1 :
10 fsc with Canary, ch 1 and turn (10)
Sign Row 2-3 :
esc in each st, ch 1 and turn (10). Embroider 'Mr Fox' in black.
— 23. Flowers & Stems :
Round 1 :
With Canary, 10 sc in MR, join and ch 2 (10)
Round 2 :
In first st: 3 dc, ch 2, sl st. Skip next st. Repeat 5 times to create petals.
Stems :
ch 10 or 12 with Jalapeno to create various lengths of green stems.
— 24. Mushrooms :
Large :
Work a flat circle to 32 st (4 rounds). Fold in half and sc the edges together, placing 1 inc at each end.
Medium :
Work a flat circle to 24 st (3 rounds). Fold in half and sc the edges together with an inc at each end.
Small :
Work a flat circle to 18 st (3 rounds). Fold in half and sc the edges together with an inc at each end.
There is something so magical about creating a tiny world from just a ball of thread and a hook. This Mr. Fox project is definitely a labor of love, but seeing him tucked into his little stump house makes every single stitch worth it. I hope you enjoy the process of building this miniature woodland retreat as much as I did. Happy stitching, and may your fox find plenty of adventures in his new home! 🧶🦊✨