About This Rustic Red Fox Amigurumi Pattern
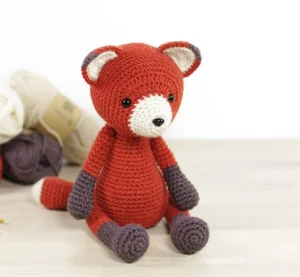
This little guy makes a stunning nursery decoration or a heartfelt gift for a nature lover. He has a timeless feel that's sure to be cherished for years by anyone who receives him.
Ideal for those with basic crocheting experience, featuring slightly more advanced stitches and techniques to expand your skills.
Takes 5-7 hours, making it an enjoyable project to finish over a couple of days.
Playful characters full of personality, designed to spark imagination and become cherished playtime favorites.
This little guy makes a stunning nursery decoration or a heartfelt gift for a nature lover. He has a timeless feel that's sure to be cherished for years by anyone who receives him.
I'm obsessed with how the jointed limbs make him so posable! It's one of those projects where you can see the character coming to life with every round. Plus, the way the ears are constructed gives them such a nice, thick texture that holds its shape perfectly without any extra wire or stiffeners.
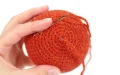
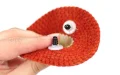
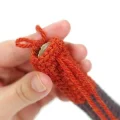
There is something so satisfying about finishing a project that has a bit of weight and structure to it. This fox is exactly that for me. I remember the first time I tried head sculpting—I was so nervous about pulling the yarn too tight and snapping it! But once you see those little eye sockets dip in, the whole character just changes. It goes from a crochet ball to a little friend with a soul.
I personally love using a wool-alpaca blend for this guy. It gives him a slightly fuzzy, rustic texture that just screams woodland. If you're feeling adventurous, you could even try brushing the tail with a wire pet brush to make it extra fluffy. Just be gentle so you don't tear the stitches! I also found that using a slightly smaller hook than the yarn suggests helps keep the fabric nice and tight, which is a lifesaver when you're stuffing the body firm enough to support the joints. I can't wait to see the colors you choose for yours!
If you've been looking for a forest friend with a bit of personality, you're going to love this little fox. He’s got that classic woodland charm but with a modern, clean shape that makes him look so professional once he's finished. I really enjoyed the way the color-blocked limbs turn out — it gives him such a sweet, hand-crafted character. He’s the perfect size for hugging and has a wonderfully sturdy feel.
Start with white yarn.
6 sc in mr (6)
6 inc (12)
(3 sc, inc) x 3 (15)
1 sc in each st (15)
(inc, 2 sc) x 5 (20)
1 sc in each st (20)
(3 sc, inc) x 5 (25)
Switch to orange yarn.
1 sc in each st (25)
(inc, 1 sc) x 3, 1 hdc, 8 hdc-inc, 1 hdc, (1 sc, inc) x 4, 1 sc (40)
11 sc, 1 hdc, (hdc-inc, 1 hdc) x 7, 14 sc (47)
8 sc, inc, (6 sc, inc) x 4, 10 sc (52)
22 sc, inc, 5 sc, inc, 23 sc (54)
1 sc, inc, 49 sc, inc, 2 sc (56)
Place safety eyes between Rounds 9 and 10, leaving 13 stitches between them. Position the nose between the first two rounds.
1 sc in each st (56)
5 sc, dec, (12 sc, dec) x 3, 7 sc (52)
(11 sc, dec) x 4 (48)
4 sc, dec, (10 sc, dec) x 3, 6 sc (44)
(9 sc, dec) x 4 (40)
3 sc, dec, (8 sc, dec) x 3, 5 sc (36)
Begin stuffing the head firmly and continue to add fiberfill as you work.
(7 sc, dec) x 4 (32)
2 sc, dec, (6 sc, dec) x 3, 4 sc (28)
(5 sc, dec) x 4 (24)
(dec, 2 sc) x 6 (18)
(1 sc, dec) x 6 (12)
6 dec (6)
Finish stuffing, fasten off, and leave a long tail to close the opening.
Make two pieces in white and two pieces in orange.
6 sc in mr (6)
(1 sc, inc3) x 3 (12)
2 sc, inc3, (3 sc, inc3) x 2, 1 sc (18)
3 sc, inc3, (5 sc, inc3) x 2, 2 sc (24)
Sl st into the next stitch and fasten off. Align one white and one orange piece with wrong sides together.
Attach orange yarn to the center stitch of the first inc3. 7 sc through both layers, change to brown, 1 sc, inc3, 1 sc, change back to orange, 6 sc, sc + sl st in the last stitch.
Start with brown yarn.
6 sc in mr (6)
(inc3 x 2, 1 sc) x 2 (14)
1 sc in each st (14)
3 sc, inc, 5 sc, 2 dec, 1 sc (13)
4 sc, inc, 5 sc, dec, 1 sc (13)
10 sc, dec, 1 sc (12)
10 sc, dec (11)
9 sc, dec (10)
1 sc in each st (10)
Switch to orange yarn.
1 sc in each st (10)
Stuff the hand and arm. Place the joint disk between Rounds 20 and 21.
5 dec (5)
Start with brown yarn.
6 sc in mr (6)
(inc3 x 2, 1 sc) x 2 (14)
1 sc in each st (14)
2 sc, 2 dec, 5 sc, inc, 2 sc (13)
2 sc, dec, 5 sc, inc, 3 sc (13)
2 sc, dec, 9 sc (12)
1 sc, dec, 9 sc (11)
1 sc, dec, 8 sc (10)
1 sc in each st (10)
Switch to orange yarn.
1 sc in each st (10)
6 sc, 2 dec (8)
Stuff the hand and arm. Place the joint disk between Rounds 20 and 21.
3 dec, skip remaining stitches (5)
Make two, starting with brown yarn.
6 sc in mr (6)
6 inc (12)
(1 sc, inc) x 6 (18)
(3 sc, inc, 4 sc, inc) x 2 (22)
1 sc in each st (22)
7 sc, dec, 2 sc, dec, 9 sc (20)
5 sc, dec, (1 sc, dec) x 2, 7 sc (17)
5 sc, dec, 2 sc, dec, 6 sc (15)
6 sc, dec, 7 sc (14)
1 sc in each st (14)
6 sc, dec, 6 sc (13)
1 sc in each st (13)
Switch to orange yarn.
1 sc in each st (13)
For the left leg only, work 6 extra sc at the end of Round 26. Insert joint disk between Rounds 25 and 26.
dec, 6 sc, dec, 3 sc (11)
5 dec (6)
Use orange yarn.
6 sc in mr (6)
6 inc (12)
(1 sc, inc) x 6 (18)
(inc, 2 sc) x 6 (24)
(3 sc, inc) x 6 (30)
1 sc, inc, (4 sc, inc) x 5, 3 sc (36)
3 sc, inc, (8 sc, inc) x 3, 5 sc (40)
(9 sc, inc) x 4 (44)
1 sc in each st (44)
Attach legs to the sides of the body between Rounds 9 and 10.
(9 sc, dec) x 4 (40)
3 sc, dec, (8 sc, dec) x 3, 5 sc (36)
(7 sc, dec) x 4 (32)
1 sc in each st (32)
(dec, 14 sc) x 2 (30)
1 sc in each st (30)
12 sc, dec, 4 sc, dec, 10 sc (28)
1 sc in each st (28)
(dec, 5 sc) x 4 (24)
1 sc in each st (24)
9 sc, dec, 4 sc, dec, 7 sc (22)
1 sc in each st (22)
Attach arms to the sides of the body between Rounds 27 and 28.
5 sc, dec, 9 sc, dec, 4 sc (20)
1 sc in each st (20)
5 sc, leave remaining stitches unworked (20)
Start with white yarn.
6 sc in mr (6)
(1 sc, inc) x 3 (9)
(inc, 2 sc) x 3 (12)
(2 sc, inc) x 4 (16)
1 sc, inc, (3 sc, inc) x 3, 2 sc (20)
Switch to orange yarn.
1 sc in each st (20)
(dec, 8 sc) x 2 (18)
1 sc in each st (18)
4 sc, dec, 7 sc, dec, 3 sc (16)
1 sc in each st (16)
7 sc, dec, 7 sc (15)
1 sc in each st (15)
7 sc, dec, 6 sc (14)
1 sc in each st (14)
7 sc, dec, 5 sc (13)
1 sc in each st (13)
7 sc, dec, 4 sc (12)
1 sc in each st (12)
(1 sc, dec) x 4 (8)
I hope you enjoy making this little fox as much as I did! He has such a sweet, soulful look once those eyes are sculpted in. Whether he's destined for a woodland-themed nursery or just a spot on your desk, he's sure to bring a bit of forest magic into your home. Don't forget to take a moment to really get those features positioned just right — it makes all the difference in his personality. Happy stitching! 🧶🦊✨
Absolutely! You can use safety eyes as joints by following the same placement instructions, though they won't be quite as sturdy as dedicated doll joints.
This usually happens if the legs are attached too far forward or back. Try pinning them in different spots between rounds 9 and 10 until he finds his balance before securing them.
It's optional, but highly recommended! It really defines the bridge of the nose and gives the fox that adorable, expressive face seen in the photos.
Yes, but your fox will turn out significantly larger. Just make sure to size up your hook and safety eyes accordingly to keep the proportions right.
