🧶 Beautiful ✨ Detailed 💝 Adorable

Crochet Bunny Hand Puppet Amigurumi Pattern

Crochet Bunny Hand Puppet Amigurumi Pattern
4.8★Rating
3-5 HoursTime Needed
4.1KMade This
✂️

Intermediate Level

Ideal for those with basic crocheting experience, featuring slightly more advanced stitches and techniques to expand your skills.

⏱️

Quick Craft

Fits nicely into a free afternoon — 2 to 5 hours of focused, enjoyable crocheting.

🐰

Whimsical Buddy

Playful characters full of personality, designed to spark imagination and become cherished playtime favorites.

About This Crochet Bunny Hand Puppet Amigurumi Pattern

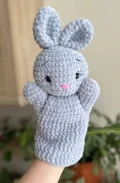
Crochet Bunny Hand Puppet Amigurumi Pattern crochet pattern - detailed view

Pop this bunny on your hand and watch little ones light up — it makes the sweetest handmade gift for a new baby, a birthday, or any occasion that calls for something truly one-of-a-kind.

Why You'll Love This Crochet Bunny Hand Puppet Amigurumi Pattern

I honestly wasn't expecting to enjoy this one as much as I did — the part where you crochet the arms directly into Round 5 of the body is so satisfying when it comes together. There's something almost magical about watching a flat circle of chains turn into a working glove that fits your hand perfectly. I also love how the head is a proper stuffed amigurumi piece, so it has that lovely round weight to it when you're performing. Every time I make a puppet, I end up putting it on immediately and refusing to take it off for at least an hour.

Crochet Bunny Hand Puppet Amigurumi Pattern step 1 Crochet Bunny Hand Puppet Amigurumi Pattern step 2 Crochet Bunny Hand Puppet Amigurumi Pattern step 3 Crochet Bunny Hand Puppet Amigurumi Pattern step 4

Switch Things Up

I made my first hand puppet years ago and honestly thought it was going to be way harder than a regular amigurumi. The idea of crocheting something hollow that needed to fit a hand felt complicated before I started. But this bunny pattern completely changed my mind about puppets.

The construction is genuinely clever. You make the head exactly like a standard amigurumi — magic ring, increases out, then decreases back in, stuff it, close it. That part feels familiar and comfortable. Then the body starts from a foundation chain ring and grows outward, and when you hit Round 5, you just... crochet the arms straight in. No sewing, no positioning pins, no second-guessing. They're locked in, symmetrical, and they look great.

The switch from single crochet to double crochet in the lower body section is the bit I love most. The dc creates this slightly looser, stretchier fabric that actually makes the glove section wearable on different hand sizes. It also works up fast — six rounds of dc goes quickly and you can feel the finish line approaching.

If I were making this again I'd try it in a warm cream or dusty rose instead of gray. The plush yarn in softer tones makes the embroidered pink nose really pop. You could also make the ears slightly longer by adding two extra even rounds before the decrease row — taller ears give it more of a classic Easter bunny silhouette.

This puppet has become my go-to handmade gift for new parents. It's practical, it's adorable, and it genuinely delights kids and grown-ups equally.

Common Mistakes & How to Fix Them

✗ When crocheting Round 5 of the body with the arms attached, it's easy to lose track of which stitches are shared with the arm and which are body-only — count carefully: 7 joined, 13 body, 7 joined, 15 body, and place a marker at each transition point.✗ The sc2tog joins at Round 6 on both sleeve sides can create a twisted or puckered look if your tension is too tight — work these stitches slightly looser than the rest of the round to keep the join flat and tidy.✗ Placing the safety eyes too close together or too low on the head is one of the most common issues here — the pattern specifies 9 sc apart and between rounds 10 and 11 from the top, so count carefully before snapping them in since they can't be moved after.✗ The ears are folded in half and then folded again before sewing — skipping the quadruple fold step and just sewing them flat will make them look wide and floppy rather than upright and perky, so take the extra minute to fold them properly.✗ When transitioning from sc to dc in Round 8-9 of the body, not adding the turning chain before starting the dc rounds will make the edge uneven and the glove section will have a visible dip — don't skip the ch at the end of Round 8.✗ Stuffing the head too firmly before closing Round 15 onward can distort the shape and make it hard to attach cleanly to the body — aim for a firm but slightly squeezable result so the neck join sits flat.

Crochet Bunny Hand Puppet Amigurumi Pattern

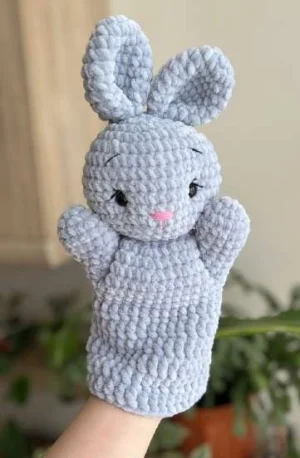
This little bunny hand puppet is one of those projects that just makes you smile the whole way through. Your fingers slide right in, and suddenly there's a whole character ready to hop into someone's imagination. Whether you're making it for a toddler's storytime, a nursery shelf, or just because you needed a new crochet project this weekend — this one delivers. The construction is clever and satisfying, moving from a plush stuffed head down into a glove-style body that actually fits your hand. You'll end up with something genuinely useful and ridiculously cute.

Intermediate 3-5 Hours

Materials Needed for Crochet Bunny Hand Puppet Amigurumi Pattern

— Main Fabric

  • 01
    Super bulky plush yarn in gray — approximately 100g per skein (120m/131yd); one skein needed for the main body, head, ears, and arms
  • 02
    Sport weight cotton yarn in black — a small amount used only for embroidering the eyelashes and eyebrows
  • 03
    Sport weight cotton yarn in pink — just a few meters needed to embroider the nose
  • 04
    Sport weight cotton yarn in gray — a small amount used for sewing the finished pieces together

— Tools Required

  • 01
    4.5 mm crochet hook
  • 02
    Large tapestry or yarn needle for sewing and embroidery
  • 03
    Stitch markers to track round beginnings and arm attachment points
  • 04
    A pair of 8 mm plastic safety eyes
  • 05
    Polyester fiber fill for stuffing the head

Progress Tracker

0% Complete

— 1. Head :

Info :

Work the head using the gray super bulky plush yarn and a 4.5 mm hook throughout.

Round 1 :

Start with a MR, work 7 sc into the ring. (7)

Round 2 :

Work inc in every stitch around. (14)

Round 3 :

Work inc in every stitch around. (28)

Round 4 :

*(3 sc, inc)* — repeat 7 times total. (35)

Round 5 :

*(4 sc, inc)* — repeat 7 times total. (42)

Round 6 :

*(13 sc, inc)* — repeat 3 times total. (45)

Round 7 :

45 sc evenly around. (45)

Round 8 :

45 sc evenly around. (45)

Round 9 :

45 sc evenly around. (45)

Round 10 :

45 sc evenly around. (45)

Round 11 :

45 sc evenly around. (45)

Round 12 :

*(13 sc, dec)* — repeat 3 times total. (42)

Round 13 :

*(4 sc, dec)* — repeat 7 times total. (35)

Round 14 :

*(3 sc, dec)* — repeat 7 times total. (28)

Info :

Insert the 8 mm plastic safety eyes now, positioning them between rounds 10 and 11 counting down from the top of the head. The two eyes should sit 9 sc apart from each other. Once placed, stuff the head firmly with fiber fill before continuing.

Round 15 :

*(2 sc, dec)* — repeat 7 times total. (21)

Round 16 :

*(1 sc, dec)* — repeat 7 times total. (14)

Round 17 :

Work dec 7 times around. (7) Thread the yarn tail through all 7 remaining loops, pull snug to close, cut and weave in the end.

— 2. Ears (Make 2) :

Info :

Use the gray super bulky plush yarn and 4.5 mm hook. Do not stuff the ears. Make 2 identical pieces.

Round 1 :

Work 7 sc into a MR. (7)

Round 2 :

Work inc in every stitch around. (14)

Round 3 :

Work 14 sc around with no increases. (14)

Round 4 :

*(1 sc, inc)* — repeat 7 times total. (21)

Round 5 :

21 sc evenly around. (21)

Round 6 :

21 sc evenly around. (21)

Round 7 :

21 sc evenly around. (21)

Round 8 :

21 sc evenly around. (21)

Round 9 :

*(1 sc, dec)* — repeat 7 times total. (14)

Round 10 :

Work 14 sc around, then close with a sl st. Leave a long yarn tail for attaching to the head. Cut the yarn. Do not stuff.

— 3. Arms (Make 2) :

Info :

Use the gray super bulky plush yarn and 4.5 mm hook. Do not stuff the arms. Make 2 identical pieces.

Round 1 :

Work 6 sc into a MR. (6)

Round 2 :

Work inc in every stitch around. (12)

Round 3 :

*(2 sc, inc)* — repeat 4 times total. (16)

Round 4 :

16 sc evenly around. (16)

Round 5 :

16 sc evenly around. (16)

Round 6 :

*(2 sc, dec)* — repeat 4 times total. (12)

Round 7 :

12 sc evenly around. (12)

Round 8 :

12 sc evenly around. (12)

Round 9 :

12 sc evenly around. (12) Finish with a sl st, cut the yarn. Do not stuff.

— 4. Body :

Info :

Use the gray super bulky plush yarn and 4.5 mm hook. Leave a long starting tail for sewing. Begin without a sl st — chain 24 and join with a sl st into the very first chain to form a ring.

Round 1 :

Work 24 sc around the ring. (24)

Round 2 :

*(3 sc, inc)* — repeat 6 times total. (30)

Round 3 :

*(4 sc, inc)* — repeat 6 times total. (36)

Round 4 :

*(5 sc, inc)* — repeat 6 times total. (42)

Round 5 :

Attach arms in this round: work 7 sc joined together with the first arm, then 13 sc on the body only, then 7 sc joined together with the second arm, then 15 sc on the body only. (42) Note: use sc2tog at each transition edge to prevent holes where the arm meets the body.

Round 6 :

sc2tog at the first arm join edge, 4 sc on the first arm only, sc2tog at the other arm edge, 12 sc on the body only, sc2tog at the second arm join edge, 4 sc on the second arm only, sc2tog at its other edge, 14 sc on the body only. (38)

Round 7 :

dec, 2 sc, dec, 12 sc, dec, 2 sc, dec, 14 sc. (34)

Round 8 :

34 sc around, then ch 1 to prepare for the double crochet section. (34)

Round 9 :

34 dc around. (34)

Round 10 :

34 dc around. (34)

Round 11 :

34 dc around. (34)

Round 12 :

34 dc around. (34)

Round 13 :

34 dc around. (34)

Round 14 :

34 dc around. (34) Fasten off and weave in ends. The glove body section is complete.

— 5. Embroidery & Eye Indenting :

Info :

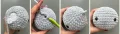
Eye indenting: Thread a length of gray cotton yarn onto a large needle. Push it through from the back of the head, emerging just above the left eye. Leave a tail at the back. Pass the needle up from below the left eye, ensuring the yarn catches on the inside of the eye. Bring the needle under and out below the right eye, then pass it back down from above the right eye so the thread presses the inside edge. Pull both thread ends at the back of the head until the eyes sink in naturally, then knot securely and tuck the tails inside the head.

Info :

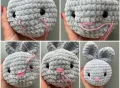
Nose embroidery: Using pink sport weight cotton yarn and a large needle, embroider a small nose shape centered on the face between the eyes.

Info :

Eye detail embroidery: Using thin black sport weight yarn and a large needle, embroider eyelashes and eyebrows above and around each eye to give the bunny its expression.

Assembly Instructions

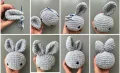
  • Fold each completed ear in half lengthwise, then fold in half again so it is quadrupled in thickness. Position both ears on top of the head with roughly 1–2 cm of space between them, and sew firmly in place using the long yarn tail.
  • With the gray cotton yarn and large needle, work through the head from back to front to indent both safety eyes as described in the embroidery section, pulling the threads until the eyes sit visibly sunken before knotting off.
  • Using pink yarn, embroider the nose centered on the face between the two eyes. Then switch to thin black yarn and add the eyelashes and eyebrows to complete the facial expression.
  • Hold the finished head against the open top edge of the body (the foundation chain end) and align the face forward. Using the gray cotton yarn threaded onto your large needle, sew the head to the body all the way around, joining them securely.

Important Notes

  • 💡The body begins with a foundation chain of 24 that is joined into a ring — leave a long starting tail here because you'll use it later to help sew the body to the head cleanly.
  • 💡When attaching the arms during Round 5 of the body, work a sc2tog at each edge where the arm meets the body fabric to close any gaps — skipping this step will leave visible holes around the arm joins.
  • 💡The ears should not be stuffed at all — keeping them flat and folding them before sewing is what gives them their characteristic upright bunny shape.
  • 💡The safety eyes must be inserted and secured after Round 14 and before continuing to Round 15 — once you start decreasing, the opening becomes too small to work safely.
  • 💡The lower glove section of the body switches from sc to dc starting at Round 9 — the dc stitch creates a stretchier, more open fabric that makes the glove comfortable to wear on different hand sizes.
  • 💡When closing the final 7 loops of the head after Round 17, thread the yarn tail through each loop with a needle rather than pulling directly through with the hook, for the cleanest possible closure.

There's something really special about a toy that actually does something — and this bunny hand puppet is exactly that kind of project. 🐰 You pour in a couple of hours, a skein of soft plush yarn, and what comes out is a character with a whole personality: round stuffed head, sunken expressive eyes, that sweet pink nose. Then your hand goes in and the bunny comes to life. ✨ Whether this one ends up in a toddler's toy basket, on a nursery shelf, or in a gift bag heading to a new mama — you're going to feel genuinely proud of this make. Now go grab your hook! 🧶
You ask,

we answer.

FAQs

Can I use a different yarn brand for this pattern?

Totally — the pattern calls for a super bulky plush yarn around 120m per 100g, so any yarn in that weight range will work. Just keep in mind that the plush or chenille texture is what gives the puppet its soft, fluffy look. A standard super bulky acrylic will work structurally but will have a smoother, less cloud-like finish.

My Round 5 arm attachment looks messy and has holes — what went wrong?

This is really common! The key is working sc2tog at every edge where the arm fabric meets the body fabric. If you just crocheted straight through without those joining decreases, the seam will have gaps. Round 6 also continues tightening those joins — work through it carefully and the holes will close up.

How do I know when the head is stuffed enough before closing?

The head should feel firm and hold its round shape when you set it down, but you should still be able to press a finger into it slightly. Overstuffing can distort the stitch pattern and make the finished head look stretched. Under-stuffing leaves it floppy and makes sewing to the body harder.

Is this puppet sized for a child's hand or an adult's?

The finished puppet measures about 28 cm (11 inches) tall, and the glove section is based on 34 dc around. It fits a standard adult hand comfortably. For a child to use it independently, the dc section could be shortened by 2–3 rounds to bring the glove opening in a bit.

Do I really need the sport weight cotton yarn in addition to the bulky plush yarn?

Yes — the fine sport weight cotton in black, pink, and gray is used only for embroidery and for the eye-indenting technique. Using the thick plush yarn for embroidery would create very clunky facial features. The contrast between the chunky plush body and the delicate embroidered details is what makes the face look so expressive.