🧢 Beautiful ✨ Detailed πŸ’ Adorable

Little Forest Owl Amigurumi Pattern

Little Forest Owl Amigurumi Pattern
4.2β˜…Rating
2-3 HoursTime Needed
3.1KMade This
βœ‚οΈ

Beginner Friendly Level

Perfect for those just starting their crocheting journey, with clear instructions and simple techniques

⏱️

Quick Craft

Fits nicely into a free afternoon β€” 2 to 5 hours of focused, enjoyable crocheting.

🎁

Tiny Treasure

Small, sweet, and gift-worthy creations that fit perfectly in the palm of your hand with detailed charm.

About This Little Forest Owl Amigurumi Pattern
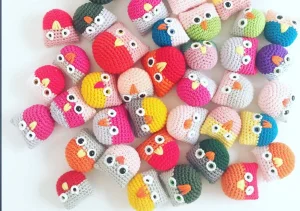
Little Forest Owl Amigurumi Pattern crochet pattern - detailed view

These make wonderful little pocket pals for kids or a thoughtful handmade addition to a gift basket for your craft-loving friends. They're so small you can take the project anywhere!

Why You'll Love This Little Forest Owl Amigurumi Pattern

I honestly can't get enough of how these little guys look in different color combos. It's one of those projects where you finish one and immediately want to start another because they're so satisfyingly fast and cute.

Little Forest Owl Amigurumi Pattern step 1 Little Forest Owl Amigurumi Pattern step 2 Little Forest Owl Amigurumi Pattern step 3 Little Forest Owl Amigurumi Pattern step 4

Switch Things Up

There is something so incredibly satisfying about a project you can start and finish in a single sitting, isn't there? I first made one of these little owls on a rainy Sunday afternoon when I just wanted to feel the rhythm of my hook without any stress. Before I knew it, I had a whole little family of them sitting on my coffee table!

What I love most about this design is how much personality you can pack into such a small shape. I've tried them in bright neons for a modern look, and in soft pastels for a more nursery-friendly vibe. If you want to get really creative, try using a variegated yarn for the bottom half of the bodyβ€”it creates a lovely feathered effect without any extra work.

A little tip from my craft room to yours: when you're embroidering the beak, try making it just a tiny bit asymmetrical. It gives the owl a quirky, handmade character that I just adore. These little guys also make the best keychains or backpack charms if you add a small lobster claw clasp to the top. I can't wait to see the color combinations you choose for your own parliament of owls!

Common Mistakes & How to Fix Them

βœ— When you're doing the color change at Round 9, make sure to finish the last stitch of Round 8 with the new color to keep the transition looking crisp and professional.βœ— If you don't pull the mr tight enough on the eye pieces, you'll have a gap in the center that makes the safety eyes sit a bit wonky.βœ— Don't overstuff the body near the top edge, or it will be really difficult to sew the seam flat and get those cute pointed ear shapes at the corners.βœ— Placing the eyes too high or too low can change the owl's expression completelyβ€”try pinning them in place before committing to the safety eye backs.
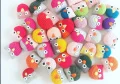
Little Forest Owl Amigurumi Pattern

These tiny owls are just the thing for using up those colorful yarn scraps you've been saving. They're quick to whip up and look adorable clustered together on a shelf or turned into a sweet keychain. You'll love how the simple shape comes to life with just a few finishing touches and your own creative color choices.

Beginner Friendly 2-3 Hours

Materials Needed for Little Forest Owl Amigurumi Pattern

β€” Main Fabric

  • 01
    Cotton DK weight yarn in your choice of two contrasting colors for the body
  • 02
    Small amount of white DK weight yarn for the eye circles
  • 03
    Scrap of orange or yellow yarn for the embroidered beak

β€” Tools Required

  • 01
    2.5mm or 3.0mm crochet hook (or size needed to match your yarn weight)
  • 02
    One pair of 6mm or 8mm safety eyes
  • 03
    Polyester fiberfill stuffing
  • 04
    Tapestry needle for assembly and embroidery
  • 05
    Sharp scissors
  • 06
    Stitch markers to track your rounds

Progress Tracker

0% Complete

β€” 1. The Body :

Round 1 :

start with 6 sc into a mr (6)

Round 2 :

work 1 inc into every st from the previous round (12)

Round 3 :

work a sequence of 1 sc followed by 1 inc, repeating this 6 times total (18)

Round 4 :

crochet 2 sc then 1 inc, and repeat that pattern 6 times around (24)

Info :

Note: The original pattern contains a typo 'increasee' in Round 4, which refers to a standard increase.

Round 5 :

work 1 sc into every st around (24)

Round 6 :

simply place 1 sc in each st for this round (24)

Round 7 :

continue with 1 sc in every st around (24)

Round 8 :

do one more round of 1 sc in each st (24)

Colour Change :

Switch to your second yarn color now

Round 9 :

with the new color, work 1 sc in each st around (24)

Round 10 :

work 1 sc in every st for the tenth round (24)

Round 11 :

place 1 sc into each st around (24)

Round 12 :

continue the pattern with 1 sc in every st (24)

Round 13 :

work 1 sc in each st around (24)

Round 14 :

finish the body with one last round of 1 sc in every st (24)

Info :

cut your yarn and pull the tail through to fasten off, leaving enough length for sewing

β€” 2. The Eyes (Make 2) :

Round 1 :

begin by making a mr and then ch 3

Round 2 :

work 10 dc into the center of your ring and pull the tail to close it tightly

Round 3 :

finish the eye by making 1 sl st into the top of that first dc

Assembly Instructions

  • Take your white eye circles and pop the safety eyes through the center hole of each one.
  • Position the eyes on the front of the body and push the posts through the crochet fabric, then secure them with the washers on the inside.
  • Stuff the body firmly with fiberfill, making sure it holds its shape but isn't bulging too much at the top.
  • Flatten the top edge of the body and sew it shut using a whip stitch or mattress stitch across the opening.
  • Pinch the outer corners of the top seam to create the pointed ear shapes.
  • Use a scrap of orange yarn to embroider a small V-shaped beak right between and slightly below the eyes.

Important Notes

  • πŸ’‘Use a smaller hook than the yarn label suggests to ensure your stitches are tight enough that the stuffing doesn't peek through.
  • πŸ’‘When sewing the top shut, make sure the eyes are centered on the front face of the owl.
  • πŸ’‘If you prefer, you can embroider the eyes with black yarn instead of using plastic safety eyes if this is for a very small child.
  • πŸ’‘The ears are formed naturally by the corners of the flat top seam, so don't be afraid to give them a little extra pinch to define the shape.

I hope you have as much fun making these little owls as I did! They are such a great way to experiment with color without committing to a huge project. Whether you make one or a whole parliament of owls, they’re sure to bring a smile to anyone who sees them. Don't forget to play around with different yarn textures tooβ€”a fuzzy yarn would make a very cozy winter owl! Happy stitching, and I can't wait to see your creations. 🧢✨

You ask,

we answer.

FAQs

What size safety eyes work best for this owl?

I find that 6mm or 8mm eyes look the best. The 6mm gives a more delicate look, while 8mm makes them look extra 'kawaii' and wide-eyed.

How do I make the ears look more pointed?

After sewing the top closed, use your fingers to firmly pinch the corners. You can even add a tiny stitch through the corner to hold that pointed shape if the yarn is very soft.

Can I use worsted weight yarn instead of DK?

Absolutely! Just use a 3.5mm or 4.0mm hook. Your owl will turn out a bit larger, but the proportions will stay exactly the same.

How do I hide the yarn tails from the eyes?

When you sew the eyes onto the body, pull the tails through to the inside of the body before you finish stuffing and closing the top.