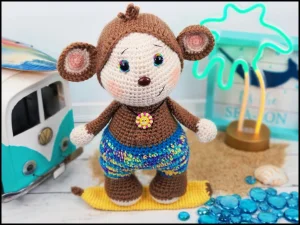
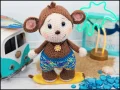
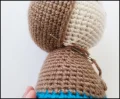
Get ready to bring some tropical sunshine into your craft room with Oakley! This little guy is the ultimate beach bum, complete with his very own surfboard and adorable swim trunks. You'll love watching his personality come to life as you work through the shaping of his face and the fun color changes in his outfit. It's the kind of project that makes you want to pack a bag and head for the coast, and I've made sure the instructions are as breezy as a summer day.
Progress Tracker
0% Complete
— 1. Legs (Make 2) :
Info :
Begin with the cream yarn (Color B).
Round 1 :
Create a mr and work 6 sc into it (6)
Round 2 :
Work 1 inc into every stitch around (12)
Round 3 :
Repeat (1 sc, 1 inc) 6 times (18)
Round 4 :
Repeat (2 sc, 1 inc) 6 times (24)
Round 5 :
Repeat (3 sc, 1 inc) 6 times (30)
Round 6 :
sc in every stitch around (30)
Colour Change :
Switch to your brown yarn (Color A).
Round 7-8 :
sc in each stitch around (30)
Round 9 :
Work 6 dec, then sc in the remaining 18 stitches (24)
Round 10 :
2 sc, 1 dec, 9 sc, 2 dec, 7 sc (21)
Info :
Start adding stuffing to the feet now.
Round 11-13 :
sc in each stitch around (21)
Colour Change :
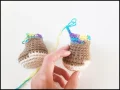
Switch to your variegated yarn (Color C).
Round 14 :
Repeat (6 sc, 1 inc) 3 times (24)
Info :
On the first leg, mark the 3rd stitch with a marker and fasten off. For the second leg, do not fasten off.
— 2. Joining the Legs :
Info :
We're going to shift the starting position on the second leg by working 6 extra sc.
Step 1 :
ch 4, then join to the first leg by working 1 sc into the marked stitch.
Step 2 :
Work 23 more sc around the first leg, 4 sc across one side of the ch 4, 24 sc around the second leg, and 4 sc across the other side of the ch 4 (56)
— 3. Body :
Round 1 :
sc in every stitch around (56)
Round 2 :
Repeat (13 sc, 1 inc) 4 times (60)
Round 3-6 :
sc in every stitch around (60)
Round 7 :
Repeat (8 sc, 1 dec) 6 times (54)
Info :
Stuff the body as you go to keep the shape firm.
Round 8 :
sc in every stitch around (54)
Round 9 :
Repeat (7 sc, 1 dec) 6 times (48)
Round 10 :
At stitch 30, switch to blue (Color E) and sc in each stitch around (48)
Round 11 :
Repeat (6 sc, 1 dec) 6 times (42)
Round 12 :
At stitch 25, switch to brown (Color A) and sc in each stitch around (42)
Round 13 :
sc in every stitch around (42)
Round 14 :
Repeat (5 sc, 1 dec) 6 times (36)
Round 15 :
Work 2 sc, 1 Bob for the belly button, then 33 sc (36)
Round 16-17 :
sc in every stitch around (36)
Round 18 :
Repeat (10 sc, 1 dec) 3 times (33)
Round 19 :
sc in every stitch around (33)
Round 20 :
Repeat (9 sc, 1 dec) 3 times (30)
Round 21 :
sc in every stitch around (30)
Round 22 :
Repeat (8 sc, 1 dec) 3 times (27)
Round 23 :
sc in every stitch around (27)
Round 24 :
Repeat (7 sc, 1 dec) 3 times (24)
Info :
Fasten off and leave a long length of yarn for attaching to the head.
— 4. Head :
Info :
Start with cream yarn (Color B). We'll work from the top down.
Round 1 :
6 sc into a mr (6)
Round 2 :
inc in every stitch around (12)
Round 3 :
Repeat (1 sc, 1 inc) 6 times (18)
Round 4 :
1 sc, 1 inc, then repeat (2 sc, 1 inc) 5 times, finishing with 1 sc (24)
Round 5 :
Repeat (3 sc, 1 inc) 6 times (30)
Round 6 :
2 sc, 1 inc, then repeat (4 sc, 1 inc) 5 times, finishing with 2 sc (36)
Round 7 :
Repeat (5 sc, 1 inc) 6 times (42)
Round 8 :
3 sc, 1 inc, then repeat (6 sc, 1 inc) 5 times, finishing with 3 sc (48)
Round 9-13 :
sc in every stitch around (48)
Round 14 :
10 sc, 6 inc, 10 sc, 6 inc, 16 sc (60)
Round 15-18 :
sc in every stitch around (60)
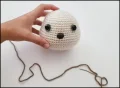
Info :
Insert eyes between rounds 11 and 12, about 10 stitches apart. Place the nose between rounds 14 and 15, centered between the eyes.
Round 19 :
10 sc, repeat (1 sc, 1 dec) 3 times, 12 sc, repeat (1 sc, 1 dec) 3 times, 20 sc (54)
Round 20 :
Repeat (7 sc, 1 dec) 6 times (48)
Round 21 :
sc in every stitch around (48)
Round 22 :
Repeat (6 sc, 1 dec) 6 times (42)
Round 23 :
Repeat (5 sc, 1 dec) 6 times (36)
Info :
To get the sunken eye look, stuff the head and use a long piece of yarn to pull the eye sockets inward, threading back and forth between them. See assembly for details.
Round 24 :
sc in every stitch around (36)
Round 25 :
Repeat (4 sc, 1 dec) 6 times (30)
Round 26 :
Repeat (3 sc, 1 dec) 6 times (24)
Info :
Fasten off and leave a short tail.
— 5. Cap :
Info :
Use brown yarn (Color A).
Round 1 :
6 sc in a mr (6)
Round 2 :
inc in every stitch (12)
Round 3 :
Repeat (1 sc, 1 inc) 6 times (18)
Round 4 :
Repeat (2 sc, 1 inc) 6 times (24)
Round 5 :
Repeat (3 sc, 1 inc) 6 times (30)
Round 6 :
Repeat (4 sc, 1 inc) 6 times (36)
Round 7 :
Repeat (5 sc, 1 inc) 6 times (42)
Round 8 :
Repeat (6 sc, 1 inc) 6 times (48)
Round 9 :
Repeat (7 sc, 1 inc) 6 times (54)
Round 10 :
Repeat (8 sc, 1 inc) 6 times (60)
Round 11-18 :
sc in every stitch around (60)
Round 19 :
18 sc, 2 sl, 3 hdc, 4 dc, 3 hdc, 2 sl, 3 hdc, 4 dc, 3 hdc, 2 sl, 10 sc (60)
Info :
Fasten off and leave a long tail for sewing.
— 6. Ears (Make 2) :
Info :
You will need to make 2 brown inner ears and 2 cream outer ears. Start with cream.
Round 1 :
6 sc in a mr (6)
Round 2 :
inc in every stitch (12)
Round 3 :
Repeat (1 sc, 1 inc) 6 times (18)
Round 4 :
Repeat (2 sc, 1 inc) 6 times (24)
Info :
Don't fasten off the brown pieces! Place one brown and one cream piece back-to-back.
Round 5 :
Work through both layers: Repeat (3 sc, 1 inc) 6 times (30)
Info :
Fasten off and leave a long tail for sewing.
— 7. Arms (Make 2) :
Info :
Start with cream yarn (Color B).
Round 1 :
6 sc in a mr (6)
Round 2 :
inc in every stitch (12)
Round 3 :
Repeat (3 sc, 1 inc) 3 times (15)
Round 4 :
sc in every stitch (15)
Round 5 :
Work 1 cluster, ch 1, then sc in the next 14 stitches (15)
Round 6 :
Skip the ch 1 from the previous round and repeat (3 sc, 1 dec) 3 times (12)
Round 7 :
Repeat (2 sc, 1 dec) 3 times (9)
Colour Change :
Switch to brown yarn (Color A). Stuff the hands only.
Round 8-19 :
sc in each stitch around (9)
Info :
Flatten the top of the arm and sc the opening shut. Leave a tail for sewing.
— 8. Tail :
Info :
Start with cream yarn (Color B).
Round 1 :
4 sc in a mr (4)
Round 2 :
inc in every stitch (8)
Round 3-5 :
sc in every stitch (8)
Colour Change :
Switch to brown yarn (Color A).
Round 6-29 :
sc in every stitch around (8)
Info :
Instead of stuffing, insert a folded and twisted pipe cleaner for poseability. Flatten the end and sc shut.
— 9. Surfboard :
Info :
Start with brown yarn (Color A).
Round 1 :
4 sc in a mr (4)
Round 2-4 :
sc in every stitch (4)
Colour Change :
Switch to yellow yarn (Color D).
Round 5 :
inc in every stitch (8)
Round 6 :
Repeat (1 sc, 1 inc) 4 times (12)
Round 7 :
Repeat (2 sc, 1 inc) 4 times (16)
Round 8 :
sc in every stitch (16)
Round 9 :
Repeat (3 sc, 1 inc) 4 times (20)
Round 10-44 :
sc in every stitch around (20)
Round 45 :
Repeat (3 sc, 1 dec) 4 times (16)
Round 46 :
sc in every stitch (16)
Round 47 :
Repeat (2 sc, 1 dec) 4 times (12)
Colour Change :
Switch back to brown (Color A).
Round 48 :
dec 6 times (6)
Info :
Fasten off and sew the end closed. Do not stuff the surfboard.
I hope you had as much fun making Oakley as I did! There's something so rewarding about finishing those final details, like the little tufts of hair and that tiny surfboard. He's such a character, and I'm sure he's going to be a huge hit wherever he ends up. Don't forget to share your finished surfers with the community—seeing your color choices for the swim trunks is always a highlight for me! Happy crafting, and may your stitches always be even and your yarn never tangle. 🧶 🐒 ✨