About This Sporty High-Top Baby Sneaker Pattern
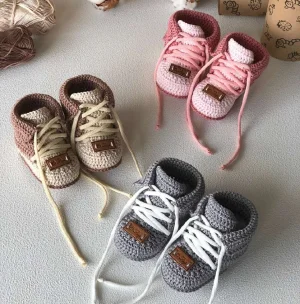
These make the ultimate baby shower gift that everyone will be talking about. They're so much more special than store-bought socks and look amazing in newborn photo shoots.
Ideal for those with basic crocheting experience, featuring slightly more advanced stitches and techniques to expand your skills.
Fits nicely into a free afternoon — 2 to 5 hours of focused, enjoyable crocheting.
An elegant detail to elevate any look, combining traditional techniques with contemporary design sensibilities.
These make the ultimate baby shower gift that everyone will be talking about. They're so much more special than store-bought socks and look amazing in newborn photo shoots.
I love how these come together! The way the toe shaping happens is like magic, and adding the laces at the end is so satisfying. It's a great project for using up those high-quality cotton scraps you've been saving.

I still remember the first time I tried making baby shoes; I was so intimidated by the shaping! But honestly, once you get the hang of how the toe decreases work, it’s like a lightbulb goes off. These sneakers are my absolute favorite to gift because they look so professional. I usually go for a classic red or a cool navy blue, but I’ve seen some makers use variegated yarn for a 'graffiti' look that is just too cool.
One little tip from my workbench: when you're doing the sidepiece, really pay attention to that first round of post stitches. It sets the foundation for the whole 'shoe' part to stand up. If you find the boots are a bit floppy, try dropping down a hook size just for the upper sections. It makes the fabric nice and dense. I love sitting down with a cup of tea and finishing a whole pair in one weekend—it’s such a satisfying 'quick win' project. Plus, seeing those tiny laces tied up at the end? It gets me every single time. I hope these bring as much joy to your nursery as they have to mine!
These little sneakers are just the cutest thing you'll ever hook up. They look like tiny versions of classic high-tops, complete with laces and a sporty sole. I love how sturdy they feel once they're finished, making them perfect for little ones who are starting to wiggle around. You can play with color combos to match any outfit, from classic red and white to soft pastels.
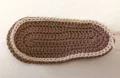
Using MC, ch 16. Work 2 dc in the 4th ch from hook, dc in next 11 sts, 6 dc in the last ch. Rotate to work along the bottom of the chain: dc in next 11 sts, 3 dc in the final st. Join with a sl st to the top of the starting ch. (34 sts)
ch 1 (counts as 1 sc), sc in same st, 1 sc, 2sc in next st, 4 sc, 2 hdc, 5 dc, [2dc in next st] 6 times, 5 dc, 2 hdc, 4 sc, 2sc in next st, 1 sc, 2sc in next st. Join with a sl st. (44 sts)
ch 3 (counts as 1 dc), dc in same st, [1 dc, 2dc in next st] 2 times, 11 dc, [2dc in next st, 1 dc] 6 times, 11 dc, [2dc in next st, 1 dc] 2 times, 2dc in next st. Join with a sl st and fasten off. (56 sts)
Join CC at the BOR with RS facing. Work sc around the post of each dc from the previous round (not into the top loops). RS should be inside the bootie. ch 1 (counts as sc), 55 sc around the posts. Join with a sl st. (56 sts)
ch 3 (counts as dc), dc in the next 55 sts. Join with a sl st. (56 sts)
ch 1 (counts as sc), sc in the next 55 sts. Join with a sl st and fasten off. (56 sts)
With WS facing, count 14 sts from BOR and join CC in the 15th st. ch 2, dc in next st, then dc2tog 13 times. (15 sts)
Turn to RS. ch 2, dc in next st, dc2tog 6 times. (8 sts)
Turn to WS. ch 2, dc6tog across the remaining stitches. Fasten off. (1 st)
Join MC at the designated spot on the side. ch 3 (counts as dc), dc in next st, dc in next 28 sts, dc in next 2 sts at the far edge. Turn. (32 sts)
ch 3 (counts as dc), dc in the next 31 sts. Turn at the end of every row. Fasten off after Row 10.
Using MC, ch 19. Work 2 dc in the 4th ch from hook, dc in next 14 sts, 6 dc in the last ch. Rotate to work along the bottom of the chain: dc in next 14 sts, 3 dc in the final st. Join with a sl st. (40 sts)
ch 1 (counts as 1 sc), sc in same st, 1 sc, 2sc in next st, 5 sc, 2 hdc, 7 dc, [2dc in next st] 6 times, 7 dc, 2 hdc, 5 sc, 2sc in next st, 1 sc, 2sc in next st. Join with a sl st. (50 sts)
ch 3 (counts as 1 dc), dc in same st, [1 dc, 2dc in next st] 2 times, 14 dc, [2dc in next st, 1 dc] 6 times, 14 dc, [2dc in next st, 1 dc] 2 times, 2dc in next st. Join with a sl st and fasten off. (62 sts)
Join CC at the BOR with RS facing. Work sc around the post of each dc from the previous round. ch 1 (counts as sc), 61 sc around the posts. Join with a sl st. (62 sts)
ch 3 (counts as dc), dc in the next 61 sts. Join with a sl st. (62 sts)
ch 1 (counts as sc), sc in the next 61 sts. Join with a sl st and fasten off. (62 sts)
With WS facing, count 15 sts from BOR and join CC in the 16th st. ch 2, dc in next st, then dc2tog 15 times. (17 sts)
Turn to RS. ch 2, dc in next st, dc2tog 7 times. (9 sts)
Turn to WS. ch 2, dc7tog across. Fasten off.
Join MC at the designated spot. ch 3 (counts as dc), dc in next st, dc in next 30 sts, dc in next 2 sts. Turn. (34 sts)
ch 3 (counts as dc), dc in the next 33 sts. Turn. Fasten off after Row 10.
Using MC, ch 22. Work 2 dc in the 4th ch from hook, dc in next 17 sts, 6 dc in the last ch. Rotate to work along the bottom of the chain: dc in next 17 sts, 3 dc in the final st. Join with a sl st. (46 sts)
ch 1 (counts as 1 sc), sc in same st, 1 sc, 2sc in next st, 6 sc, 2 hdc, 9 dc, [2dc in next st] 6 times, 9 dc, 2 hdc, 6 sc, 2sc in next st, 1 sc, 2sc in next st. Join with a sl st. (56 sts)
ch 3 (counts as 1 dc), dc in same st, [1 dc, 2dc in next st] 2 times, 17 dc, [2dc in next st, 1 dc] 6 times, 17 dc, [2dc in next st, 1 dc] 2 times, 2dc in next st. Join with a sl st and fasten off. (68 sts)
Join CC at the BOR with RS facing. Work sc around the post of each dc from the previous round. ch 1 (counts as sc), 67 sc around the posts. Join with a sl st. (68 sts)
ch 3 (counts as dc), dc in the next 67 sts. Join with a sl st. (68 sts)
ch 1 (counts as sc), sc in the next 67 sts. Join with a sl st and fasten off. (68 sts)
With WS facing, count 16 sts from BOR and join CC in the 17th st. ch 2, dc in next st, then dc2tog 17 times. (19 sts)
Turn to RS. ch 2, dc in next st, dc2tog 8 times. (10 sts)
Turn to WS. ch 2, dc8tog across. Fasten off.
Join MC at the designated spot. ch 3 (counts as dc), dc in next st, dc in next 32 sts, dc in next 2 sts. Turn. (36 sts)
ch 3 (counts as dc), dc in the next 35 sts. Turn. Fasten off after Row 10.
Using MC, ch 26. Work 2 dc in the 4th ch from hook, dc in next 21 sts, 6 dc in the last ch. Rotate to work along the bottom of the chain: dc in next 21 sts, 3 dc in the final st. Join with a sl st. (54 sts)
ch 1 (counts as 1 sc), sc in same st, 1 sc, 2sc in next st, 7 sc, 2 hdc, 12 dc, [2dc in next st] 6 times, 12 dc, 2 hdc, 7 sc, 2sc in next st, 1 sc, 2sc in next st. Join with a sl st. (64 sts)
ch 3 (counts as 1 dc), dc in same st, [1 dc, 2dc in next st] 2 times, 21 dc, [2dc in next st, 1 dc] 6 times, 21 dc, [2dc in next st, 1 dc] 2 times, 2dc in next st. Join with a sl st and fasten off. (76 sts)
Join CC at the BOR with RS facing. Work sc around the post of each dc from the previous round. ch 1 (counts as sc), 75 sc around the posts. Join with a sl st. (76 sts)
ch 3 (counts as dc), dc in the next 75 sts. Join with a sl st. (76 sts)
ch 1 (counts as sc), sc in the next 75 sts. Join with a sl st and fasten off. (76 sts)
With WS facing, count 18 sts from BOR and join CC in the 19th st. ch 2, dc in next st, then dc2tog 19 times. (21 sts)
Turn to RS. ch 2, dc in next st, dc2tog 9 times. (11 sts)
Turn to WS. ch 2, dc9tog across. Fasten off.
Join MC at the designated spot. ch 3 (counts as dc), dc in next st, dc in next 36 sts, dc in next 2 sts. Turn. (40 sts)
ch 3 (counts as dc), dc in the next 39 sts. Turn. Fasten off after Row 10.
Using CC, join yarn at the toe edge. ch 3 (counts as dc), work 6 dc into the horizontal stitches of the toe, 1 dc into the center stitch, 6 dc into the next horizontal toe stitches, and 1 dc in the final indicated stitch. Turn. (15 sts)
ch 3 (counts as dc), dc in the next 14 sts. Turn at the end of each row. Fasten off after Row 8.
If the baby has high arches or 'roly poly' feet, you can repeat the sidepiece Round 3 once or twice more before starting the toe to create a deeper shoe.
I really hope you enjoy making these tiny trainers! There's something so magical about seeing a little pair of shoes come to life from just a bit of string and a hook. They're the perfect project for a rainy afternoon or a long car ride. Once you finish one, the second one always flies by. Don't forget to take a photo of your finished pair—they are seriously camera-ready! Happy crocheting, and I can't wait to see the color combinations you choose for your little one. 🧶✨
You can, but cotton is recommended because it's more breathable for babies and provides the structural stiffness needed for the sneaker shape.
Check your dc height; if your stitches are too short, the sole won't reach the width needed. Try using a slightly larger hook for the sole only.
Cotton cord tends to grip better than satin ribbon, but if you use ribbon, a double knot is usually necessary to keep them secure on wiggly feet.
It's best for someone who knows the basics. The toe shaping and working into the posts of stitches can be a bit fiddly if it's your very first project.
