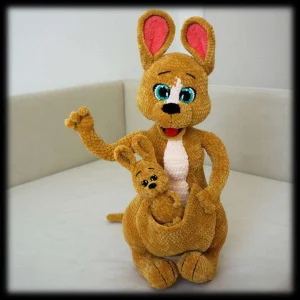
There is something truly magical about the bond between a mother and her baby, and capturing that in crochet is such a rewarding experience. This pattern helps you create a stunning, large-scale kangaroo complete with a functional pouch for her little joey. You'll love working with velvet yarn to achieve that irresistibly soft, huggable texture. It's a significant project that rewards your patience with a professional-quality heirloom piece that looks beautiful in any nursery or collection.
Progress Tracker
0% Complete
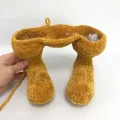
— 1. Mama Legs (Make 2) :
Round 1 :
Using the 3.5mm hook and brown yarn, ch 21. Starting in the 2nd ch from hook: 2 sc, 9 sc, 9 hdc, 4 hdc in the last ch. Work along the other side of the chain: 9 hdc, 9 sc, 2 sc in the starting ch (44)
Round 2 :
2 inc, 9 sc, 9 hdc, 4 inc using hdc, 9 hdc, 9 sc, 2 inc (52)
Round 3 :
(1 sc, 1 inc)*2, 9 sc, 9 hdc, (1 hdc, 1 inc using hdc)*4, 9 hdc, 9 sc, (1 sc, 1 inc)*2 (60)
Round 4 :
60 sl st around (60)
Round 5 :
Work 60 sc in blo (60)
Round 9 :
Switch to 3.0mm hook. 24 sc, (1 sc, 1 dec)*4, 24 sc (56)
Round 10 :
24 sc, 4 dec, 24 sc (52)
Info :
Verify stitch alignment: 18 sts on the back and 34 sts on the front (toes). Switch back to 3.5mm hook.
Info :
Begin stuffing the foot firmly.
Round 13 :
(5 sc, 1 inc)*3 (21)
Round 14 :
(6 sc, 1 inc)*3 (24)
Round 15 :
(3 sc, 1 inc)*6 (30)
Round 16 :
(4 sc, 1 inc)*6 (36)
Info :
Ensure your working yarn is centered at the back. Adjust if necessary.
Round 17 :
15 sc, 2 inc, 19 sc (38)
Round 18 :
15 sc, (1 sc, 1 inc)*2, 19 sc (40)
Round 19 :
12 sc, (1 sc, 1 inc)*6, 16 sc (46)
Info :
Fasten off the first leg. Repeat for the second leg.
— 2. Mama Tail :
Round 1 :
In brown yarn with 3.5mm hook, 6 sc in mr (6)
Round 9 :
8 sc, 1 inc (10)
Round 11 :
9 sc, 1 inc (11)
Round 13 :
10 sc, 1 inc (12)
Round 15 :
11 sc, 1 inc (13)
Round 17 :
12 sc, 1 inc (14)
Round 19 :
13 sc, 1 inc (15)
Round 21 :
14 sc, 1 inc (16)
Round 23 :
15 sc, 1 inc (17)
Round 25 :
16 sc, 1 inc (18)
Round 27 :
17 sc, 1 inc (19)
Round 29 :
18 sc, 1 inc (20)
Round 31 :
19 sc, 1 inc (21)
Round 33 :
20 sc, 1 inc (22)
Round 35 :
21 sc, 1 inc (23)
Round 37 :
22 sc, 1 inc (24)
Round 39 :
23 sc, 1 inc (25)
Round 41 :
24 sc, 1 inc (26)
Info :
Fasten off and stuff as you go every few centimeters.
— 3. Mama Crotch :
Round 1 :
Using brown yarn and 3.5mm hook, 8 sc in mr (8)
Round 3 :
(1 sc, 1 inc)*8 (24)
Round 4 :
(2 sc, 1 inc)*8 (32)
Round 5 :
(3 sc, 1 inc)*8 (40)
Round 6 :
(4 sc, 1 inc)*8 (48)
Info :
Do not cut the yarn.
— 4. Connecting Mama Legs & Body :
Info :
Sew the legs to the crotch piece using cotton thread. Align them so 8 stitches from each leg join to 8 stitches on the crotch sides. Ensure the working thread is at the back.
Round 7-9 :
Work 108 sc around the entire joined piece (108)
Round 10 :
32 sc, (1 sc, 1 dec)*6, 16 sc, (1 sc, 1 dec)*6, 24 sc (96)
Info :
Sew the tail onto the back over 10 stitches. Adjust the working thread position by undoing 2 stitches if needed.
Round 11 :
Combine remaining stitches from body and tail: 96 + 26 - 10 - 10 = 102 sc (102)
Round 12 :
6 sc, 1 dec, (11 sc, 1 dec)*3, 55 sc (98)
Round 13 :
5 sc, 1 dec, (10 sc, 1 dec)*3, 55 sc (94)
Round 14 :
4 sc, 1 dec, (9 sc, 1 dec)*3, 55 sc (90)
Round 15 :
(13 sc, 1 dec)*6 (84)
Round 16 :
(12 sc, 1 dec)*6 (78)
Round 17 :
(11 sc, 1 dec)*6 (72)
Round 18 :
(10 sc, 1 dec)*6 (66)
Round 19 :
(9 sc, 1 dec)*6 (60)
Round 32 :
35 sc, (1 sc, 1 inc)*10, 5 sc (70)
— 5. Mama Hands (Make 2) :
Round 1 :
In brown yarn with 3.5mm hook, ch 6. Starting in 2nd ch: 5 sc. This is the first finger.
Round 2 :
Ch 6, starting in 2nd ch: 5 sc. Second finger.
Round 3 :
Ch 6, starting in 2nd ch: 5 sc. Third finger.
Round 4 :
Work 8 sc along the edge of the fingers to join them.
Round 5 :
Work 8 sc in flo, turn, work 8 sc in flo on the other side (16)
Round 6 :
(2 sc, 1 dec)*4 (12)
Round 7 :
(4 sc, 1 dec)*2 (10)
Info :
Insert the twisted wire armature into the hand. Stuff lightly as you continue.
Round 12 :
(4 sc, 1 inc)*2 (12)
Round 17 :
(5 sc, 1 inc)*2 (14)
Round 22 :
(6 sc, 1 inc)*2 (16)
— 6. Joining Mama Hands & Body :
Info :
Switch to 3.0mm hook. Connect hands to body by sewing over 3 stitches using cotton thread.
Round 37 :
29 sc on back, 13 sc on left arm, 2 sc, (1 sc, 1 dec)*10, 2 sc on chest, 13 sc on right arm, 1 sc on back (80)
Round 38 :
28 sc, (3 sc, 1 dec)*3, 22 sc, (1 dec, 3 sc)*3 (74)
Round 39 :
28 sc, (2 sc, 1 dec)*3, 22 sc, (1 dec, 2 sc)*3 (68)
Round 40 :
28 sc, (1 sc, 1 dec)*3, (6 sc, 1 dec)*2, 6 sc, (1 dec, 1 sc)*3 (60)
Round 41 :
(13 sc, 1 dec)*4 (56)
Round 42 :
(5 sc, 1 dec)*8 (48)
Round 43 :
(4 sc, 1 dec)*8 (40)
Round 44 :
(3 sc, 1 dec)*8 (32)
Round 45 :
(2 sc, 1 dec)*8 (24)
— 7. Mama Head :
Round 46 :
Switch to 3.5mm hook. 24 sc (24)
Round 47 :
(2 sc, 1 inc)*8 (32)
Round 48 :
(3 sc, 1 inc)*8 (40)
Round 49 :
(4 sc, 1 inc)*8 (48)
Round 50 :
(5 sc, 1 inc)*8 (56)
Round 51 :
(6 sc, 1 inc)*8 (64)
Round 52 :
(7 sc, 1 inc)*8 (72)
Round 53 :
(8 sc, 1 inc)*8 (80)
Round 58 :
Switch to 3.0mm hook. 38 sc, (1 sc, 1 dec)*14 (66)
Round 59 :
In brown: (1 sc, 1 dec)*2, 26 sc, (1 sc, 1 dec)*3, 9 sc. Switch to light powder: 4 sc. Switch back to brown: 9 sc, 1 sc, 1 dec (60)
Round 60-63 :
In brown: 45 sc. In light powder: 4 sc. In brown: 11 sc (60)
Round 64 :
In brown: 46 sc. In light powder: 2 sc. In brown: 12 sc (60)
Round 65 :
In brown: 47 sc. In light powder: 1 sc. In brown: 12 sc (60)
Round 66 :
Using only brown from here: (8 sc, 1 dec)*6 (54)
Round 67 :
(7 sc, 1 dec)*6 (48)
Round 68 :
(6 sc, 1 dec)*6 (42)
Round 69 :
(5 sc, 1 dec)*6 (36)
Round 70 :
(4 sc, 1 dec)*6 (30)
Round 71 :
(3 sc, 1 dec)*6 (24)
Round 72 :
(2 sc, 1 dec)*6 (18)
Round 73 :
(1 sc, 1 dec)*6 (12)
Info :
Close the opening and weave in the tail.
— 8. Mama Belly :
Row 1 :
With light powder yarn and 3.5mm hook, ch 5. In 2nd ch: 4 sc (5)
Row 2-4 :
Turn, ch 1, 3 sc (4)
Row 5 :
Turn, ch 1, 2 inc, 1 sc (6)
Row 6 :
Turn, ch 1, 1 inc, 2 sc, 1 inc, 1 sc (8)
Row 7-13 :
Turn, ch 1, 7 sc (8)
Row 14 :
Turn, ch 1, 1 dec, 2 sc, 1 dec, 1 sc (6)
Row 15 :
Turn, ch 1, 2 dec, 1 sc (4)
Row 16 :
Turn, ch 1, 2 inc, 1 sc (6)
Row 17 :
Turn, ch 1, 1 inc, 2 sc, 1 inc, 1 sc (8)
Row 18-19 :
Turn, ch 1, 7 sc (8)
Row 20 :
Turn, ch 1, 1 inc, 4 sc, 1 inc, 1 sc (10)
Row 21-22 :
Turn, ch 1, 9 sc (10)
Row 23 :
Turn, ch 1, 1 inc, 6 sc, 1 inc, 1 sc (12)
Row 24-25 :
Turn, ch 1, 11 sc (12)
Row 26 :
Turn, ch 1, 1 inc, 8 sc, 1 inc, 1 sc (14)
Row 27-37 :
Turn, ch 1, 13 sc (14)
Row 38 :
Turn, ch 1, 1 dec, 8 sc, 1 dec, 1 sc (12)
Row 39-40 :
Turn, ch 1, 11 sc (12)
Row 41 :
Turn, ch 1, 1 dec, 6 sc, 1 dec, 1 sc (10)
Row 42-43 :
Turn, ch 1, 9 sc (10)
Row 44 :
Turn, ch 1, 1 dec, 4 sc, 1 dec, 1 sc (8)
Row 45-70 :
Turn, ch 1, 7 sc (8)
Row 71 :
Turn, ch 1, 1 dec, 2 sc, 1 dec, 1 sc (6)
Row 72-74 :
Turn, ch 1, 5 sc (6)
Row 75 :
Turn, ch 1, 2 dec, 1 sc (4)
Row 76-78 :
Turn, ch 1, 3 sc (4)
Row 79 :
Turn, ch 1, 2 dec (2)
Row 80-82 :
Turn, ch 1, 1 sc (2)
Info :
Fasten off. Sew to the chest and belly area, adding a small amount of stuffing underneath.
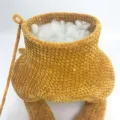
— 9. Mama Bag (Pouch) :
Row 1 :
In brown yarn with 3.5mm hook, ch 51. In 2nd ch: 50 sc (50)
Row 2-9 :
Turn, ch 1, 49 sc (50)
Row 10 :
Turn, ch 1, 1 dec, 44 sc, 1 dec, 1 sc (48)
Row 11 :
Turn, ch 1, 1 dec, 42 sc, 1 dec, 1 sc (46)
Row 12 :
Turn, ch 1, 1 dec, 40 sc, 1 dec, 1 sc (44)
Row 13 :
Turn, ch 1, 1 dec, 38 sc, 1 dec, 1 sc (42)
Row 14 :
Turn, ch 1, 1 dec, 36 sc, 1 dec, 1 sc (40)
Row 15 :
Turn, ch 1, 1 dec, 34 sc, 1 dec, 1 sc (38)
Row 16 :
Turn, ch 1, 1 dec, 32 sc, 1 dec, 1 sc (36)
Row 17 :
Turn, ch 1, 1 dec, 30 sc, 1 dec, 1 sc (34)
Row 18 :
Turn, ch 1, 1 dec, 28 sc, 1 dec, 1 sc (32)
Row 19 :
Turn, ch 1, 1 dec, 26 sc, 1 dec, 1 sc (30)
Row 20 :
Turn, ch 1, 1 dec, 24 sc, 1 dec, 1 sc (28)
Row 21 :
Turn, ch 1, 1 dec, 22 sc, 1 dec, 1 sc (26)
Row 22 :
Turn, ch 1, 1 dec, 20 sc, 1 dec, 1 sc (24)
Row 23 :
Turn, ch 1, 1 dec, 18 sc, 1 dec, 1 sc (22)
Row 24 :
Turn, ch 1, 1 dec, 16 sc, 1 dec, 1 sc (20)
Row 25 :
Turn, ch 1, 1 dec, 14 sc, 1 dec, 1 sc (18)
Row 26 :
Turn, ch 1, 1 dec, 12 sc, 1 dec, 1 sc (16)
Row 27 :
Turn, ch 1, 1 dec, 10 sc, 1 dec, 1 sc (14)
Row 28 :
Turn, ch 1, 1 dec, 8 sc, 1 dec, 1 sc (12)
Row 29 :
Turn, ch 1, 1 dec, 6 sc, 1 dec, 1 sc (10)
Row 30 :
Turn, ch 1, 1 dec, 4 sc, 1 dec, 1 sc (8)
Info :
Fasten off and sew to the body over the belly piece.
— 10. Mama Ears (Make 2) :
Outer Ear Round 1 :
In brown yarn, ch 10. In 2nd ch: 2 sc, 7 sc, 4 sc in last ch. Other side: 7 sc, 2 sc in starting ch (22)
Outer Ear Round 2 :
2 inc, 7 sc, 4 inc, 7 sc, 2 inc (30)
Outer Ear Round 3 :
(1 sc, 1 inc)*2, 7 sc, (1 sc, 1 inc)*4, 7 sc, (1 sc, 1 inc)*2 (38)
Outer Ear Round 4 :
(2 sc, 1 inc)*2, 7 sc, (2 sc, 1 inc)*4, 7 sc, (2 sc, 1 inc)*2 (46)
Outer Ear Round 5 :
(3 sc, 1 inc)*2, 7 sc, (3 sc, 1 inc)*4, 7 sc, (3 sc, 1 inc)*2 (54)
Outer Ear Round 6 :
54 sc (54)
Inner Ear Round 1-3 :
Repeat Rounds 1-3 of the Outer Ear using Coral yarn. Fasten off.
Info :
Sew the inner ear onto the outer ear. Pinch the bottom and sew over 3 stitches. Attach to head between Rounds 65 and 68.
— 11. Mama Eyes (Make 2) :
Round 1 :
Using black YarnArt Jeans and 1.5mm hook, 8 sc in mr (8)
Round 3 :
Switch to Emerald yarn: (1 sc, 1 inc)*6, 1 sc, 1 inc (where the 1st st is sc and 2nd is sl st). Place marker.
Round 4 :
Using black cotton thread in blo: ch 1, 22 sl st.
Round 5 :
Starting in the 7th st from marker, using white yarn in blo: ch 1, 9 sc, 1 sl st.
Round 6 (Left Eye) :
Starting in the 6th st from marker, using black cotton in blo: ch 1, 4 sl st, 1 inc (sc), 1 inc (hdc), 1 inc (dc), 1 inc (hdc), 1 inc (sc), 5 sl st.
Round 6 (Right Eye) :
Starting in the 2nd st from marker, using black cotton in blo: ch 1, 2 sl st, 1 inc (sc), 1 inc (hdc), 1 inc (dc), 1 inc (hdc), 1 inc (sc), 7 sl st.
— 12. Baby Kangaroo :
Round 1-3 :
Body: 8 sc in mr, 8 inc, (1 sc, 1 inc)*8 (24)
Round 6-9 :
Decrease rounds: (6 sc, 1 dec)*3, (5 sc, 1 dec)*3, (4 sc, 1 dec)*3, (3 sc, 1 dec)*3 (12)
Round 10 :
(1 sc, 1 dec)*4 (8)
Round 11-13 :
Head: 8 inc, (1 sc, 1 inc)*8, (2 sc, 1 inc)*8 (32)
Round 15 :
(1 sc, 1 dec)*8, 8 sc (24)
Round 18-19 :
(1 sc, 1 dec)*8, 8 dec (8). Close opening.
I hope you enjoy every moment of bringing this mama and baby kangaroo to life! There's something so satisfying about finishing a project of this scale and seeing the two characters interact. Whether you're making this as a special nursery piece or just because you love kangaroos, it's sure to be a cherished creation. Don't forget to share your progress with the community — I'd love to see your finished joey tucked into that cozy pouch! Happy crocheting, and enjoy your new velvet friends. 🧶 ✨ 🦘