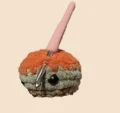
🧢 Beautiful ✨ Detailed πŸ’ Adorable

Crochet Bunny Pumpkin Amigurumi Pattern

Crochet Bunny Pumpkin Amigurumi Pattern
4.8β˜…Rating
3-5 HoursTime Needed
2.6KMade This
βœ‚οΈ

Intermediate Level

Ideal for those with basic crocheting experience, featuring slightly more advanced stitches and techniques to expand your skills.

⏱️

Quick Craft

Fits nicely into a free afternoon β€” 2 to 5 hours of focused, enjoyable crocheting.

🐰

Whimsical Buddy

Playful characters full of personality, designed to spark imagination and become cherished playtime favorites.

About This Crochet Bunny Pumpkin Amigurumi Pattern

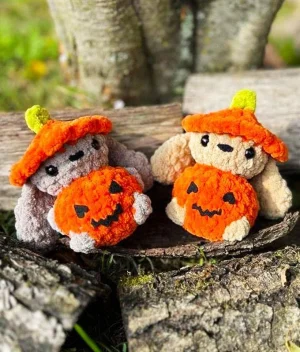
Crochet Bunny Pumpkin Amigurumi Pattern crochet pattern - detailed view

This makes a fantastic desk companion or a unique gift for anyone who obsesses over autumn aesthetics. It sits perfectly on a shelf and brings a pop of orange cheer to any room during the harvest season.

Why You'll Love This Crochet Bunny Pumpkin Amigurumi Pattern

I'm a sucker for "two-in-one" designs, and this bunny-in-a-pumpkin is just too clever. The way the hat brim is worked directly into the head is a total game-changer for assembly, and using chenille yarn makes the whole process feel like you're crocheting a cloud!

Crochet Bunny Pumpkin Amigurumi Pattern step 1 Crochet Bunny Pumpkin Amigurumi Pattern step 2 Crochet Bunny Pumpkin Amigurumi Pattern step 3 Crochet Bunny Pumpkin Amigurumi Pattern step 4

Switch Things Up

I remember the first time I tried to combine two shapes into one amigurumiβ€”it felt like a total puzzle! This pumpkin bunny is such a clever solution to that. The way the brown face peeks out from under the orange 'hat' is just genius. When I made mine, I found that the type of stuffing really matters; if you use a cluster-fill, it holds that round pumpkin shape much better than standard polyfill.

If you want to customize yours, try playing with the colors. A white 'ghost' bunny in a teal pumpkin would look amazing for a more modern decor style. Also, don't be afraid to really go for it with the pumpkin face! I used a tiny bit of fabric glue for the felt pieces, and it held up great. One little tip: when you're doing those bobble stitches for the feet, make sure you're working on the 'right' side of the fabric so they pop outward. If they seem to be sinking in, just give them a little nudge from the back. It’s those tiny details that really make the character come alive!

Common Mistakes & How to Fix Them

βœ— When working Round 16 in the back loops, make sure you don't skip the front loops; you'll need those later to create the wavy hat brim.βœ— The bobble stitches for the feet can sometimes tuck inside the bodyβ€”push them out with your finger before you start the next round to keep them visible.βœ— If you stuff the head too firmly before embroidering the face, it can be hard to hide your yarn tails, so try to add the eyes and nose while it's still a bit squishy.βœ— Placing the safety eyes too high or too low changes the 'hat' look, so double-check they are exactly between rounds 13 and 14 as suggested in the steps.

Crochet Bunny Pumpkin Amigurumi Pattern

This little guy is the ultimate mashup of spooky and sweet! You're going to love how the pumpkin body doubles as a cozy home for this tiny rabbit. It's a quick project that uses plush chenille yarn, making it incredibly soft to hold. Whether you're decorating for October or just love a quirky plushie, this pattern is a joy to work through and brings a smile to everyone who sees it.

Intermediate 3-5 Hours

Materials Needed for Crochet Bunny Pumpkin Amigurumi Pattern

β€” Main Fabric

  • 01
    Super soft chenille yarn in a vibrant orange for the pumpkin skin and hat top
  • 02
    Warm brown chenille yarn for the bunny face and the little bobble feet
  • 03
    A small amount of green chenille yarn for the stem on top

β€” Tools Required

  • 01
    5mm crochet hook
  • 02
    Sturdy yarn needle for sewing and embroidery
  • 03
    Sharp scissors
  • 04
    High-quality polyester fiberfill stuffing
  • 05
    Plastic safety eyes (approx 10mm recommended)
  • 06
    Black felt or embroidery thread for the pumpkin face details

Progress Tracker

0% Complete

β€” 1. Head and Body :

Info :

Start your work using the Orange yarn.

Round 1 :

Work 4 x sc into a MR (4)

Round 2 :

Work 4 x inc around (8)

Round 3 :

In BLO, repeat (1 x sc, 1 x inc) 4 times (12)

Round 4 :

Repeat (2 x sc, 1 x inc) 4 times (16)

Round 5 :

4 x sc, 1 x BO in Brown yarn, 4 x sc, 1 x BO in Brown yarn, 6 x sc (16)

Round 6 :

Repeat (3 x sc, 1 x inc) 4 times (20)

Round 7 :

Work 1 x sc in each stitch around (20)

Round 8 :

4 x sc, 1 x BO in Brown yarn, 10 x sc, 1 x BO in Brown yarn, 4 x sc (20)

Info :

Gently pull the work to the sides to help it take on a rounder shape.

Round 9 :

Repeat (2 x sc, 1 x dec) 5 times (15)

Round 10 :

Repeat (1 x sc, 1 x dec) 5 times (10)

Info :

Stretch the piece, add stuffing, and switch to Brown yarn.

Round 11 :

In BLO, repeat (1 x sc, 1 x inc) 5 times (15)

Round 12 :

Repeat (2 x sc, 1 x inc) 5 times (20)

Round 13 :

Work 1 x sc in each stitch around (20)

Round 14 :

Work 1 x sc in each stitch around (20)

Colour Change :

Switch back to Orange yarn for the top of the head.

Round 15 :

Work 1 x sc in each stitch around (20)

Info :

Place safety eyes between Round 13 and Round 14, roughly 4 stitches apart. Stretch the fabric slightly.

Round 16 :

In BLO, repeat (2 x sc, 1 x dec) 5 times (15)

Info :

Give the work another stretch and finish stuffing firmly.

Round 17 :

Repeat (1 x sc, 1 x dec) 5 times (10)

Round 18 :

Work 5 x dec (5)

Info :

Fasten off and sew the opening shut. Squish the body to make it look chubbier and embroider the nose between the eyes.

β€” 2. Hat Brim :

Info :

Use Orange yarn and insert your hook into the FLO of Round 16.

Round 1 :

Repeat (1 x sc, 1 x ch, 2 x dc in the same stitch, 1 x ch) in every stitch all the way around.

β€” 3. Ears (Make 2) :

Round 1 :

Work 6 x sc into a MR (6)

Round 2 :

Repeat (2 x inc, 1 x sc) 2 times (10)

Round 3 :

1 x sc, 2 x inc, 3 x sc, 2 x inc, 2 x sc (14)

Round 4 :

1 x sc, 2 x dec, 3 x sc, 2 x dec, 2 x sc (10)

Round 5 :

Work 1 x sc in each stitch around (10)

Round 6 :

Repeat (1 x dec, 3 x sc) 2 times (8)

Info :

Flatten the ear. Work 4 x sc through both layers to close, then ch 1 and turn. Work 4 x sc across the top. Fasten off and leave a long tail for sewing.

β€” 4. Pumpkin Stem :

Info :

Attach Green yarn to the very top center of the head.

Row 1 :

ch 3, starting in the second chain from the hook, work 2 x hdc, then sl st into the hat to secure. Fasten off and weave in ends.

Assembly Instructions

  • After finishing the head, use a yarn needle to sew the remaining 5 stitches closed and weave in the tail securely.
  • Position the safety eyes between rounds 13 and 14, leaving about 4 stitches of space between them for a cute expression.
  • Take your brown yarn and embroider a small horizontal nose right between the eyes to bring the bunny's face to life.
  • Flatten the ears and sew them onto the head, tucking them slightly under the orange hat brim for a peek-a-boo effect.
  • If you're adding a pumpkin face, cut small triangles from black felt and glue them onto the orange body, or use black thread to stitch a jagged mouth.

Important Notes

  • πŸ’‘Keep your tension consistent, especially when switching between the orange and brown yarn, to avoid gaps in the fabric.
  • πŸ’‘When working the bobble stitches, ensure you pull the loops tight so the 'feet' stand out prominently against the body.
  • πŸ’‘If you find your pumpkin looks a bit flat, give it a good squish and massage the stuffing to help it round out.
  • πŸ’‘Using a stitch marker is highly recommended since chenille yarn can make it tricky to see the start of your rounds.

I hope you have as much fun making this little pumpkin bunny as I did! There's something so satisfying about watching those little bobble feet appear. Don't forget to give him a good squish once he's finished to get that perfect chubby shape. Whether he's guarding your candy bowl or sitting on a windowsill, he's sure to be a conversation starter. Happy hooking, and enjoy your new handmade friend! πŸ§ΆπŸŽƒβœ¨

You ask,

we answer.

FAQs

Can I use velvet yarn instead of chenille?

Absolutely! Velvet yarn has a similar weight and will give the bunny a beautiful, luxurious sheen, though it might be slightly more slippery to work with.

What size safety eyes should I use?

For a 5mm hook and chenille yarn, 10mm eyes usually look best, but you can go up to 12mm if you want a more wide-eyed, kawaii look.

My hat brim looks a bit wavy/ruffled, is that normal?

Yes! The pattern uses increases and chains in the front loops of Round 16 specifically to create that ruffled, organic pumpkin-top look.

How do I make the pumpkin face look spooky?

Instead of felt, use black embroidery floss to stitch a jagged, 'carved' mouth and triangular eyes for that classic jack-o-lantern vibe.