🧢 Beautiful ✨ Detailed πŸ’ Adorable

Chihuahua in a Carrier Bag Amigurumi Pattern

Chihuahua in a Carrier Bag Amigurumi Pattern
4.4β˜…Rating
8-10 HoursTime Needed
2.2KMade This
βœ‚οΈ

Intermediate Level

Ideal for those with basic crocheting experience, featuring slightly more advanced stitches and techniques to expand your skills.

⏱️

All-Day Adventure

Requires 8-10 hours, ideal for a full day of immersive crocheting.

🐰

Whimsical Buddy

Playful characters full of personality, designed to spark imagination and become cherished playtime favorites.

About This Chihuahua in a Carrier Bag Amigurumi Pattern

Chihuahua in a Carrier Bag Amigurumi Pattern crochet pattern - detailed view

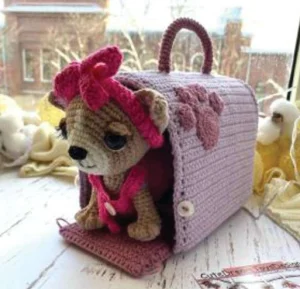
This set makes an unforgettable gift for dog lovers or a standout piece for your own collection. The structured bag and removable dress add a level of playability that everyone adores.

Why You'll Love This Chihuahua in a Carrier Bag Amigurumi Pattern

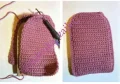
I absolutely adore how this project feels like a mini-engineering feat! Seeing the bag transition from flat panels to a 3D structure using simple cardboard inserts is so satisfying. Plus, the jacquard colorwork on the pup's face gives it such a high-end, boutique look that you'll be so proud to show off to your friends.

Chihuahua in a Carrier Bag Amigurumi Pattern step 1 Chihuahua in a Carrier Bag Amigurumi Pattern step 2 Chihuahua in a Carrier Bag Amigurumi Pattern step 3 Chihuahua in a Carrier Bag Amigurumi Pattern step 4

Switch Things Up

There is something so incredibly charming about a tiny dog with its own little world, isn't there? When I first saw this chihuahua pattern, I knew it wasn't just about the toyβ€”it was about the whole experience. Making the bag feels like building a little house, and seeing that tiny face peeking out for the first time is a total 'aww' moment.

One thing I really want to mention is the cardboard inserts. Don't skip them! They give the bag that crisp, professional structure that makes it look like a boutique find rather than just a soft pouch. I actually used an old cereal box for mine, and it worked like a charm after a bit of tape reinforcement.

If you're nervous about the jacquard colorwork on the head, just take it slow. Keep your floats loose so the face doesn't pucker, and remember that those eyelashes and eyelids will hide a multitude of tiny 'oops' moments. It’s such a rewarding project to see come together piece by piece. I hope you enjoy every stitch of this little pup’s journey!

Common Mistakes & How to Fix Them

βœ— If you cut the cardboard inserts even slightly too large, the crochet fabric will stretch awkwardly and the bag won't close properly, so trim them conservatively.βœ— The jacquard colorwork on the head requires careful tension; if you pull the yarn floats too tight, the chihuahua's face will pucker and look distorted.βœ— When attaching the legs with the button mount, ensure the thread is pulled very tight so the dog can stand firmly without the limbs wobbling or sagging.βœ— Forgetting to wrap the cardboard edges in tape can lead to the sharp corners eventually poking through your stitches over time.

Chihuahua in a Carrier Bag Amigurumi Pattern

Get ready to create the ultimate travel companion with this incredibly detailed set. You aren't just making a toy; you're crafting a tiny world for your new pup, complete with a custom-fitted dress and a sturdy, professional-looking carrier bag. You will love the way the structured panels come together to form a cozy home for this sweet little chihuahua. It is a rewarding project that combines classic amigurumi with clever construction techniques.

Intermediate 8-10 Hours

Materials Needed for Chihuahua in a Carrier Bag Amigurumi Pattern

β€” Main Fabric

  • 01
    Sport weight 4-ply cotton blend yarn (Yarn Art Jeans or similar)
  • 02
    Colors needed: Lilac for the bag roof and handle
  • 03
    Beige and white for the chihuahua's body and facial markings
  • 04
    Gray-pink for the bag base, door, and decorative paw print
  • 05
    Bright pink for the stylish dress and matching headband
  • 06
    Light pink for the inner ears and paw pads
  • 07
    A small amount of black for the embroidered nose and mouth

β€” Tools Required

  • 01
    2.0 mm crochet hook
  • 02
    14 mm safety eyes
  • 03
    Craft eyelashes on a ribbon
  • 04
    High-quality polyester fiberfill stuffing
  • 05
    Thick cardboard for structural support
  • 06
    Adhesive tape to secure cardboard edges
  • 07
    7 small buttons for the leg joints and dress fastener
  • 08
    Yarn needle for assembly and embroidery
  • 09
    Stitch markers to track rounds

Progress Tracker

0% Complete

β€” 1. Tail :

Row 1 :

ch 10, then starting in the 3rd ch from your hook, work 8 sl st back down. Leave a long tail for attaching later.

β€” 2. Legs (Make 4) :

Round 1 :

Using light pink yarn, start with 6 sc into a MR (6)

Round 2 :

Work 6 inc around (12)

Round 3 :

Switch to beige yarn. Repeat (1 sc, 1 inc) 6 times (18)

Round 4 :

Work (1 sc, 1 4-dc bobble) 4 times, then work 10 sc (18)

Round 5 :

Work 6 dec, followed by 6 sc (12)

Round 6 :

Work 2 dec, followed by 8 sc (10)

Round 7 :

Work 2 dec, followed by 6 sc (8)

Round 8-11 :

Work 8 sc (8)

Info :

Pause here to firmly stuff the foot and leg with fiberfill.

Round 12 :

Repeat (3 sc, 1 inc) 2 times (10)

Round 13-15 :

Work 10 sc (10)

Round 16 :

Work 5 dec (5)

Info :

Fasten off and hide the yarn tail inside the piece.

β€” 3. Body :

Round 1 :

Using beige yarn, work 6 sc into a MR (6)

Round 2 :

Work 6 inc around (12)

Round 3 :

Repeat (1 sc, 1 inc) 6 times (18)

Round 4 :

Repeat (2 sc, 1 inc) 6 times (24)

Round 5 :

Repeat (3 sc, 1 inc) 6 times (30)

Round 6 :

Repeat (4 sc, 1 inc) 6 times (36)

Round 7-10 :

Work 36 sc (36)

Round 11 :

Work 9 sc, then repeat (1 dec, 1 sc) 6 times, finish with 9 sc (30)

Round 12-15 :

Work 30 sc (30)

Round 16 :

Repeat (3 sc, 1 dec) 6 times (24)

Round 17 :

Work 24 sc (24)

Round 18 :

Repeat (3 sc, 1 inc) 6 times (30)

Round 19-21 :

Work 30 sc (30)

Round 22 :

Repeat (3 sc, 1 dec) 6 times (24)

Round 23 :

Work 24 sc (24)

Round 24 :

Repeat (2 sc, 1 dec) 6 times (18)

Round 25 :

Repeat (1 sc, 1 dec) 6 times (12)

Info :

Stuff the body firmly before closing.

Round 26 :

Work 6 dec (6)

Info :

Cut the yarn and weave in the ends.

β€” 4. Head :

Round 1 :

Using white yarn, work 6 sc into a MR (6)

Round 2 :

Work 6 inc around (12)

Round 3 :

Work 3 inc, 3 sc, 3 inc, 3 sc (18)

Round 4 :

Work 3 inc, 6 sc, 3 inc, 6 sc (24)

Round 5 :

Work 24 sc (24)

Round 6 :

Switch to beige yarn but keep white for jacquard: 3 beige sc, 1 beige inc, 2 beige sc, 1 beige inc, 4 white sc, 1 white inc, repeat (3 beige sc, 1 beige inc) 3 times (30)

Round 7 :

Work 4 beige sc, 1 beige inc, repeat (2 beige sc, 2 white sc, 2 white sc inc), repeat (4 beige sc, 1 beige inc) 3 times (36)

Round 8 :

Repeat (5 beige sc, 1 beige inc) 2 times, 2 white sc, 3 beige sc inc, repeat (5 beige sc, 1 beige inc) 3 times (42)

Round 9 :

Repeat (6 beige sc, 1 beige inc) 2 times, 2 white sc, 4 beige sc inc, repeat (6 beige sc, 1 beige inc) 3 times (48)

Round 10-16 :

Using only beige yarn, work 48 sc (48)

Info :

Place safety eyes between Rounds 8 and 9, spaced about 12-14 sc apart.

Round 17 :

Repeat (6 sc, 1 dec) 6 times (42)

Round 18 :

Repeat (5 sc, 1 dec) 6 times (36)

Round 19 :

Repeat (4 sc, 1 dec) 6 times (30)

Round 20 :

Repeat (3 sc, 1 dec) 6 times (24)

Round 21 :

Repeat (2 sc, 1 dec) 6 times (18)

Round 22 :

Repeat (1 sc, 1 dec) 6 times (12)

Info :

Stuff the head thoroughly, shaping the muzzle area as you go.

Round 23 :

Work 6 dec (6)

Info :

Fasten off and hide the yarn tail.

β€” 5. Ears (Make 2 Beige & 2 Light Pink) :

Row 1 :

ch 8, start in 2nd ch: 7 sc, turn (7)

Row 2 :

ch 1, 1 dec, 5 sc, turn (6)

Row 3 :

ch 1, 1 dec, 4 sc, turn (5)

Row 4 :

ch 1, 1 dec, 3 sc, turn (4)

Row 5 :

ch 1, 1 dec, 2 sc, turn (3)

Row 6 :

ch 1, 1 dec, 1 sc, turn (2)

Row 7 :

ch 1, 1 dec (1)

Join :

Hold one beige and one pink piece together. Using beige yarn, sc through both layers along the edges: 7 sc on the side, 1 inc in the corner, 7 sc on the other side. Leave a tail for sewing.

β€” 6. Eyelids (Make 2) :

Round 1 :

Using beige yarn, work 5 sc into a MR. Do not close the circle into a ring; leave it as a small semi-circle. Leave a tail for sewing.

β€” 7. Dress :

Row 1 :

Using bright pink yarn, ch 27. Starting in 2nd ch: repeat (1 sc, 1 inc) 13 times, turn (39)

Row 2 :

ch 1, 39 sc, turn (39)

Row 3 :

ch 1, 5 sc, ch 10 (skip 10 sc), 9 sc, ch 10 (skip 10 sc), 5 sc, turn (39)

Row 4-5 :

ch 2, 39 dc, turn (39)

Row 6 :

ch 2, repeat (1 dc-inc, 1 sc) 19 times, 1 dc. Fasten off.

β€” 8. Headband :

Row 1 :

Using bright pink yarn, ch 90. Starting in 3rd ch from hook, work 88 dc. Fasten off and weave in ends.

β€” 9. Bag Door (Make 2) :

Row 1 :

Using gray-pink yarn, ch 19. Start in 2nd ch: 18 sc, turn (18)

Row 2-7 :

ch 1, 18 sc, turn (18)

Border :

Place a cardboard rectangle between the two pieces. Crochet them together around the edges: 16 sc, corner inc, 7 sc, corner inc, 16 sc, corner inc, 7 sc, corner inc.

β€” 10. Bag Roof (Make 2) :

Row 1 :

Using lilac yarn, ch 35. Start in 2nd ch: 34 sc, turn (34)

Row 2-72 :

ch 1, 34 sc, turn (34)

Border :

Place cardboard between the pieces. Join with: 72 sc, corner inc, 32 sc, corner inc, 72 sc, corner inc, 32 sc, corner inc.

β€” 11. Bag Base (Make 2) :

Row 1 :

Using gray-pink yarn, ch 21. Start in 2nd ch: 20 sc, turn (20)

Row 2-34 :

ch 1, 20 sc, turn (20)

Border :

Place cardboard between the pieces. Join with: 18 sc, corner inc, 32 sc, corner inc, 18 sc, corner inc, 32 sc, corner inc.

β€” 12. Bag Back Wall (Make 2) :

Row 1 :

Using gray-pink yarn, ch 19. Start in 2nd ch: 18 sc, turn (18)

Row 2-24 :

ch 1, 18 sc, turn (18)

Row 25 :

ch 1, 1 dec, 14 sc, 1 dec, turn (16)

Row 26 :

ch 1, 1 dec, 12 sc, 1 dec, turn (14)

Row 27 :

ch 1, 1 dec, 10 sc, 1 dec, turn (12)

Row 28 :

ch 1, 1 dec, 8 sc, 1 dec, turn (10)

Border :

Place cardboard between the pieces. Join with 68 sc around the perimeter, including corner increases as needed.

β€” 13. Bag Handle :

Round 1 :

Using gray-pink yarn, work 6 sc into a MR (6)

Round 2-30 :

Work 6 sc (6)

Info :

Fasten off leaving a long tail for sewing.

β€” 14. Paw Print Application :

Small Pads (x4) :

Round 1: 6 sc in MR. Round 2: 6 inc (12). Fasten off.

Large Pad (x1) :

Round 1: 6 sc in MR. Round 2: 6 inc (12). Round 3: (1 sc, 1 inc) * 6 (18). Round 4: (2 sc, 1 inc) * 6 (24). Fasten off.

Assembly Instructions

  • Begin by sculpting the face; use a needle and beige yarn to tighten the cheeks by pulling thread through the eye area to the base of the head.
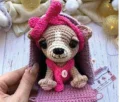
  • Sew the eyelashes to the eyelids, embroider a white highlight under the safety eyes, and then stitch the eyelids over the top of the eyes.
  • Attach the ears to the sides of the head and embroider the nose and mouth using black thread, then sew the completed head to the body.
  • Mount the legs to the body using buttons; thread your needle through the leg, the body, and the opposite leg's button to create a moveable joint.
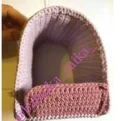
  • Assemble the bag by joining the Roof to the Base using 34 rev-sc, then attach the Door and Back Wall to the remaining edges using rev-sc.
  • Sew the handle to the top center of the Roof and stitch the paw print application onto one of the side walls of the bag.
  • Finish by sewing buttons to the bag sides and creating loops on the door to keep it closed, then dress your pup and place her inside!

Important Notes

  • πŸ’‘Always wrap your cardboard inserts in adhesive tape to prevent moisture from the air or washing from weakening the bag's structure.
  • πŸ’‘When working the jacquard sections on the head, carry the unused yarn color loosely behind your work to prevent the fabric from bunching.
  • πŸ’‘Use a very strong thread or doubled-up yarn for the button mounting of the legs to ensure the joints can handle being moved frequently.
  • πŸ’‘The reverse single crochet (crab stitch) used for bag assembly provides a decorative, sturdy rib that helps the bag maintain its shape.
  • πŸ’‘If your stitches are naturally loose, consider dropping down to a 1.75mm hook to ensure the stuffing doesn't show through the dog's body.

You've done it! Your little chihuahua is officially ready for its first outing in that beautiful new carrier. There’s such a unique sense of accomplishment in finishing a multi-part project like this, from the tiny paws to the structured bag walls. I hope this little pup brings a huge smile to your face every time you see it peeking out. Don't forget to share your finished photosβ€”I'd love to see the colors you chose for the dress and bag! Happy crafting, and enjoy your new whimsical companion. 🧢✨

You ask,

we answer.

FAQs

Can I use plastic sheets instead of cardboard for the bag?

Absolutely! Using plastic canvas or thin flexible plastic (like from a clean ice cream tub) is a great alternative because it makes the bag fully washable.

What should I do if my safety eyes won't stay in place?

If the stitches are a bit loose, you can cut a small circle of felt, poke a hole in it, and place it on the eye post behind the crochet fabric before snapping the washer on.

The dress seems too tight for my dog, how can I fix it?

Crochet tension varies! If it's too snug, simply add 2-4 extra chains to your starting row and follow the same increase pattern to give the pup a bit more room.

How do I attach the eyelashes without them falling off?

I recommend sewing them onto the eyelid piece with a few tiny stitches using matching sewing thread before you attach the eyelid to the head for the most secure hold.