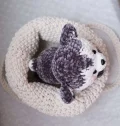
🧶 Beautiful ✨ Detailed 💝 Adorable

My Little Husky Dog Amigurumi Pattern

My Little Husky Dog Amigurumi Pattern
4.7★Rating
3-5 HoursTime Needed
3.2KMade This
✂️

Intermediate Level

Ideal for those with basic crocheting experience, featuring slightly more advanced stitches and techniques to expand your skills.

⏱️

Quick Craft

Fits nicely into a free afternoon — 2 to 5 hours of focused, enjoyable crocheting.

🐥

Charming Critter

Delightful animal designs with sweet details that capture the essence of your favorite woodland and farmyard friends.

About This My Little Husky Dog Amigurumi Pattern

My Little Husky Dog Amigurumi Pattern crochet pattern - detailed view

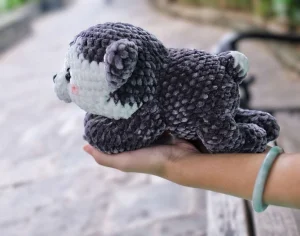
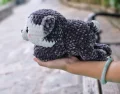
This little husky makes a wonderful gift for dog lovers or a charming addition to a nursery. Its lying-down pose is perfect for perching on a desk or a bedspread for a touch of handmade cheer.

Why You'll Love This My Little Husky Dog Amigurumi Pattern

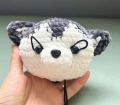
I absolutely love how the velvet texture of the yarn makes the color transitions on the face look so seamless. It is incredibly satisfying to see the 'mask' appear as you switch between the gray and white yarns, and the end result is just so huggable!

My Little Husky Dog Amigurumi Pattern step 1 My Little Husky Dog Amigurumi Pattern step 2 My Little Husky Dog Amigurumi Pattern step 3 My Little Husky Dog Amigurumi Pattern step 4

Switch Things Up

I have always had a soft spot for huskies—they have such big personalities and those striking markings! When I sat down to design this little guy, I really wanted to capture that classic 'mask' without making the color changes too intimidating. Using chenille yarn was a total game-changer for this project. Not only does it make the husky incredibly soft, but the fluffiness helps hide any little imperfections in the stitches, which is always a win in my book!

One thing I discovered while making my prototype is that the tension really matters when you are sculpting the eye sockets. If you pull too tight, the head can get a bit wonky, but just the right amount of tugging gives him that soulful, puppy-dog look that makes everyone go 'aww.' I actually tried making one in a chocolate brown and cream combo too, and he looked just like a little bear cub! Don't be afraid to experiment with different shades of gray or even a deep black to match your favorite pup. I can't wait to see your finished huskies!

Common Mistakes & How to Fix Them

✗ The facial markings in Rounds 6 through 12 require precise color switching; if you lose count, the husky's mask will look lopsided or off-center.✗ When attaching the legs at Round 6 of the body, failing to check the alignment on a flat surface can result in a dog that wobbles or tips over.✗ Over-stuffing the ears will make them too bulky to sit flat against the head; remember that these should remain unstuffed for the correct look.✗ If you don't pull the yarn firmly enough when creating the eye sockets, the safety eyes won't have that deep, expressive set that gives the dog its personality.

My Little Husky Dog Amigurumi Pattern

Get ready to clear some space on your shelf for the softest little pup you will ever make. This husky pattern is all about those adorable facial details and that irresistible squish that only chenille yarn can provide. I have designed this to be a relaxing project where you can really see the character emerge as you work through the color changes. It is the kind of project that reminds you why you fell in love with amigurumi in the first place—pure, handmade joy.

Intermediate 3-5 Hours

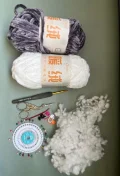
Materials Needed for My Little Husky Dog Amigurumi Pattern

— Main Fabric

  • 01
    Plush Chenille or Velvet yarn in Gray (approximately 120 meters or 1.2 skeins)
  • 02
    Plush Chenille or Velvet yarn in White (approximately 40 meters or 0.5 skeins)

— Tools Required

  • 01
    4mm crochet hook
  • 02
    14mm safety eyes
  • 03
    8mm safety nose
  • 04
    Polyester fiberfill stuffing
  • 05
    Tapestry needles in black and white
  • 06
    Sharp scissors
  • 07
    Sewing pins for positioning
  • 08
    Stitch markers

Progress Tracker

0% Complete

— 1. Head :

Info :

Begin with your gray yarn.

Round 1 :

Place 8 sc into a MR (8)

Round 2 :

Work 1 inc into every st around (16)

Round 3 :

Repeat (1 sc, 1 inc) 8 times (24)

Round 4 :

1 sc, 1 inc, then repeat (2 sc, 1 inc) 7 times, ending with 1 sc (32)

Round 5 :

Repeat (3 sc, 1 inc) 8 times (40)

Info :

Now you will work with both gray and white yarn for the facial markings.

Round 6 :

Using gray, 16 sc, then 2 sc in white, 4 sc in gray, 2 sc in white, and finish with 16 sc in gray (40)

Round 7 :

15 sc in gray, 4 sc in white, 2 sc in gray, 4 sc in white, then 15 sc in gray (40)

Round 8 :

14 sc in gray, 5 sc in white, 2 sc in gray, 5 sc in white, then 14 sc in gray (40)

Round 9 :

10 sc with gray, then switch to white for 6 inc, 8 sc, and 6 inc, ending with 10 sc in gray (52)

Round 10-11 :

10 sc in gray, 32 sc in white, and 10 sc in gray (52)

Round 12 :

10 sc in gray, then using white work 6 dec, 8 sc, 6 dec, and finish with 10 sc in gray (52)

Info :

Cut the gray yarn and continue using only white for the rest of the head.

Note :

The stitch count for Round 13 in the source appears inconsistent with a 52-stitch base. If you follow the repeat exactly, you will have leftover stitches. Work the repeat until you reach 36 sts or have completed the round.

Round 13 :

Repeat (8 sc, 1 dec) 4 times (36)

Round 14 :

Work 1 sc in each st around (36)

Round 15 :

Repeat (4 sc, 1 dec) 6 times (30)

Round 16 :

Repeat (3 sc, 1 dec) 6 times (24)

Info :

Place the 14mm safety eyes between Rounds 10 and 11, leaving a gap of 7 sts between them. Begin stuffing the head.

Round 17 :

Work 12 dec around (12)

Round 18 :

Work 6 dec around (6)

Info :

Stuff the head firmly. Fasten off and leave a long tail. Weave the tail through the front loops of the last round, pull tight to close, and hide the end inside the head.

— 2. Muzzle :

Info :

Use white yarn.

Round 1 :

6 sc into a MR (6)

Round 2 :

Repeat (1 sc, 1 inc) 3 times (9)

Round 3 :

Work 6 sc, then 3 inc, and finish with a sl st (12)

Info :

Fasten off and leave a long tail for sewing.

— 3. Body :

Info :

Use gray yarn.

Round 1 :

8 sc into a MR (8)

Round 2 :

8 inc around (16)

Round 3 :

Repeat (1 sc, 1 inc) 8 times (24)

Round 4 :

Repeat (1 sc, 1 inc, 1 sc) 8 times (32)

Round 5 :

Repeat (3 sc, 1 inc) 8 times (40)

Round 6-10 :

Work 1 sc in each st around (40)

Round 11 :

Repeat (3 sc, 1 dec) 8 times (32)

Round 12-14 :

Work 1 sc in each st around (32)

Round 15 :

Repeat (14 sc, 1 dec) twice (30)

Round 16 :

Work 30 sc, then finish with a sl st (30)

Info :

Fasten off, leave a long tail, and stuff the body firmly.

— 4. Arms and Legs (Make 4) :

Info :

Use gray yarn for all four limbs.

Round 1 :

6 sc into a MR (6)

Round 2 :

6 inc around (12)

Round 3-12 :

4 sc, 1 inc, 5 sc, 1 dec (12)

Info :

Stuff the limb firmly. Flatten the top opening.

Round 13 :

Work 6 sc through both layers to close the piece, then sl st (6)

Info :

Fasten off and leave a long tail.

— 5. Ears (Make 2) :

Info :

Start with gray yarn.

Round 1 :

6 sc into a MR (6)

Round 2 :

Repeat (1 sc, 1 inc) 3 times (9)

Round 3 :

In gray (2 sc, 1 inc) twice, then 1 sc in white, 1 sc in gray, and 1 inc in gray (12)

Round 4 :

7 sc in gray, 3 sc in white, 2 sc in gray (12)

Round 5 :

With gray 3 sc, 1 inc, 3 sc, then with white 1 inc, 3 sc, and finish with 1 gray inc (15)

Info :

Do not stuff the ears. Flatten the piece.

Round 6 :

Work 7 sc through both layers to close, then sl st (7)

Info :

Fasten off and leave a tail for sewing.

— 6. Tail :

Info :

Start with white yarn.

Round 1 :

6 sc into a MR (6)

Round 2 :

Repeat (1 sc, 1 inc) 3 times (9)

Info :

Switch to gray yarn and cut the white tail.

Round 3 :

Repeat (2 sc, 1 inc) 3 times (12)

Round 4-5 :

Work 1 sc in each st around (12)

Info :

Stuff the tail lightly, fasten off, and leave a long tail.

Assembly Instructions

  • Sew the white muzzle onto the face, centered between the eyes, and attach the 8mm safety nose to the muzzle.
  • Attach the ears to the top of the head between Rounds 4 and 8, ensuring they are spaced 8 stitches apart.
  • Create expressive eye sockets by using a needle and yarn to pull the area around the safety eyes slightly inward.
  • Embroider small eyelashes using black and white yarn to give the husky its signature soulful look.
  • Sew the body to the head by matching one stitch on the body to one stitch on the head for a secure join.
  • Attach the two back legs at Round 6 of the body, positioning them about 10 stitches apart so the dog sits flat.
  • Sew the arms to the body between Rounds 12 and 15 (6 stitches apart) and attach the tail to the rear.

Important Notes

  • 💡This entire project is worked in a continuous spiral, so do not join your rounds with a slip stitch unless specifically instructed.
  • 💡Keep a stitch marker at the beginning of every round to ensure your facial color changes stay perfectly aligned.
  • 💡If you choose a different yarn weight, remember that your hook size and finished dimensions will change accordingly.
  • 💡Stuffing the head and body very firmly is key to maintaining the husky's shape, especially after sculpting the eyes.
  • 💡When closing flat pieces like the ears or limbs, ensure you are working through both thicknesses of the fabric for a clean edge.

I am so happy you decided to spend some of your creative time making this little husky dog. There is nothing quite like the feeling of finishing the last few stitches, sewing on that tiny tail, and realizing you have created a brand new friend from just a hook and some yarn. I hope this puppy brings a huge smile to your face or to whoever is lucky enough to receive him as a gift. Keep those hooks moving and stay inspired, my friend! Happy crocheting! 🧶✨
You ask,

we answer.

FAQs

Can I use standard cotton yarn instead of chenille?

Yes, but your husky will be significantly smaller and less 'plush.' You should also drop your hook size to about 2.5mm to keep the stitches tight.

Is the eye sculpting necessary?

It's optional, but it really defines the face. Without it, the head will look more like a simple sphere rather than a puppy with a defined brow.

How do I keep the color changes clean?

Always finish the last pull-through of the stitch before a color change with the new color. This prevents the old color from 'bleeding' into the next stitch.

What if I can't find 14mm safety eyes?

You can use 12mm eyes for a slightly smaller look, or even embroider the eyes with black yarn if this is intended for a very young child.