🧶 Beautiful ✨ Detailed 💝 Adorable

Crochet Christmas Bells Holiday Ornament Pattern

Crochet Christmas Bells Holiday Ornament Pattern
4.7★Rating
3-5 HoursTime Needed
1.6KMade This
✂️

Intermediate Level

Ideal for those with basic crocheting experience, featuring slightly more advanced stitches and techniques to expand your skills.

⏱️

Quick Craft

Fits nicely into a free afternoon — 2 to 5 hours of focused, enjoyable crocheting.

🎄

Holiday Cheer

Festive fun for the season, bringing handmade magic to celebrations and creating new family traditions.

About This Crochet Christmas Bells Holiday Ornament Pattern

Crochet Christmas Bells Holiday Ornament Pattern crochet pattern - detailed view

This ornament makes a genuinely lovely handmade gift — tuck one into a card, hang it on a gift bag, or make a few to deck out your whole tree. People always ask where you got it.

Why You'll Love This Crochet Christmas Bells Holiday Ornament Pattern

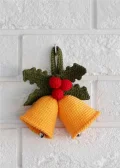
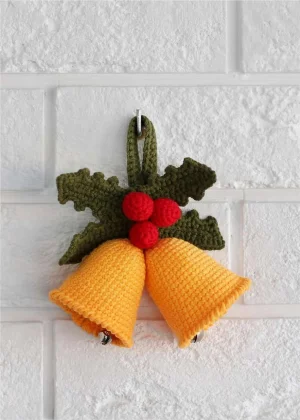
I made my first set of these bells on a quiet December evening with a mug of tea beside me, and I honestly didn't want to put them down. There's something really satisfying about working those early increase rounds and watching the bell shape emerge — it feels almost like magic. The crab stitch border on the rim is one of my favorite finishing touches in any pattern; it's a little fiddly the first time but gives such a polished edge. And assembling everything at the end — the leaves fanning out, the berries nestled in the center, the loop sewn on tight — feels genuinely rewarding. I love that you get five distinct little pieces to make before the big reveal of putting it all together.

Crochet Christmas Bells Holiday Ornament Pattern step 1 Crochet Christmas Bells Holiday Ornament Pattern step 2 Crochet Christmas Bells Holiday Ornament Pattern step 3 Crochet Christmas Bells Holiday Ornament Pattern step 4

Switch Things Up

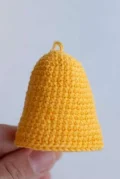
I have a small tradition of making at least one new handmade ornament every December, and the year I made these Christmas bells was genuinely one of my favorites. There's something almost meditative about working those early increase rounds — you start with just six stitches in a magic ring, and within a few rounds that familiar bell silhouette starts to take shape. I remember sitting by the window with the yellow yarn pooled in my lap thinking, this is exactly why I crochet.

The crab stitch border is the detail I always point out when people ask about these bells. It's one of those techniques that looks impressive but is really just sc worked backwards — once you get the rhythm, it goes fast, and that little ridged hem at the rim makes the whole ornament look professionally finished. If you've never tried it before, don't stress. Take it one stitch at a time on the first bell and you'll fly through it on the second.

One thing I'd suggest: make both bells before you move on to the leaves and berries. Finishing both bells in one sitting means you stay in the same mindset and your tension stays consistent — the two bells will match perfectly, and assembly will be so much smoother.

For the leaves, I'd genuinely recommend steam blocking even if you're usually a skip-the-blocking type (I often am). These leaves want to curl, and a few seconds with a damp cloth and a warm iron transforms them. It takes about two minutes and makes a real difference in how polished the finished ornament looks.

Color-wise, the classic gold and green is obviously gorgeous — but I've also seen these made in silver-white with pale blue leaves for a frosty look, or deep burgundy bells with gold leaves for something a little richer. Once you've made the pattern once, it's easy to play around.

Common Mistakes & How to Fix Them

✗ Crocheting the bell too loosely will cause the fiberfill stuffing to show through the fabric — keep your tension firm throughout all 20 rounds, especially during the increase sections.✗ The crab stitch in Round 20 is worked in the opposite direction from your normal crochet — if you forget to reverse your direction and just work a regular sc round, the distinctive ridged border won't form at all.✗ When threading the bell clapper (the small metal jingle bell) through the eye using a smaller hook, it's easy to tangle the chain — work slowly and make sure the chain 16 is not twisted before you pull it through.✗ Many crafters sew all four leaves into one flat cluster before attaching the bells, then find the bells sit unevenly — check that both bells hang at a similar angle before tying off all threads at the back of the leaves.✗ The berries are small and get stuffed before the opening is closed — if you overstuff them they become stiff and lumpy rather than plump and round, so add fiberfill gradually and check the shape as you go.✗ On the loop section, the instruction says '1 cp' in Round 2 — this refers to a turning chain. If you skip it and don't turn your work, Row 3 won't line up and your loop will twist. Always turn after the chain in Row 2.

Crochet Christmas Bells Holiday Ornament Pattern

There's something about handmade Christmas decorations that just hits differently — and these crocheted bells are exactly the kind of project that makes you fall a little more in love with the craft. You'll work up two golden bells, four textured holly leaves, three plump little berries, and a tidy hanging loop, all coming together into one showstopping ornament. The finished piece measures roughly 4.7 by 5.1 inches with the loop, so it hangs beautifully on a tree branch or a wreath. Your tension matters here — tight stitches keep the stuffing hidden and give the bells that smooth, satisfying shape you're going for. This is a project you can genuinely finish in an afternoon, and it looks like something you'd find in a boutique holiday shop.

Intermediate 3-5 Hours

Materials Needed for Crochet Christmas Bells Holiday Ornament Pattern

— Main Fabric

  • 01
    DK weight cotton-acrylic blend yarn (55% cotton, 45% acrylic; approximately 50g per 160m skein) in yellow — used for both bells and the bell clappers
  • 02
    Same DK weight yarn in dark green — used for all four holly leaves and the hanging loop
  • 03
    Same DK weight yarn in red — used for the three round berries

— Tools Required

  • 01
    2.25mm crochet hook (primary hook for all sections)
  • 02
    A smaller crochet hook for threading the bell clapper yarn through the metal jingle bell eye
  • 03
    2 small metal jingle bells (tambourines) — one per crocheted bell
  • 04
    Polyester fiberfill or similar stuffing material
  • 05
    Tapestry needle for sewing pieces together and weaving in ends
  • 06
    Scissors
  • 07
    Stitch marker or a small piece of contrasting yarn to mark the beginning of rounds

Progress Tracker

0% Complete

— 1. Bells (make 2) — Yellow Yarn :

Info :

Work in continuous spirals throughout — no turning chains unless specified. Keep tension tight so fiberfill won't show through. Make 2 bells total.

Round 1 :

Start with a MR and work 6 sc into the ring. (6)

Round 2 :

Work 1 INC in each stitch around. (12)

Round 3 :

(1 sc, INC) repeated 6 times. (18)

Round 4 :

(2 sc, INC) repeated 6 times. (24)

Round 5 :

(3 sc, INC) repeated 6 times. (30)

Round 6 :

30 sc across. (30)

Round 7 :

30 sc across. (30)

Round 8 :

(4 sc, INC) repeated 6 times. (36)

Round 9 :

36 sc across. (36)

Round 10 :

36 sc across. (36)

Round 11 :

36 sc across. (36)

Round 12 :

36 sc across. (36)

Round 13 :

36 sc across. (36)

Round 14 :

36 sc across. (36)

Round 15 :

(5 sc, INC) repeated 6 times. (42)

Round 16 :

42 sc across. (42)

Round 17 :

42 sc across. (42)

Round 18 :

42 sc across. (42)

Round 19 :

42 sc across. (42)

Info :

The next round is worked using Crab Stitch (Reverse SC) — work in the opposite direction to your normal crochet to create the ridged decorative border at the bell's rim.

Round 20 :

Work 42 Crab St around the rim, then 1 SL ST to finish. Cut yarn, pull the tail firmly, and tuck it inside the bell.

— 2. Bell Clapper (make 2) :

Info :

Each crocheted bell gets a small metal jingle bell attached inside using a short crocheted chain. Use yellow yarn and a smaller hook to thread through the metal bell's eye.

Row 1 :

CH 16 with yellow yarn. Using a smaller hook, pass the yarn through the eye of a metal jingle bell to secure it in place.

Row 2 :

Starting in the second CH from the hook, work 15 sc along the chain. Cut yarn and fasten off. Attach this finished clapper inside the crocheted bell and tie off all threads securely.

— 3. Leaves (make 4) — Dark Green Yarn :

Info :

Each leaf is worked back and forth along a foundation chain, then a second decorative round adds the jagged lobed edges. Make 4 leaves total. If a finished leaf looks uneven or curled, steam block it briefly by placing a damp cloth on top and holding a warm iron just above it for a few seconds — don't press directly.

Foundation :

CH 15. Starting in the second CH from the hook, work 13 sc along the chain, then 3 sc into the final stitch to turn the corner. Continue working back along the other side of the foundation chain and work 12 sc, then 3 sc into the last stitch.

Round 2 :

(3 sc, CH 3, 1 sc back into the previous stitch) repeated 4 times, then 3 sc, CH 3, 1 sc back into the previous stitch, then (3 sc, CH 3, 1 sc back into the previous stitch) repeated 4 more times, then 2 sc, 2 SL ST. Cut yarn leaving a long tail for sewing.

— 4. Berries (make 3) — Red Yarn :

Round 1 :

Start with a MR and work 6 sc into the ring. (6)

Round 2 :

Work 1 INC in each stitch around. (12)

Round 3 :

12 sc across. (12)

Round 4 :

12 sc across. (12)

Round 5 :

12 sc across. (12)

Round 6 :

12 sc across. (12)

Info :

Fill the berry firmly but gently with fiberfill, then use your tapestry needle to run the yarn through the remaining stitches and draw the opening closed. Fasten off.

— 5. Hanging Loop — Dark Green Yarn :

Row 1 :

CH 41, then turn and work back along the other side of the chain foundation.

Row 2 :

Work 40 sc across, CH 1, turn.

Row 3 :

Work 40 sc across. Cut yarn, leaving a long tail.

Info :

Use your tapestry needle to join both short ends of the loop together neatly. The remaining yarn tail will be used to sew the loop to the back of the assembled leaf cluster.

Assembly Instructions

  • Arrange all four leaves flat and stitch them together at their base points, fanning them out evenly so they form a full cluster — this becomes the backdrop for the entire ornament.
  • Thread each bell's yarn tails through to the back of the leaf cluster using a tapestry needle, positioning the two bells side by side at the center bottom of the leaves. Tie all thread ends securely at the back.
  • Tie both crocheted bells together at their tops using the hanging yarn tails so they sit close together and face slightly outward, giving that classic double-bell silhouette.
  • Sew all three red berries onto the front of the leaf cluster at the center, nestling them between where the leaves meet — cluster them tightly together so no gaps show.
  • Fold the green loop strip in half to form a loop shape and join the two short ends together with your tapestry needle and the long yarn tail.
  • Position the joined loop at the very back of the leaf cluster and sew it down firmly with the remaining yarn tail, at the same time using the stitching to tuck in and hide any loose threads still protruding from the back.

Important Notes

  • 💡This pattern works entirely in continuous spiral rounds for the bells and berries — do not close each round with a SL ST or use turning chains unless the pattern specifically tells you to.
  • 💡Your stitch tension is critical for the bells: if your fabric is too open, the polyester stuffing inside will be visible through the holes. If your finished bell feels soft and squishy when you squeeze it, your gauge is probably too loose.
  • 💡The alternating V and X look of single crochet (grabbing yarn over the hook for one stitch, then under for the next) is what gives the bells their distinctive woven texture — try this technique on a small swatch before starting if you haven't used it before.
  • 💡The crab stitch in Round 20 of each bell is worked right to left — the opposite of your normal crochet direction. Go slowly on this round and keep your tension even; it can feel awkward at first but gets easier after the first few stitches.
  • 💡Steam blocking the finished leaves really does make a difference — fresh off the hook they can curl or look uneven, but a few seconds under a damp cloth with a warm iron will flatten and open them up beautifully.
  • 💡Leave a long enough yarn tail when finishing the leaves (at least 20cm) — you'll need it for sewing, and short tails are frustrating to work with on small pieces like these.

By the time you sew that last berry into place and hang your finished bells up, you're going to feel incredibly proud — and honestly, you should. 🎄 This ornament packs a lot of charm into a small project: the shaping of the bells, the texture of the crab stitch border, those plump little berries. Whether it ends up on your own tree or wrapped up as a gift for someone you love, it carries that special handmade warmth that no shop-bought decoration ever quite matches. Make one, and you'll probably want to make five more. 🧶 Happy hooking, and happy holidays! ✨

You ask,

we answer.

FAQs

Do I need to know how to do crab stitch before starting this pattern?

You'll need it for Round 20 of each bell, but it's not complicated — it's just single crochet worked in reverse (right to left instead of left to right). Practice a few stitches on your yarn tail before you get to that round and you'll be fine.

Can I use a different yarn weight — like worsted — instead of DK?

You can, but the finished bells will be noticeably larger (roughly 30-40% bigger) and the fabric will be less dense. The tight gauge of DK on a 2.25mm hook is what keeps the stuffing hidden and gives the bells their smooth shape, so going up in weight will change both the look and the drape of the rim.

The leaves came out really curled and uneven — did I do something wrong?

Probably not — this happens a lot with flat crocheted pieces that are worked in both directions along a foundation chain. The pattern actually addresses this: place a damp cloth over the leaf and hold a warm iron just above it (don't press down) for a few seconds to steam block it flat. It works really well.

Where do the metal jingle bells go exactly?

Each metal jingle bell hangs inside one crocheted bell via a short crocheted chain threaded through its eye. You chain 16, use a smaller hook to pull the chain through the eye of the metal bell, then work 15 sc back along the chain. This creates a little strap that anchors the jingle bell inside the crocheted shell.

How do I keep the two crocheted bells from spinning around after assembly?

After threading the yarn tails through to the back of the leaves, tie the two bells together at their top openings before securing everything at the back. That knot between the bells is what keeps them sitting side by side at the right angle.