About This Crochet Gingerbread Man Amigurumi Pattern

This makes a wonderful handmade holiday gift or a festive shelf decoration — the kind of thing people pick up, smile at, and never want to put back down.
Ideal for those with basic crocheting experience, featuring slightly more advanced stitches and techniques to expand your skills.
Fits nicely into a free afternoon — 2 to 5 hours of focused, enjoyable crocheting.
Festive fun for the season, bringing handmade magic to celebrations and creating new family traditions.
This makes a wonderful handmade holiday gift or a festive shelf decoration — the kind of thing people pick up, smile at, and never want to put back down.
Honestly, I fell for this pattern the moment I finished that icing hat. There's this little technique where you work the scalloped edge and then embroider the sprinkles on top — it looks so impressive but it's actually not hard at all. I also love how the body is worked from a foundation chain oval, which is a really satisfying construction once you get the hang of it. It's the kind of project I reach for when I want to feel productive without any stress.

I made my first gingerbread man amigurumi on a quiet December evening with a mug of tea going cold on the table beside me, and honestly I didn't move until he was done. There's something meditative about working a pattern that has such a clear personality from the very beginning — you know exactly who this little guy is going to be before you're even halfway through the body.
One thing I'd suggest trying: don't limit yourself to the classic brown and white colorway. I've seen versions done in pale pink (a sugar cookie edition!) and even deep burgundy with gold icing, and they are stunning. The structure of the pattern supports any color story you want to tell — the scallop-edged hat is especially beautiful in cream or off-white if you want a softer, vintage feel.
The oval foundation chain on the body threw me off the first time I tried it. My tip: before you start Round 1, lay your chain flat and put a pin or stitch marker at each curved end so you know exactly where to work your increases. That visual anchor makes the whole oval construction click into place immediately.
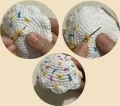
For the sprinkles on the hat — don't overthink them. Pull out whatever colorful yarn scraps you have, thread a needle, and just scatter short straight stitches across the surface. The randomness is the whole point. Mine has a little hot pink one that landed almost sideways and it's my favorite part of the whole doll.
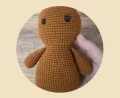
There's something about a little gingerbread figure that just makes the whole holiday season feel warmer — and this crocheted version is no exception. You'll work through a satisfying oval-based body, a perfectly round head, and the cutest stubby little arms, all coming together into a doll that fits right in your palm. The white icing hat with its scalloped edge is honestly the most fun part to make, and decorating it with colorful yarn sprinkles is where your personality really gets to shine. This pattern is written out clearly, round by round, so you can pick it up and put it down without losing your place.
Use brown yarn throughout this section. The piece is worked in a continuous spiral beginning from an oval foundation chain. Stuff firmly as you work — do not wait until the end.
Start with a foundation chain of 15 ch. Beginning in the 2nd ch from the hook, work 1 inc, then 12 sc across, then 3 sc all into the last chain stitch. Continue working along the other side of the chain: 13 sc. (30)
2 inc, 12 sc, 3 inc, 12 sc, 1 inc. (36)
(sc, inc) 2 times, 13 sc, (inc, sc) 3 times, 12 sc, inc. (42)
(2 sc, inc) 2 times, 14 sc, (inc, 2 sc) 3 times, 13 sc, inc. (48)
Working in blo only: sc around. (48)
sc around. (48)
(7 sc, inc) 6 times. (54)
sc around. (54)
sc around. (54)
sc around. (54)
sc around. (54)
sc around. (54)
sc around. (54)
sc around. (54)
(7 sc, dec) 6 times. (48)
sc around. (48)
sc around. (48)
sc around. (48)
(6 sc, dec) 6 times. (42)
sc around. (42)
sc around. (42)
sc around. (42)
(5 sc, dec) 6 times. (36)
sc around. (36)
sc around. (36)
sc around. (36)
(4 sc, dec) 6 times. (30)
sc around. (30)
sc around. (30)
sc around. (30)
(4 sc, inc) 6 times. (36)
(5 sc, inc) 6 times. (42)
(6 sc, inc) 6 times. (48)
(7 sc, inc) 6 times. (54)
(8 sc, inc) 6 times. (60)
sc around. (60)
sc around. (60)
sc around. (60)
sc around. (60)
sc around. (60)
sc around. (60)
sc around. (60)
sc around. (60)
Attach the 8 mm safety eyes between Rounds 43 and 44, placing them 9 stitches apart from each other.
sc around. (60)
sc around. (60)
sc around. (60)
sc around. (60)
sc around. (60)
(8 sc, dec) 6 times. (54)
(7 sc, dec) 6 times. (48)
(6 sc, dec) 6 times. (42)
(5 sc, dec) 6 times. (36)
(4 sc, dec) 6 times. (30)
(3 sc, dec) 6 times. (24)
(2 sc, dec) 6 times. (18)
(sc, dec) 6 times. (12)
dec around until the opening is fully closed. Fasten off and weave in the end.
Use brown yarn. Make two identical arms. Close each arm by crocheting both edges together simultaneously — flatten the arm before closing so it lies straight.
6 sc into a magic ring. (6)
inc in each st around. (12)
(sc, inc) 6 times. (18)
Working in blo only: sc around. (18)
sc around. (18)
sc around. (18)
sc around. (18)
(4 sc, dec) 3 times. (15)
sc around. (15)
sc around. (15)
sc around. (15)
(3 sc, dec) 3 times. (12)
Do not stuff the arms. Flatten the opening and crochet through both layers simultaneously to close. Leave a long yarn tail for sewing to the body.
Use white yarn throughout the hat. The hat begins at the crown and increases outward, finishing with a decorative scallop edge.
6 sc into a magic ring. (6)
inc in each st around. (12)
(sc, inc) 6 times. (18)
(2 sc, inc) 6 times. (24)
(3 sc, inc) 6 times. (30)
(4 sc, inc) 6 times. (36)
sc around. (36) — Note: the PDF labels this as Round 8 but follows Round 6 in sequence; treat as the next round.
(5 sc, inc) 6 times. (42)
(6 sc, inc) 6 times. (48)
(7 sc, inc) 6 times. (54)
(8 sc, inc) 6 times. (60)
sc around. (60)
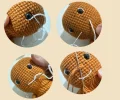
Scallop edge: *skip 2 sts, 5 dc all into the next st, skip 2 sts, sc in the next st* — repeat this sequence all the way around the round.
After the hat is complete, use colored yarn scraps (yellow, pink, blue, etc.) to embroider short straight stitches across the top surface of the hat to look like candy sprinkles. Vary the direction and color for the most realistic effect.
There's a reason gingerbread figures have been a holiday symbol for centuries — they're cheerful, warm, and impossible not to smile at. This little crocheted version carries all of that charm in a pocket-sized, huggable form. Whether you're making him for your own shelf, tucking him into a gift basket, or whipping up a whole batch for friends, he's the kind of project that feels festive from the very first stitch. 🧶 Happy hooking, and I hope your little gingerbread man brings as much joy to whoever receives him as he did to you while making him! ✨🎄
Using yarn that suits a 1.80–2.00 mm hook (like YarnArt Jeans), the finished doll comes out at roughly 15 cm tall. If you use a heavier yarn with a larger hook, the doll will be proportionally bigger — a DK weight with a 3.5 mm hook, for example, could easily produce a 20–22 cm figure.
No — the arms are left unstuffed. You flatten them at the end of Round 12 and crochet both layers shut at the same time. This keeps them flat and easy to sew onto the body, and they look great that way.
They're worked as a single continuous piece, starting from an oval foundation chain at the base and working all the way up through Round 57 at the top of the head. The waist indentation is created naturally through the decrease and re-increase rounds in the middle section.
Absolutely — any yarn that works with a 1.80–2.00 mm hook will do. The original used YarnArt Jeans, which is a cotton-acrylic blend that gives a nice tight fabric for amigurumi. A similar cotton or cotton-blend yarn in the same weight is your best substitute for comparable results.
There does appear to be a plain sc round between the Round 6 increase and the Round 8 increase in the PDF, labeled as Round 8 in the source. It's worth working a plain sc around (36) between those two increase rounds to keep the shaping gradual — the pattern steps in this document include that round for clarity.
After positioning the hat centered on top of the head, use a length of white yarn threaded on a tapestry needle and sew all the way around the bottom edge of the hat, catching the head fabric below it with each stitch. Weaving in the tail on the inside locks everything down solidly.
