About This Crochet Penguin Amigurumi Pattern
Pop him into a gift box with a skein of yarn and he becomes one of the most thoughtful handmade presents — the kind that people genuinely keep for years rather than tucking away.
Ideal for those with basic crocheting experience, featuring slightly more advanced stitches and techniques to expand your skills.
Takes 5-7 hours, making it an enjoyable project to finish over a couple of days.
Playful characters full of personality, designed to spark imagination and become cherished playtime favorites.
Pop him into a gift box with a skein of yarn and he becomes one of the most thoughtful handmade presents — the kind that people genuinely keep for years rather than tucking away.
I keep coming back to this pattern because the construction is just so clever — the legs and body grow from a single joined piece, which means no floppy limbs wobbling around during assembly. There's something deeply satisfying about working those two little saffron feet and then watching the body balloon up from them. The removable cap is my personal favourite detail. I've made versions where I switch the cap colour entirely and it gives the whole penguin a different mood. It's one of those patterns that rewards you at every stage, not just at the end.

I'll be honest — I was not prepared for how much I'd love making this penguin. I picked up the pattern expecting a straightforward amigurumi build, and what I got instead was this genuinely clever construction that kept surprising me at every stage.
The moment that really got me was when the legs and body become one piece. You crochet these two little saffron feet, build up the black leg cylinders, join them together with a single slip stitch, and then suddenly you're working this big beautiful body round straight out of them. No seaming legs onto a body later. No guessing placement. It just grows, naturally, the way a real penguin would — bottom-up and confident.
The face is where I slowed right down and enjoyed myself. Needle sculpting feels intimidating the first time you do it, but the four-point method used here is genuinely logical once you have your needle in hand. I found that using a slightly longer doll needle made the process much smoother — easier to guide from the base opening to the eye position without losing the thread inside the head.
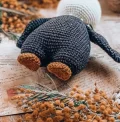
If you want to switch things up, try the crochet cap in a deep rust or burnt orange instead of saffron — it gives the whole penguin a completely different personality, almost autumnal. A variegated yarn scarf also looks incredible against the dark body. And if you're making a second one (which you will be), the tail takes about ten minutes and is so satisfying to sew on — that little rounded bump at the back just completes the whole silhouette.
This is the kind of pattern you return to. It's earned a permanent spot in my favourites.
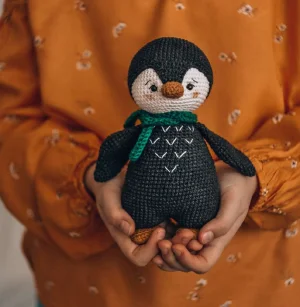
This little penguin is honestly one of those projects that just makes you smile the whole way through. From the moment you start that magic ring to the second you tie on his tiny scarf, there's something genuinely joyful about watching him come together in your hands. You'll crochet every part of him — his round cream face, his sturdy little body built right up from his feet, his flat wings, and even a removable cap with a jaunty peak. The finished toy stands about 18 cm tall and has the kind of personality that makes people stop and ask if they can hold him.
Start with a mr, work 6 sc into it. (6)
Work 1 inc in each st around. (12)
(1 sc, inc) x 6. (18)
(2 sc, inc) x 6. (24)
(3 sc, inc) x 6. (30)
(4 sc, inc) x 6. (36)
(5 sc, inc) x 6. (42)
(6 sc, inc) x 6. (48)
(7 sc, inc) x 6. (54)
(8 sc, inc) x 6. (60)
Work 60 sc each round — no shaping. (60) — 10 rounds total.
Before working Round 21, pause to fit your 8mm safety eyes. Position them between rounds 17 and 18, with 10 stitches between them. Secure the backs firmly.
(8 sc, dec) x 6. (54)
(7 sc, dec) x 6. (48)
(6 sc, dec) x 6. (42)
(5 sc, dec) x 6. (36)
(4 sc, dec) x 6. (30) — begin stuffing the head now.
(3 sc, dec) x 6. (24)
Work 24 sc, then sl st. (24) — finish stuffing very firmly and evenly. Fasten off and weave the end inside the head.
This is the fabric cap that gets sewn to the head. It has a folded peak crocheted separately and edged in black. Work in continuous rounds.
Start with a mr, work 6 sc. (6)
Work 1 inc in each st. (12)
(1 sc, inc) x 6. (18)
(2 sc, inc) x 6. (24)
(3 sc, inc) x 6. (30)
(4 sc, inc) x 6. (36)
(5 sc, inc) x 6. (42)
(6 sc, inc) x 6. (48)
(7 sc, inc) x 6. (54)
(8 sc, inc) x 6. (60)
(19 sc, inc) x 3. (63)
Work 63 sc each round — no shaping. (63) — 8 rounds. Do not cut the yarn.
Now you'll build the vertical peak at the front. Fold the cap in half. Place your stitch marker at the center front. Count 4 stitches out from the marker in each direction — you'll be working across 9 stitches total (the center st plus 4 on each side). Attach black yarn here.
Ch1, work 1 sc into the same st, then 6 sc, dec. (8)
Ch1, 6 sc, dec. (7)
Ch1, 5 sc, dec. (6)
Ch1, 4 sc, dec. (5)
Ch1, 3 sc, dec. (4)
Ch1, 2 sc, dec. (3) — fasten off.
Return to the black yarn and work one round of sc around the entire hat piece including the peak. Approximate stitch counts: 27 sc up to the peak, 6 sc along one side of the peak, 3 sc across the peak top, 6 sc down the other side, 26 sc to complete the round. Leave a long tail for sewing to the head.
Ch4. Starting in the 2nd ch from the hook: work 2 sc, then 3 sc all into the final ch. Continue along the other side of the foundation chain: 1 sc, then 3 sc all into the first ch. (9)
3 sc, 3 sc into one st, 4 sc, 3 sc into one st. (13)
Work 13 sc each round — no shaping. (13) — 2 rounds. End the final st with a sl st. Fasten off, leaving a long tail for sewing.
Sew the cap to the head using straight pins to hold it while you stitch. The base of the cap sits above round 3 of the head (counting from the bottom). The tip of the peak should land above round 10 of the head (counting from the bottom).
Sew the beak to the head, positioning it just above the lower edge of the peak.
Needle-sculpt the eyes using cream yarn: thread a needle into the opening at the head base, bring it out at point 1, push it in at point 2, bring it out at point 3, push it in at point 4, then return the needle into the base opening. Pull the thread ends firmly and secure with a knot.
Use cream yarn to embroider the eye whites following the reference photos. Use black sewing thread to embroider the eyelids over the top of each eye. Embroider the eyebrows above the eyes with black sewing thread.
Dust blush onto the cheeks with a cosmetic brush. All thread tails from head embroidery should be tucked inside the head opening, knotted together, and trimmed after all details are complete.
Ch6. Starting in the 2nd ch from the hook: work 4 sc, then 3 sc all into the last ch. Continue along the other side of the foundation chain: 3 sc, then inc into the first ch. (12)
5 sc, 3 sc into one st, 5 sc, 3 sc into one st. (16)
6 sc, inc, 7 sc, inc, 1 sc. (18)
Work 18 sc each round — no shaping. (18) — 2 rounds.
(1 sc, dec) x 6. (12)
Work 12 sc each round — no shaping. (12) — 2 rounds.
Work 6 dec. (6) — fasten off, leaving a tail. Thread a needle through the front loops of the remaining stitches and pull closed. Weave in the tail.
Place a pin at the center of the foot's third round from the top. Step 2 stitches out from the pin in each direction. Working into the upper layer of stitches only, work 12 sc around in a circle, starting to the right of the pin and working clockwise. Weave in the yarn tail inside the piece. (12)
Work 1 inc in every st. (24)
(3 sc, inc) x 6. (30)
Work 30 sc, then sl st. (30) — fasten off on the first leg only. On the second leg, do not cut the yarn. Instead, work 18 additional sc to bring your yarn to the midpoint of the opposite side of the leg. Join both legs with a sl st, making sure they sit parallel to each other.
Work 30 sc around the first leg, then 30 sc around the second leg. (60) — place a stitch marker at the beginning of this round at the front of the body.
Work 60 sc — no shaping. (60)
(9 sc, inc) x 6. (66)
Work 66 sc each round — no shaping. (66) — 8 rounds.
(9 sc, dec) x 6. (60)
Work 60 sc each round — no shaping. (60) — 3 rounds.
(8 sc, dec) x 6. (54)
Work 54 sc each round — no shaping. (54) — 3 rounds. Begin stuffing the legs and body now.
(7 sc, dec) x 6. (48)
Work 48 sc each round — no shaping. (48) — 3 rounds.
(6 sc, dec) x 6. (42)
Work 42 sc each round — no shaping. (42) — 2 rounds.
(5 sc, dec) x 6. (36) — continue stuffing the body.
Work 36 sc — no shaping. (36)
(4 sc, dec) x 6. (30)
Work 30 sc — no shaping. (30)
(3 sc, dec) x 6. (24) — stuff the body firmly. Fasten off, leaving a long tail for sewing the head on.
Start with a mr, work 6 sc. (6)
(1 sc, inc) x 3. (9)
(2 sc, inc) x 3. (12)
(3 sc, inc) x 3. (15)
(4 sc, inc) x 3. (18)
Work 18 sc, then sl st. (18) — fasten off, leaving a long tail for sewing.
Start with a mr, work 6 sc. (6)
(1 sc, inc) x 3. (9)
Work 9 sc — no shaping. (9)
2 sc, inc, (1 sc, inc) x 2, 2 sc. (12)
3 sc, inc, (2 sc, inc) x 2, 2 sc. (15)
Work 15 sc — no shaping. (15)
4 sc, inc, (3 sc, inc) x 2, 2 sc. (18)
dec, 3 sc, inc, (1 sc, inc) x 4, 2 sc, dec. (21)
Work 21 sc — no shaping. (21)
dec, 3 sc, inc, (2 sc, inc) x 4, 1 sc, dec. (24)
Work 24 sc each round — no shaping. (24) — 4 rounds.
8 sc, dec, (1 sc, dec) x 2, 8 sc. (21)
Work 21 sc — no shaping. (21)
7 sc, dec, (1 sc, dec) x 2, 6 sc. (18)
Work 18 sc — no shaping. (18)
5 sc, dec, (1 sc, dec) x 2, 5 sc. (15)
Work 15 sc — no shaping. (15)
6 sc, dec, 7 sc. (14)
Work 14 sc — no shaping. (14)
Fold the wing in half so the two flat edges meet. Work 7 sc through both layers to close and join. Fasten off, leaving a long tail for sewing to the body.
This is a separate crocheted cap worked in joined rounds using dc. Each round begins with 3 turning ch (counted as 1 dc) and ends with a sl st joining the round. This cap is removable.
Ch57, join with sl st into a circle, taking care not to twist the chain. (57 ch loop)
Ch3 (counts as 1 dc), work 56 dc around, sl st to join. (57)
Ch3, then alternate fpdc and bpdc to the end of the round, sl st to join. (57)
Ch3, 16 dc, dec, (17 dc, dec) x 2, sl st to join. (54)
Ch3, 53 dc, sl st to join. (54)
Ch3, 6 dc, dec, (7 dc, dec) x 5, sl st to join. (48)
Ch3, 5 dc, dec, (6 dc, dec) x 5, sl st to join. (42)
Ch3, 4 dc, dec, (5 dc, dec) x 5, sl st to join. (36)
Ch3, 3 dc, dec, (4 dc, dec) x 5, sl st to join. (30)
Ch3, 2 dc, dec, (3 dc, dec) x 5, sl st to join. (24)
Ch3, 1 dc, dec, (2 dc, dec) x 5, sl st to join. (18)
Ch3, dec, (1 dc, dec) x 5, sl st to join. (12)
Ch3, work 5 dec, 1 dc, sl st to join. (7) — fasten off, leaving a tail. Thread a needle through the front loops of the remaining stitches and draw the top closed. Sew a bell onto the tip. Weave in the tail.
The scarf is worked flat in rows using sl st through the back loop only (blo). Use any yarn in your preferred colour.
Ch61. Starting in the 2nd ch from the hook, work all rows across 60 sts.
blo 60 sl st, ch1, turn. (60)
blo 60 sl st, ch1, turn. (60) — 3 rows.
blo 60 sl st. (60) — no turning ch. Fasten off and weave in both ends.
There's a reason this penguin ends up being made more than once — once for yourself, and again because someone spots him on your shelf and simply has to have one. 🧶 He's one of those projects that photographs beautifully, displays perfectly, and feels genuinely special in your hands. Whether you dress him up in different scarf colours or swap the cap yarn for something seasonal, he's endlessly adaptable. I hope every round of this pattern brings you a little spark of happiness. You made something wonderful — and that little guy is very lucky to exist. ✨🐧
You don't need prior experience, but it does help to practice on a scrap piece of fabric first. The sculpting here creates the subtle indentations around the eyes using cream yarn — the pattern walks you through the four anchor points, so if you follow the numbered diagram carefully, it's very manageable even if it's your first time.
Yes, you can wear just the crochet cap — it's designed to sit on the head independently. The sewn cap is what gives the peaked visor effect, so if you skip it, your penguin will simply have a rounded crochet hat instead. Both look great, honestly.
This is the trickiest moment in the whole pattern. The key is to work those extra 18 sc on the second leg before joining so the yarn ends up at the correct position — then hold both legs flat against a surface and check alignment from directly above before making that joining sl st. If they're twisted, it's worth frogging back rather than working on.
YarnArt Jeans is a fingering/sport weight cotton-mix yarn, so any sport or light DK cotton yarn around 160m per 50g will give a similar result with the 2mm hook. Going up to a true DK weight will produce a noticeably larger toy — probably 20–25% bigger — and the fabric will be softer, which can make the face details less crisp.
Yes — Round 13 reads: ch3, 5 dec, 1 dc, sl st, giving 7 stitches remaining. This is intentional. You then thread a needle through the front loops of those 7 stitches to cinch the top of the cap closed before sewing on the bell. It's a slightly unconventional close-off but it works neatly.
The 8mm safety eyes are the main concern for very young children — if you're making this for a baby or toddler, consider embroidering the eyes with black yarn instead of using plastic safety eyes. The bell on the crochet cap should also be removed or replaced with an embroidered detail for safety.
