About This Spring Kitty Amigurumi Pattern
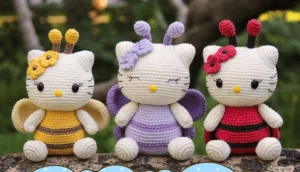
These little companions look stunning on a tiered tray or as part of a spring display. They're also sturdy enough for gentle play, making them a hit with both kids and collectors.
Ideal for those with basic crocheting experience, featuring slightly more advanced stitches and techniques to expand your skills.
Takes 5-7 hours, making it an enjoyable project to finish over a couple of days.
Playful characters full of personality, designed to spark imagination and become cherished playtime favorites.
These little companions look stunning on a tiered tray or as part of a spring display. They're also sturdy enough for gentle play, making them a hit with both kids and collectors.
I honestly couldn't pick a favorite between the three versions, so I ended up making them all! The way the head is constructed from a foundation chain gives it such a great shape compared to a standard sphere. Plus, using thread fastening for the arms means your kitty can actually 'wave' or hold things, which adds so much personality to the finished toy.

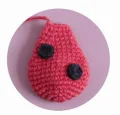
I’ve always felt that amigurumi is at its best when it combines a classic shape with a fun, imaginative twist. These Spring Kitties are the perfect example of that. When I first sat down to design the butterfly version, I spent so much time getting the wings just right—I wanted them to look delicate but still be sturdy enough to hold their shape.
One of my favorite parts of this pattern is the head construction. Starting with a foundation chain instead of a magic ring gives the face a wider, more 'kawaii' look that works so well for this character. If you’re feeling adventurous, try using a variegated yarn for the butterfly wings to get a beautiful stained-glass effect!
I also love the thread-fastening technique for the arms. It’s a tiny bit more work than just sewing them on flat, but being able to pose your kitty makes such a difference in its personality. It goes from being a static toy to a little character that can wave hello. I can't wait to see which bug version you decide to make first!
You're going to love making these little garden-themed kitties! Whether you choose the butterfly, bee, or ladybug version, they all share that iconic sweet face and chubby shape. It's the kind of project that keeps you engaged with fun color changes and a few clever techniques, like the puff stitch thumbs and thread-jointed limbs. Grab your favorite spring yarn colors and let's get started on these whimsical garden friends.
Start with 6 sc into a MR (6)
Work 6 inc around the circle (12)
Put 1 sc into every stitch from the previous round (12)
Work 6 sc, 1 ps to create the thumb, and finish with 5 sc (12)
sc in each stitch around (12)
sc in each stitch around (12)
sc in each stitch around (12)
sc in each stitch around (12)
sc in each stitch around (12)
sc in each stitch around (12)
Add stuffing to the arm, but keep it light at the top end.
Work 6 dec to close (6)
Fasten off and leave a small tail. Use your needle to weave through the front loops only to pull the hole shut and hide the end.
Work 8 sc into a MR (8)
Work 8 inc around (16)
Repeat (1 sc, inc) 8 times (24)
sc in each stitch around (24)
sc in each stitch around (24)
sc in each stitch around (24)
Work 8 sc, 4 dec, and 8 sc (20)
Work 8 sc, 2 dec, and 8 sc (18)
sc in each stitch around (18)
Fasten off and leave a long yarn tail for sewing. Stuff the foot firmly.
Work 6 sc into a MR (6)
Repeat (1 sc, inc) 3 times (9)
Repeat (2 sc, inc) 3 times (12)
Repeat (3 sc, inc) 3 times (15)
Repeat (4 sc, inc) 3 times (18)
Repeat (5 sc, inc) 3 times (21)
Work 3 sc, inc, then repeat (6 sc, inc) 2 times, and finish with 3 sc (24)
Fasten off and leave a long tail. Add a bit of stuffing to each ear.
Work 6 sc into a MR (6)
Work 6 inc around (12)
sc in each stitch around (12)
sc in each stitch around (12)
sc in each stitch around (12)
Fasten off and leave a tail for attaching to the body.
Work 5 sc into a MR (5)
Switch to your contrast color and cut the center color yarn.
Repeat (sl st, hdc, 3 dc, hdc) 5 times into the stitches of the first round (30)
Fasten off and leave a tail for assembly.
Work 6 sc into a MR (6)
Work 6 inc around (12)
sc in each stitch around (12)
sc in each stitch around (12)
sc in each stitch around (12)
Work 6 dec (6)
Add stuffing and switch to your contrast color.
sc in each stitch around (6)
sc in each stitch around (6)
sc in each stitch around (6)
sc in each stitch around (6)
Fasten off with a long tail. Slide a small wire inside to make them poseable.
Ch 14. Start in the second loop from your hook.
Work an inc, 11 sc, 2 inc in the final ch, then rotate and work along the other side: 11 sc, inc (30)
Work 2 inc, 11 sc, 3 inc, 13 sc, inc (36)
Work inc, 1 sc, inc, 13 sc, inc, 1 sc, inc, 1 sc, inc, 13 sc, inc, 1 sc (42)
sc in each stitch around (42)
Work 1 sc, inc, 2 sc, inc, 14 sc, inc, 2 sc, inc, 2 sc, inc, 14 sc, inc, 1 sc (48)
sc in each stitch around (48)
Repeat (7 sc, inc) 6 times (54)
sc in each stitch around (54)
Repeat (8 sc, inc) 6 times (60)
sc in each stitch around (60)
Repeat (9 sc, inc) 6 times (66)
sc in each stitch around (66)
sc in each stitch around (66)
sc in each stitch around (66)
sc in each stitch around (66)
sc in each stitch around (66)
sc in each stitch around (66)
sc in each stitch around (66)
sc in each stitch around (66)
sc in each stitch around (66)
Repeat (9 sc, dec) 6 times (60)
Work 1 sc, dec, then repeat (8 sc, dec) 5 times, and finish with 7 sc (54)
Repeat (7 sc, dec) 6 times (48)
Work 1 sc, dec, then repeat (6 sc, dec) 5 times, and finish with 5 sc (42)
Repeat (5 sc, dec) 6 times (36)
Work 1 sc, dec, then repeat (4 sc, dec) 5 times, and finish with 3 sc (30)
Begin stuffing the head firmly and evenly. Place a marker at the start of the next round.
Repeat (3 sc, dec) 6 times (24)
Work 1 sc, dec, then repeat (2 sc, dec) 5 times, and finish with 1 sc (18)
Repeat (1 sc, dec) 6 times (12)
Work 6 dec (6)
Fasten off and leave a long tail. Close the hole with a needle, then bring the yarn tail out at Round 27 where you placed your marker.
Ch 15. Start in the second loop from your hook.
Work an inc, 12 sc, 2 inc in the final ch, then rotate and work along the other side: 12 sc, inc (32)
Work 2 inc, 12 sc, 4 inc, 12 sc, 2 inc (40)
Repeat (inc, 1 sc) 2 times, then 12 sc, repeat (inc, 1 sc) 4 times, then 12 sc, and finish with (inc, 1 sc) 2 times (48)
sc in each stitch around (48)
sc in each stitch around (48)
sc in each stitch around (48)
Join your contrast color for the stripes. Don't cut the main color yet.
sc in each stitch around using contrast color (48)
sc in each stitch around using contrast color (48)
sc in each stitch around using main color (48)
sc in each stitch around using main color (48)
sc in each stitch around using main color (48)
sc in each stitch around using main color (48)
sc in each stitch around using contrast color (48)
Repeat (6 sc, dec) 6 times using contrast color (42)
Cut the contrast yarn and continue only with the main color.
sc in each stitch around (42)
sc in each stitch around (42)
Repeat (5 sc, dec) 6 times (36)
sc in each stitch around (36)
Repeat (4 sc, dec) 6 times (30)
sc in each stitch around (30)
sc in each stitch around (30)
Work 2 extra sc so the round ends exactly at the side. Fasten off, hide the tail, and stuff the body firmly.
Work 6 sc into a MR (6)
Work 6 inc around (12)
Repeat (1 sc, inc) 6 times (18)
Repeat (2 sc, inc) 6 times (24)
Repeat (3 sc, inc) 6 times (30)
sc in each stitch around (30)
sc in each stitch around (30)
sc in each stitch around (30)
sc in each stitch around (30)
Repeat (13 sc, dec) 2 times (28)
Repeat (12 sc, dec) 2 times (26)
Repeat (11 sc, dec) 2 times (24)
Repeat (10 sc, dec) 2 times (22)
Repeat (9 sc, dec) 2 times (20)
Repeat (8 sc, dec) 2 times (18)
Repeat (7 sc, dec) 2 times (16)
Repeat (6 sc, dec) 2 times (14)
Work 2 extra sc to align, fold flat, and crochet 7 sc through both layers to close. Don't stuff.
Work 6 sc into a MR, then sl st to join (6)
Fasten off with a long tail. Sew these onto the wings symmetrically.
Work 6 sc into a MR (6)
Work 6 inc around (12)
Repeat (1 sc, inc) 6 times (18)
sc in each stitch around (18)
sc in each stitch around (18)
sc in each stitch around (18)
sc in each stitch around (18)
Repeat (7 sc, dec) 2 times (16)
Fasten off and leave a small tail.
Work 6 sc into a MR (6)
Work 6 inc around (12)
Repeat (1 sc, inc) 6 times (18)
Repeat (2 sc, inc) 6 times (24)
Repeat (3 sc, inc) 6 times (30)
sc in each stitch around (30)
sc in each stitch around (30)
sc in each stitch around (30)
sc in each stitch around (30)
Repeat (13 sc, dec) 2 times (28)
Repeat (12 sc, dec) 2 times (26)
Repeat (11 sc, dec) 2 times (24)
Repeat (10 sc, dec) 2 times (22)
Repeat (9 sc, dec) 2 times (20)
Repeat (8 sc, dec) 2 times (18)
Join the upper and lower parts: sc into the 1st st of the lower part, then work 5 sc, dec, 8 sc along the lower part. Move to the upper part: 7 sc, dec, 9 sc (32)
Work 5 sc, dec, 14 sc, dec, 9 sc (30)
Work 4 sc, dec, 13 sc, dec, 9 sc (28)
Work 6 extra sc to align, fold flat, and crochet 14 sc through both layers to close. Fasten off with a long tail.
I hope you have as much fun bringing these Spring Kitties to life as I did! There's something so satisfying about seeing those little wings come together. Don't be afraid to mix and match the colors to create your own unique bug-kitty hybrid — maybe a mint green butterfly or a pink ladybug? Whatever you choose, I’m sure it’ll be absolutely darling. Happy hooking, and enjoy your new little garden friends! 🧶✨🌸
Absolutely! If you use safety eyes, just make sure to place them around Round 10 of the head before you finish stuffing and closing it up.
The secret is a little bit of wire! Just fold a small piece of craft wire, insert it into the antenna before sewing it on, and it will stay perfectly upright.
This is a technique where you use a long needle to sew through the body from one arm to the other. It creates a joint that allows the arms to move up and down!
You sure can. Using worsted weight yarn and a 3.5mm hook will result in a much larger kitty, perfect for a plushie, though you'll need larger eyes to match.
Check the placement of the tail! If you sew it a bit lower (around Round 5-6), it acts like a kickstand to keep the body balanced.
