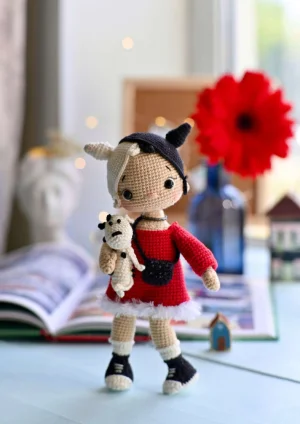
You are going to have so much fun bringing this iconic, fashion-forward character to life. There is something incredibly satisfying about working with that striking black-and-white contrast, and the addition of her tiny Dalmatian sidekick makes the whole project feel complete. Whether you are a fan of classic stories or just love a doll with a bit of an edge, this piece is sure to be the star of your collection. Grab your hooks and let's get started on this stylish little rebel!
Progress Tracker
0% Complete
— 1. Head :
Round 1 :
Using beige yarn, start with 6 sc into a mr (6)
Round 2 :
Work 6 inc around the circle (12)
Round 3 :
Repeat (1 sc, 1 inc) a total of 6 times (18)
Round 4 :
Repeat (2 sc, 1 inc) a total of 6 times (24)
Round 5 :
Repeat (3 sc, 1 inc) a total of 6 times (30)
Round 6 :
Repeat (4 sc, 1 inc) a total of 6 times (36)
Round 7 :
Repeat (5 sc, 1 inc) a total of 6 times (42)
Round 8 :
Repeat (6 sc, 1 inc) a total of 6 times (48)
Round 9 :
Repeat (7 sc, 1 inc) a total of 6 times (54)
Round 10 :
Repeat (8 sc, 1 inc) a total of 6 times (60)
Round 11 :
sc in each of the 60 stitches (60)
Round 12 :
sc in each of the 60 stitches (60)
Round 13 :
sc in each of the 60 stitches (60)
Round 14 :
sc in each of the 60 stitches (60)
Round 15 :
sc in each of the 60 stitches (60)
Round 16 :
sc in each of the 60 stitches (60)
Round 17 :
sc in each of the 60 stitches (60)
Round 18 :
sc in each of the 60 stitches (60)
Round 19 :
sc in each of the 60 stitches (60)
Round 20 :
sc in each of the 60 stitches (60)
Round 21 :
sc in each of the 60 stitches (60)
Round 22 :
sc in each of the 60 stitches (60)
Round 23 :
sc in each of the 60 stitches (60)
Round 24 :
sc in each of the 60 stitches (60)
Round 25 :
sc in each of the 60 stitches (60)
Round 26 :
sc in each of the 60 stitches (60)
Info :
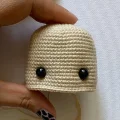
Place the 7mm safety eyes between rounds 21 and 22, leaving a gap of 13 stitches between them.
Round 27 :
Repeat (8 sc, 1 dec) a total of 6 times (54)
Round 28 :
Repeat (7 sc, 1 dec) a total of 6 times (48)
Round 29 :
Repeat (4 sc, 1 dec) a total of 8 times (40)
Round 30 :
Repeat (3 sc, 1 dec) a total of 8 times (32)
Round 31 :
Repeat (2 sc, 1 dec) a total of 8 times (24)
Round 32 :
Repeat (2 sc, 1 dec) a total of 6 times (18)
Info :
Finish stuffing firmly, fasten off, and hide the yarn tail.
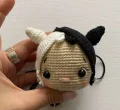
— 2. Hair Cap (Make 1 Black & 1 White) :
Round 1 :
Create a mr and work 6 sc into it (6)
Round 2 :
Work 6 inc around (12)
Round 3 :
Repeat (1 sc, 1 inc) 6 times (18)
Round 4 :
Repeat (2 sc, 1 inc) 6 times (24)
Round 5 :
Repeat (3 sc, 1 inc) 6 times (30)
Round 6 :
Repeat (4 sc, 1 inc) 6 times (36)
Round 7 :
Repeat (5 sc, 1 inc) 6 times (42)
Round 8 :
Repeat (6 sc, 1 inc) 6 times (48)
Round 9 :
Repeat (7 sc, 1 inc) 6 times (54)
Round 10 :
Repeat (8 sc, 1 inc) 6 times (60)
Round 11 :
Repeat (9 sc, 1 inc) 6 times (66)
Round 12 :
sc in each of the 66 stitches (66)
Round 13 :
sc in each of the 66 stitches (66)
Round 14 :
Repeat (10 sc, 1 inc) 6 times (72)
Round 15 :
sc in each of the 72 stitches, then ch 13 and fasten off (72)
— 3. Bangs (Make 1 Black & 1 White) :
Row 1 :
ch 5, starting in the 2nd ch from hook: 2 sc, 1 hdc, 1 dc. Fasten off with a long tail for sewing.
— 4. Ponytails (Make 1 Black & 1 White) :
Round 1 :
Start with 6 sc in a mr (6)
Round 2 :
Repeat (1 sc, 1 inc) 3 times (9)
Round 3 :
sc in each of the 9 stitches (9)
Round 4 :
Repeat (2 sc, 1 inc) 3 times (12)
Round 5 :
Repeat (3 sc, 1 inc) 3 times (15)
Round 6 :
sc in each of the 15 stitches (15)
Round 7 :
Repeat (3 sc, 1 dec) 6 times (12)
Round 8 :
Repeat (2 sc, 1 dec) 3 times (9)
Round 9 :
Repeat (1 sc, 1 dec) 3 times (6)
Info :
Fasten off leaving a tail. Stuff these lightly while sewing them to the head.
— 5. Ears (Make 2) :
Round 1 :
Using beige yarn, work 5 sc into a mr. Fasten off leaving a sewing tail.
— 6. Hands (Make 2) :
Round 1 :
Using beige, work 6 sc in a mr (6)
Round 2 :
Work 6 inc around (12)
Round 3 :
sc in each of the 12 stitches (12)
Round 4 :
sc in each of the 12 stitches (12)
Round 5 :
6 sc, 1 bubble, 5 sc (12)
Round 6 :
sc in each of the 12 stitches (12)
Round 7 :
Repeat (4 sc, 1 dec) 2 times (10)
Round 8-24 :
Work 17 rounds of 10 sc each (10)
Info :
Stuff as you go and fasten off.
— 7. Legs (Make 2) :
Round 1 :
With white yarn, ch 8. Starting in 2nd ch: 6 sc, 3 sc in last ch, 5 sc along other side, 1 inc (16)
Round 2 :
1 inc, 5 sc, 1 inc, 1 sc, 1 inc, 5 sc, 1 inc, 1 sc (20)
Round 3 :
1 sc, 1 inc, 5 sc, 1 inc, 3 sc, 1 inc, 5 sc, 1 inc, 2 sc (24)
Round 4 :
2 sc, 1 inc, 5 sc, 1 inc, 5 sc, 1 inc, 5 sc, 1 inc, 3 sc (28)
Info :
Prepare your insoles now. Trace the sole shape onto cardboard or plastic, cut it out, and glue it inside after Round 5.
Round 5 :
Work 28 sc into the blo (28)
Round 6 :
9 sc, 9 sc into blo, 10 sc into both loops (28)
Round 7 :
Switch to black yarn. Work 28 sc into both loops (28)
Round 8 :
Work 27 sc. Leave the last stitch unworked so your round start stays centered (27)
Round 9 :
8 sc, 6 dec, 8 sc (22)
Round 10 :
7 sc, 4 dec, 7 sc (18)
Round 11 :
sc in all 18 stitches (18)
Round 12 :
Repeat (1 sc, 1 dec) 6 times (12)
Round 13 :
sc in all 12 stitches (12)
Round 14 :
Switch to white yarn. Work 12 sc in blo (12)
Round 15 :
Repeat (2 sc, 1 inc) 4 times (16)
Round 16 :
sc in all 16 stitches (16)
Round 17 :
sc in all 16 stitches (16)
Round 18 :
Switch to beige yarn. Work 15 sc, 1 inc in blo (17)
Round 19 :
Work 17 sc into both loops (17)
Round 20 :
1 inc, 16 sc (18)
Round 21 :
sc in all 18 stitches (18)
Round 22 :
1 inc, 17 sc (19)
Round 23 :
sc in all 19 stitches (19)
Round 24 :
18 sc, 1 inc (20)
Round 25 :
sc in all 20 stitches (20)
Round 26 :
1 dec, 16 sc, 1 dec (18)
Round 27 :
2 sc, 1 dec, 10 sc, 1 dec, 2 sc (16)
Round 28 :
sc in all 16 stitches (16)
Round 29 :
2 sc, 1 inc, 10 sc, 1 inc, 2 sc (18)
Round 30 :
sc in all 18 stitches (18)
Round 31 :
Repeat (5 sc, 1 inc) 3 times (21)
Round 32-34 :
Work 4 rounds of 21 sc each (21)
Round 35 :
Switch to white yarn. Repeat (6 sc, 1 inc) 3 times (24)
Round 36-38 :
Work 3 rounds of 24 sc each (24)
Round 39 (Left) :
Work 18 sc so the join is on the inside thigh. Fasten off.
Round 39 (Right) :
Work 12 sc so the join is on the inside thigh. Do not fasten off.
Sock Trim :
Using white yarn in the flo of Round 17: 16 sl st. Fasten off.
Shoe Trim :
Using black yarn in the flo of Round 13: 12 sc. Fasten off.
— 8. Sneakers Front :
Info :
Attach white yarn to the flo of Round 5 on the leg (center of the 9 sc section). Work in turning rows with the foot facing you.
Row 1 :
2 sc, sl st, ch 1, turn
Row 2 :
3 sc, sl st, ch 1, turn
Row 3 :
4 sc, sl st, ch 1, turn
Row 4 :
5 sc, sl st, ch 1, turn
Row 5 :
6 sc, sl st, ch 1, turn
Row 6 :
7 sc, sl st, ch 1, turn
Row 7 :
8 sc, sl st, ch 1, turn
Row 8 :
8 sc, sl st. Fasten off and hide tails.
— 9. Body :
Round 40 :
ch 1 from the right leg and attach to the left leg. Ensure the legs are slightly pigeon-toed. Work shifting stitches if needed to align.
Info :
Work 24 sc around left leg, 2 inc along chain, 24 sc around right leg, 2 sc along chain + 6 shifting sc (54)
Round 41-46 :
Work 6 rounds of 54 sc each (54)
Round 47 :
Repeat (7 sc, 1 dec) 6 times (48)
Round 48 :
sc in all 48 stitches (48)
Round 49 :
Repeat (14 sc, 1 dec) 3 times (45)
Round 50 :
sc in all 45 stitches (45)
Round 51 :
Repeat (13 sc, 1 dec) 3 times (42)
Round 52 :
Switch to beige yarn. Work 42 sc into the blo (42)
Round 53-55 :
Work 3 rounds of 42 sc into both loops (42)
Round 56 :
Repeat (12 sc, 1 dec) 3 times (39)
Round 57-58 :
Work 2 rounds of 39 sc each (39)
Round 59 :
Join arms: 3 sc on body, 5 sc through body and hand, 16 sc on body, 5 sc through body and hand, 10 sc on body (39)
Info :
Insert the wire frame into the arms and body now.
Round 60 :
3 sc, 5 sc around remaining hand stitches, 16 sc, 5 sc around hand, 10 sc (39)
Round 61 :
Repeat (11 sc, 1 dec) 3 times (36)
Round 62 :
Repeat (1 sc, 1 dec) 12 times (24)
Round 63 :
Repeat (2 sc, 1 dec) 6 times (18)
Round 64-67 :
Work 4 rounds of 18 sc for the neck (18)
Info :
Fasten off leaving a long tail for sewing the head.
— 10. Dress Sleeves (Make 2) :
Round 1 :
Using red yarn, ch 18 and join with a sl st to form a circle. Work 18 sc (18)
Round 2 :
Repeat (5 sc, 1 inc) 3 times (21)
Round 3 :
sc in all 21 stitches (21)
Round 4 :
Repeat (6 sc, 1 inc) 3 times (24)
Round 5-6 :
Work 2 rounds of 24 sc each (24)
Round 7 :
Repeat (6 sc, 1 dec) 3 times (21)
Round 8-11 :
Work 4 rounds of 21 sc each (21)
Round 12 :
Repeat (5 sc, 1 dec) 3 times (18)
Round 13-14 :
Work 2 rounds of 18 sc each (18)
Info :
Fasten off and weave in ends.
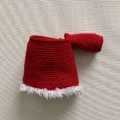
— 11. Dress :
Round 1 :
Using red yarn, ch 60 and join with a sl st to form a circle. sc in each ch (60)
Round 2-3 :
Work 2 rounds of 60 sc each (60)
Round 4 :
Repeat (18 sc, 1 dec) 3 times (57)
Round 5 :
sc in all 57 stitches (57)
Round 6 :
Repeat (17 sc, 1 dec) 3 times (54)
Round 7-17 :
Work 11 rounds of 54 sc each (54)
Round 18 :
Repeat (16 sc, 1 dec) 3 times (51)
Round 19-21 :
Work 3 rounds of 51 sc each (51)
Round 22 :
2 sc on dress, 6 sc through dress and sleeve, 16 sc on dress, repeat (1 sc, 1 dec) 3 times, 18 sc on dress (48)
Round 23 :
2 sc, 12 sc around remaining sleeve stitches, 40 sc around dress (54)
Round 24 :
4 sc, 3 hdc, 2 dc, 3 hdc, 42 sc (54)
Info :
Fasten off. Attach white Mink yarn to the bottom hem.
Round 25 :
Work 60 sc with the white Mink yarn. Fasten off.
— 12. Bag :
Round 1 :
With black yarn, ch 8. Starting in 3rd ch: 5 dc, 3 dc in last ch, 4 dc along other side, 1 dc inc (14)
Round 2 :
Work 14 sc into the blo (14)
Round 3-5 :
Work 3 rounds of 14 sc into both loops (14)
Row 6 :
Switch to turning rows for the flap: 1 sc, turn, 6 sc, ch 1, turn.
Row 7-10 :
Work 4 rows of 6 sc each, with a ch 1 and turn at the end of each row.
Info :
Fasten off. Attach yarn to the side of the bag, ch 50 for the strap, and join to the other side.
— 13. Dalmatian Head :
Round 1 :
Using white yarn, 6 sc in mr (6)
Round 3 :
Repeat (1 sc, 1 inc) 6 times (18)
Round 4 :
Repeat (2 sc, 1 inc) 6 times (24)
Round 5-6 :
Work 2 rounds of 24 sc each (24)
Round 7 :
Repeat (6 sc, 1 dec) 3 times (21)
Round 8 :
sc in all 21 stitches (21)
Round 9 :
Repeat (5 sc, 1 dec) 3 times (18)
Round 10-12 :
Work 3 rounds of 18 sc each (18)
Round 13 :
Repeat (4 sc, 1 dec) 3 times (15)
Round 14 :
Repeat (3 sc, 1 dec) 3 times (12)
Info :
Close the hole by sewing through the front loops and hide the tail.
— 14. Dalmatian Body :
Round 1 :
Using white yarn, 6 sc in mr (6)
Round 3 :
Repeat (1 sc, 1 inc) 6 times (18)
Round 4-6 :
Work 3 rounds of 18 sc each (18)
Round 7 :
Repeat (4 sc, 1 dec) 3 times (15)
Round 8-10 :
Work 3 rounds of 15 sc each (15)
Round 11 :
Repeat (3 sc, 1 dec) 3 times (12)
Round 12-14 :
Work 3 rounds of 12 sc each (12)
Round 15 :
Repeat (1 sc, 1 dec) 4 times (8)
Round 16 :
sc in all 8 stitches (8)
Round 17 :
Flatten the opening and crochet 4 sc through both sides to close. Leave a tail for sewing.
— 15. Dalmatian Parts :
Ears :
Make 1 Black & 1 White: ch 5, starting in 2nd ch: 4 sc. Fasten off.
Paws :
Make 4 White: ch 9, starting in 2nd ch: 8 sc. Fasten off.
I am so incredibly proud of you for finishing this project! This doll is such a labor of love, and seeing her standing there with her little Dalmatian and her stylish bag is just the best feeling. She has so much personality, doesn't she? Whether she's going to a new home as a gift or staying with you as a centerpiece in your craft room, she is truly a masterpiece. I hope you enjoyed every stitch of this journey. Don't forget to share your finished photos — I'd love to see your version! Happy crafting! 🧶✨💖