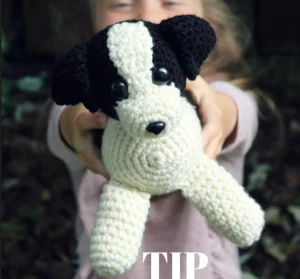
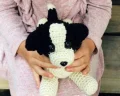
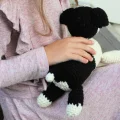
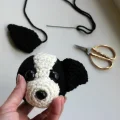
I'm so excited to share Tip with you! This sweet Border Collie is inspired by a real-life pup, and he has so much character. Whether you're making him as a gift for a dog lover or just want a new companion for your own shelf, you'll find the process of watching his little face come together incredibly rewarding. He is designed to be soft, huggable, and full of that classic, inquisitive collie charm that we all love.
Progress Tracker
0% Complete
— 1. Head :
Round 1 :
Start with black yarn and create a MR, ch 1, then work 6 sc into the ring. Pull tight but do not join your rounds; work in a continuous spiral. (6)
Round 2 :
Work 1 inc into every st around. (12)
Round 3 :
Work (1 sc, 1 inc) 6 times. (18)
Round 4 :
Work (2 sc, 1 inc) 6 times. (24)
Round 5 :
Work (3 sc, 1 inc) 6 times. (30)
Round 6 :
Work (4 sc, 1 inc) 6 times. (36)
Round 7-12 :
Work 1 sc into every st around. (36)
Round 13 :
Work (4 sc, 1 sc dec) 6 times. (30)
Round 14 :
Work (3 sc, 1 sc dec) 6 times. (24)
Round 15 :
Work (2 sc, 1 sc dec) 6 times. (18)
Info :
Insert the 16 mm safety eyes between the stitches of Round 4, placing them about 5 stitches apart. Begin stuffing the head firmly.
Round 16 :
Work (1 sc, 1 sc dec) 6 times. (12)
Round 17 :
Work 6 sc dec around. (6)
Info :
Cut the yarn, leaving a tail for finishing. Use your needle to weave through the final 6 sts, pull tight to close, and hide the tail inside the head.
— 2. Muzzle :
Round 1 :
Using cream yarn, create a MR, ch 1, and work 6 sc into the ring. (6)
Round 2 :
Work 1 inc into every st around. (12)
Round 3 :
Work (1 sc, 1 inc) 6 times. (18)
Round 4-6 :
Work 1 sc into every st around. At the end of Round 6, sl st into the first sc to join. (18)
Info :
You will now transition from working in rounds to working in flat rows for the bridge of the nose.
Row 1 :
ch 1, work 1 sc into the same space as the join and 1 sc in each of the next 2 sts. Turn your work. (3)
Info :
Note: For the following rows, do not ch 1 at the end of the row before turning.
Row 2-3 :
Work 1 sc in each st across. Turn. (3)
Row 4 :
Work 1 inc in the first st, then 1 sc in the next 2 sts. Turn. (4)
Row 5-10 :
Work 1 sc in each st across. Turn. (4)
Info :
Fasten off, leaving a long tail for sewing. Secure the safety nose to the center front of the muzzle rounds.
— 3. Ears (Make 2) :
Round 1 :
Using black yarn, start at the ear tip with a MR, ch 1, and work 3 sc in the ring. Work in a continuous spiral. (3)
Round 2 :
Work 1 inc in every st. (6)
Round 3 :
Work 1 sc into every st around. (6)
Round 4 :
Work (1 sc, 1 inc) 3 times. (9)
Round 5 :
Work 1 sc into every st around. (9)
Round 6 :
Work (2 sc, 1 inc) 3 times. (12)
Round 7 :
Work 1 sc into every st around. (12)
Round 8 :
Work (3 sc, 1 inc) 3 times. (15)
Round 9-11 :
Work 1 sc into every st around. (15)
Round 12 :
Work (1 sc, 1 sc dec) 5 times. (10)
Round 13 :
Work 1 sc into every st around. (10)
Info :
Fasten off with a long sewing tail. Flatten the opening and sew it closed through both layers.
— 4. Body - Part 1 (Cream Underside) :
Round 1 :
Start with cream yarn and a MR, ch 1, and work 6 sc into the ring. (6)
Round 2 :
Work 1 inc in every st. (12)
Round 3 :
Work (1 sc, 1 inc) 6 times. (18)
Round 4 :
Work (2 sc, 1 inc) 6 times. (24)
Round 5 :
Work (3 sc, 1 inc) 6 times. (30)
Round 6 :
Work (4 sc, 1 inc) 6 times. (36)
Round 7-12 :
Work 1 sc into every st around. At the end of Round 12, join with a sl st. (36)
Row 1 :
ch 1, work in flo for this row only: 1 sc in the same space as join, then 1 sc in the next 8 sts. Turn. (9)
Info :
Do not use a ch-1 at the end of these rows.
Row 2-9 :
Work through both loops now: 1 sc in each st across. Turn. (9)
Row 10 :
1 sc in the first st, 1 sc dec, 1 sc in each st until only 3 sts remain, 1 sc dec, 1 sc in the final st. Turn. (7)
Row 11 :
Work 1 sc in each st across. Turn. (7)
Row 12 :
Repeat the instructions for Row 10. Turn. (5)
Row 13-20 :
Work 1 sc in each st across. Turn. (5)
Info :
Fasten off and leave a long tail for sewing.
— 5. Body - Part 2 (Black Main Body) :
Round 13 :
Using black yarn, join with a sc in the first unworked blo of Round 12 from Part 1. sc in the next 8 blo, then sc through both loops for the remaining 27 sts. (36)
Round 14-26 :
Work 1 sc into every st around. (36)
Round 27 :
Work (4 sc, 1 sc dec) 6 times. (30)
Round 28 :
Work (3 sc, 1 sc dec) 6 times. (24)
Round 29 :
Work (2 sc, 1 sc dec) 6 times. (18)
Info :
Stuff the body firmly.
Round 30 :
Work (1 sc, 1 sc dec) 6 times. (12)
Round 31 :
Work 6 sc dec around. (6)
Info :
Fasten off, weave the tail through the last 6 sts to close, and hide the end.
— 6. Front Legs (Make 2) :
Round 1 :
With cream yarn, create a MR and work 6 sc inside. (6)
Round 2 :
Work 1 inc in every st. (12)
Round 3-12 :
Work 1 sc into every st around. At the end of Round 12, join with a sl st. (12)
Info :
Stuff the leg, then flatten the top and sew the opening closed. Leave a tail for sewing.
— 7. Hind Legs (Make 2) :
Round 1-5 :
Follow the instructions for Rounds 1-5 of the Front Legs using cream yarn. (12)
Round 6 :
Join black yarn in any st and work 1 sc in every st around. (12)
Round 7-12 :
Work 1 sc into every st around. At the end of Round 12, join with a sl st. (12)
Info :
Stuff the leg, flatten the top opening, and sew it shut. Leave a tail for sewing.
— 8. Tail :
Round 1 :
Using cream yarn, work 3 sc into a MR. (3)
Round 2 :
Work 1 inc in every st. (6)
Round 3 :
Work 1 sc into every st around. Join with a sl st and fasten off. (6)
Round 4 :
Join black yarn in any st and work 1 sc into every st around. (6)
Round 5 :
Work (2 sc, 1 inc) twice. (8)
Round 6-7 :
Work 1 sc into every st around. Join with a sl st. (8)
Info :
Fasten off and flatten the top to sew closed. Stuffing is optional.
I can’t wait to see your finished Tip! There’s something so special about finishing a project like this and seeing that little face staring back at you. This pattern is such a tribute to the loyalty of Border Collies, and I hope your handmade pup brings a smile to whoever receives him. Don't forget to take a photo of your new friend before he heads off to his new home—seeing all your different versions of Tip is truly the highlight of my day. Happy crocheting, and enjoy your new little companion! 🧶✨🐶