About This Desert Blossom Crochet Cactus Pillow Pattern
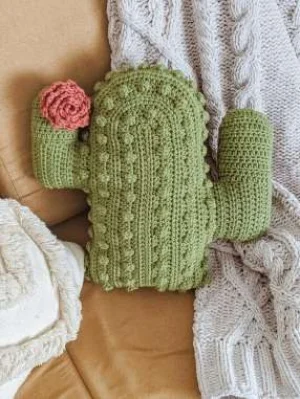
This whimsical pillow makes a wonderful housewarming gift or a playful addition to a child's bedroom, bringing a pop of handmade warmth to any cozy corner of your home.
Ideal for those with basic crocheting experience, featuring slightly more advanced stitches and techniques to expand your skills.
Takes 5-7 hours, making it an enjoyable project to finish over a couple of days.
A warm touch for your space that transforms ordinary corners into inviting nooks filled with handmade charm.
This whimsical pillow makes a wonderful housewarming gift or a playful addition to a child's bedroom, bringing a pop of handmade warmth to any cozy corner of your home.
I love this project because the main body is worked in one piece, letting you settle into a soothing, rhythmic flow without constantly switching colors. The way the bobbles stand out against the half double crochet rows is incredibly satisfying, and seeing the arms finally stitch together feels like magic.

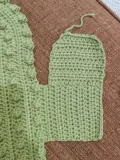
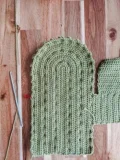
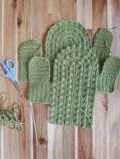
There is something so incredibly cozy about bringing natural, earthy textures into our living spaces, and this cactus pillow does exactly that! I remember making my very first one on a rainy weekend, watching the little bobbles pop up row by row like tiny, harmless thorns. It is the perfect project for when you want to create something substantial but do not want to deal with the endless yarn tails of a multi-colored blanket.
If you want to put your own creative spin on this design, try experimenting with different shades of green—a dusty olive or a vibrant forest green would look absolutely stunning! You could also swap out the coral yarn for a bright mustard yellow or a soft cream to match your home decor.
When it comes to stuffing, my biggest secret is to use small clumps of fiberfill rather than giant handfuls. It takes a little longer, but it prevents the stuffing from clumping up and ensures your cactus arms stay smooth, round, and perfectly huggable.
Bring a touch of the desert indoors with this delightfully textured cactus pillow. You will absolutely love watching this friendly little succulent take shape as you work up the beautiful, ridged panels and pop on that perfect coral blossom. It is the ultimate cozy addition to any sofa or nursery chair, offering all the charm of a real plant without any of the watering worries.
ch 41, work 1 hdc in the 2nd ch from your hook and in each of the next 38 ch, work 6 hdc into the very last ch, now turn your work to crochet along the opposite side of your starting chain and work 39 hdc. ch 1, turn. (84)
hdc 39, work 2 hdc in each of the next 6 stitches, hdc 39. ch 1, turn. (90)
sc 2, bobble, [sc 3, bobble] repeat this sequence all the way around until you have 3 stitches left, sc 3. ch 1, turn.
hdc 39, [work 2 hdc in the next stitch, hdc 1] repeat this 6 times, hdc 39. ch 1, turn. (96)
hdc 39, [work 2 hdc in the next stitch, hdc 2] repeat this 6 times, hdc 39. ch 1, turn. (102)
hdc 39, [work 2 hdc in the next stitch, hdc 3] repeat this 6 times, hdc 39. ch 1, turn. (108)
sc 2, bobble, [sc 3, bobble] repeat this sequence all the way around until you have 5 stitches left, sc 3, bobble, sc 1. ch 1, turn.
hdc 39, [work 2 hdc in the next stitch, hdc 4] repeat this 6 times, hdc 39. ch 1, turn. (114)
hdc 39, [work 2 hdc in the next stitch, hdc 5] repeat this 6 times, hdc 39. ch 1, turn. (120)
hdc 39, [work 2 hdc in the next stitch, hdc 6] repeat this 6 times, hdc 39. ch 1, turn. (126)
sc 2, bobble, [sc 3, bobble] repeat this sequence all the way around until you have 3 stitches left, sc 3. Fasten off and weave in your ends.
With the right side of your first main cactus body facing you, count 15 stitches up from the bottom edge along the right side. Attach your sage green yarn into that 15th stitch.
hdc 14. ch 1, turn.
hdc 14. ch 1, turn.
hdc 14. ch 1, turn.
hdc 14. ch 1, turn.
hdc 14. ch 1, turn.
hdc 14. ch 1, turn.
hdc 14. ch 1, turn.
hdc 14. ch 1, turn.
hdc 14. ch 1, turn.
hdc 14. ch 1, turn.
hdc 14. ch 1, turn.
Rotate your work so you can crochet directly along the raw vertical edges of the rows you just made. Work 14 hdc evenly across this raw edge. ch 1, turn.
hdc 14. ch 1, turn.
hdc 14. ch 1, turn.
hdc 14. ch 1, turn.
hdc 14. ch 1, turn.
hdc 14. ch 1, turn.
hdc 14. ch 1, turn.
hdc 14. ch 1, turn.
hdc 14. ch 1, turn.
hdc2tog, hdc 10, hdc2tog. ch 1, turn. (12)
hdc2tog, hdc 8, hdc2tog. ch 1, turn. (10)
hdc2tog, hdc 6, hdc2tog. Fasten off. (8)
With the wrong side of your first main cactus body facing you, count 27 stitches up from the bottom edge along the right side. Attach your sage green yarn into that 27th stitch.
ch 1, hdc 12. ch 1, turn.
hdc 12. ch 1, turn.
hdc 12. ch 1, turn.
hdc 12. ch 1, turn.
hdc 12. ch 1, turn.
hdc 12. ch 1, turn.
hdc 12. ch 1, turn.
hdc 12. ch 1, turn.
hdc 12. ch 1, turn.
Rotate your work to crochet along the raw row ends. Work 12 hdc evenly across this raw edge. ch 1, turn.
hdc 12. ch 1, turn.
hdc 12. ch 1, turn.
hdc 12. ch 1, turn.
hdc 12. ch 1, turn.
hdc 12. ch 1, turn.
hdc2tog, hdc 8, hdc2tog. ch 1, turn. (10)
hdc2tog, hdc 6, hdc2tog. ch 1, turn. (8)
hdc2tog, hdc 4, hdc2tog. Fasten off. (6)
Now we will create the mirrored back panel. With the wrong side of your second main cactus body facing you, count 15 stitches up from the bottom edge along the right-hand side. Attach your sage green yarn in that 15th stitch.
hdc 14. ch 1, turn.
hdc 14. ch 1, turn.
hdc 14. ch 1, turn.
hdc 14. ch 1, turn.
hdc 14. ch 1, turn.
hdc 14. ch 1, turn.
hdc 14. ch 1, turn.
hdc 14. ch 1, turn.
hdc 14. ch 1, turn.
hdc 14. ch 1, turn.
hdc 14. ch 1, turn.
Rotate your panel to work along the raw vertical edges. Work 14 hdc evenly across this raw edge. ch 1, turn.
hdc 14. ch 1, turn.
hdc 14. ch 1, turn.
hdc 14. ch 1, turn.
hdc 14. ch 1, turn.
hdc 14. ch 1, turn.
hdc 14. ch 1, turn.
hdc 14. ch 1, turn.
hdc 14. ch 1, turn.
hdc2tog, hdc 10, hdc2tog. ch 1, turn. (12)
hdc2tog, hdc 8, hdc2tog. ch 1, turn. (10)
hdc2tog, hdc 6, hdc2tog. Fasten off. (8)
With the right side of your second main cactus body facing you, count 27 stitches up from the bottom edge along the right-hand side. Attach your sage green yarn in that 27th stitch.
ch 1, hdc 12. ch 1, turn.
hdc 12. ch 1, turn.
hdc 12. ch 1, turn.
hdc 12. ch 1, turn.
hdc 12. ch 1, turn.
hdc 12. ch 1, turn.
hdc 12. ch 1, turn.
hdc 12. ch 1, turn.
hdc 12. ch 1, turn.
Rotate your panel to work along the raw vertical edges. Work 12 hdc evenly across this raw edge. ch 1, turn.
hdc 12. ch 1, turn.
hdc 12. ch 1, turn.
hdc 12. ch 1, turn.
hdc 12. ch 1, turn.
hdc 12. ch 1, turn.
hdc2tog, hdc 8, hdc2tog. ch 1, turn. (10)
hdc2tog, hdc 6, hdc2tog. ch 1, turn. (8)
hdc2tog, hdc 4, hdc2tog. Fasten off. (6)
ch 50, work 1 sc in the 2nd ch from your hook, work 3 dc in the next ch, [work 1 sc in the next ch, then 3 dc in the following ch] repeat this sequence all the way to the end of the chain. Fasten off, leaving a long tail for assembling and sewing.
I hope you have the absolute best time bringing this sweet cactus pillow to life! There is nothing quite like the feeling of seeing those textured ridges and bobbles plump up into a real, huggable accent piece. When you finish sewing on that bright little blossom, find the perfect sunny spot on your couch for your new companion to live. Happy crafting, and may your stitches always bring you joy! 🧶🌵✨
Yes, you can substitute a worsted weight acrylic yarn. Keep in mind that cotton yarn provides a sturdier, more structured fabric that holds its shape well when stuffed, while acrylic will feel slightly softer and may stretch a bit more over time.
The flower is designed to twist naturally due to the stitch pattern. If it is not curling, make sure you are working the alternating single crochet and triple double crochet groups into consecutive chains. When rolling it up, start tightly at the center and wrap loosely as you move outward.
Bobble stitches naturally pop out away from you as you work them. When working Row 3, Row 7, and Row 11, gently push the bobbles toward the front of the panel with your finger before completing the next single crochet to lock them in place.
Absolutely! The easiest way to scale up the size is to use a bulkier yarn (like a chunky or blanket weight yarn) paired with a larger hook size. This will naturally increase the overall dimensions without needing to alter the stitch counts.
