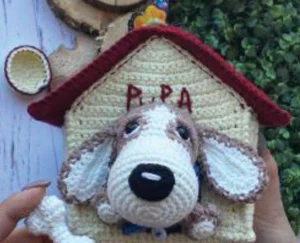
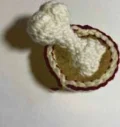
Get ready to create a whole miniature world with this charming Dog PuPa set. You'll be crafting not just a sweet, floppy-eared pup with poseable legs, but also his very own structured doghouse, a tiny bone, and a food bowl. It’s a project that keeps things interesting with varied techniques, from button-jointing to structural assembly. If you love a project with lots of personality and fun accessories, you're going to have a blast with this one.
Progress Tracker
0% Complete
— 1. Tail :
Row 1 :
Using your beige yarn, ch 8. Starting in the second ch from the hook, work 5 sl st and then 2 sc. Cut the yarn, leaving a long tail for sewing later.
— 2. Legs (Make 4) :
Round 1 :
With white yarn, work 6 sc into a MR (6)
Round 3 :
Switch to beige. Working in BLO only, (1 sc, inc) 6 times (18)
Round 4 :
(1 sc, 4-dc bobble st) 4 times, then work 10 sc (18)
Round 5 :
(1 sc, dec) 6 times (12)
Info :
Begin stuffing the leg with fiberfill and continue as you go.
Round 6 :
(2 sc, dec) 3 times (9)
Round 7 :
2 sc, dec, 5 sc (8)
Round 8-11 :
Work 8 sc in each round (8)
Info :
Fasten off and weave in your ends.
— 3. Body :
Round 1 :
Using beige, work 6 sc into a MR (6)
Round 3 :
(1 sc, inc) 6 times (18)
Round 4 :
(2 sc, inc) 6 times (24)
Round 5 :
(3 sc, inc) 6 times (30)
Round 6-8 :
Work 30 sc in each round (30)
Round 9 :
6 sc, (dec, 1 sc) 6 times, 6 sc (24)
Round 10 :
8 sc, work 8 sc in FLO, 8 sc (24)
Round 11-12 :
Work 24 sc in each round (24)
Round 13 :
8 sc, work 8 sc into the unworked back loops of Round 10, 8 sc (24)
Round 14 :
8 sc, work 8 sc in FLO, 8 sc (24)
Round 15 :
Work 24 sc (24)
Round 16 :
8 sc, work 8 sc into the unworked back loops of Round 14, 8 sc (24)
Round 17 :
(3 sc, inc) 6 times (30)
Round 18-19 :
Work 30 sc in each round (30)
Round 20 :
(3 sc, dec) 6 times (24)
Round 21 :
(2 sc, dec) 6 times (18)
Round 22 :
(1 sc, dec) 6 times (12)
Info :
Stuff the body firmly with fiberfill.
Info :
Fasten off and hide the yarn tail inside.
— 4. Head :
Round 1 :
Using white yarn, work 6 sc into a MR (6)
Round 3 :
3 inc, 3 sc, 3 inc, 3 sc (18)
Round 4 :
(1 sc, inc) twice, 3 sc, (inc, 1 sc) 3 times, 4 sc, inc (24)
Round 5 :
(2 sc, inc) twice, 4 sc, (inc, 2 sc) 3 times, 4 sc, inc (30)
Round 6 :
(3 sc, inc) twice, 4 sc, (inc, 3 sc) 3 times, 5 sc, inc (36)
Round 7 :
(4 sc, inc) twice, 5 sc, (inc, 4 sc) 3 times, 5 sc, inc (42)
Round 8-10 :
Work 42 sc in each round (42)
Round 11 :
(4 sc, dec) twice, 5 sc, (dec, 4 sc) 3 times, 5 sc, dec (36)
Round 12 :
Work 36 sc (36)
Round 13 :
(3 sc, dec) twice, 4 sc, (dec, 3 sc) 3 times, 5 sc, dec (30)
Round 14-15 :
Work 30 sc in each round (30)
Info :
From Round 16 to 21, you will use the jacquard technique. White stitches are indicated in the instructions below.
Round 16 :
With beige: (3 sc, inc) twice. With white: 4 sc. With beige: inc, 2 sc, inc, (3 sc, inc) twice, 6 sc (36)
Round 17 :
With beige: 10 sc. With white: 4 sc. With beige: 22 sc (36)
Round 18 :
With beige: 10 sc. With white: 4 sc. With beige: 22 sc (36)
Round 19 :
With beige: 9 sc. With white: 6 sc. With beige: 21 sc (36)
Round 20 :
With beige: 9 sc. With white: 6 sc. With beige: 21 sc (36)
Round 21 :
With beige: 11 sc. With white: 2 sc. With beige: 23 sc (36)
Round 22 :
Cut the white yarn and continue with beige only. Work 36 sc (36)
Info :
Place safety eyes between Rounds 18 and 19, leaving about 8-10 stitches between them.
Round 23 :
(4 sc, dec) 6 times (30)
Round 24 :
(3 sc, dec) 6 times (24)
Round 25 :
(2 sc, dec) 6 times (18)
Round 26 :
(1 sc, dec) 6 times (12)
Info :
Stuff the head firmly.
Info :
Fasten off and weave in the ends.
— 5. Ears (Make 2) :
Info :
You will need to crochet 2 pieces in beige and 2 in white. These are worked in rows.
Row 1 :
Ch 13. Starting in the 2nd ch: 11 sc, 4 dc in the final ch. Turn and work along the other side of the chain: 11 sc (25)
Row 2 :
Ch 1, 7 sc, 4 dc, dc-inc, 4 dc, 7 sc (30)
Info :
Fasten off the white pieces. Keep the beige pieces on your hook. Layer a white piece over a beige piece and join them by crocheting through both layers: (sl st, inc) 15 times along the edge. Leave a long tail for sewing.
— 6. Nose :
Round 1 :
Using black yarn, ch 5. Starting in the 2nd ch: inc, 2 sc, 3 sc in the last ch. Turn to work along the bottom: 3 sc (10)
Round 2 :
inc, 4 sc, 2 inc, 2 sc, inc (14)
Info :
Fasten off, leaving a tail for sewing.
— 7. Coat :
Row 1 :
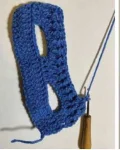
Using blue yarn, ch 32. Starting in the 3rd ch from hook: 30 dc, turn (30)
Row 2 :
Ch 2, 30 dc, turn (30)
Row 3 :
Ch 2, 4 dc, ch 8 (skip 8 dc), 6 dc, ch 8 (skip 8 dc), 4 dc, turn (30)
Row 4 :
Ch 2, 30 dc (working into the chains), turn (30)
Row 5 :
Ch 2, (BPdc, FPdc) 15 times, turn (30)
Row 6 :
Ch 2, (FPdc, BPdc) 15 times (30)
Info :
Fasten off. Add buttons and loops to secure the coat.
— 8. Dog Bowl :
Round 1 :
Using yellow yarn, work 6 sc into a MR (6)
Round 3 :
(1 sc, inc) 6 times (18)
Round 4 :
(2 sc, inc) 6 times (24)
Round 5 :
Work 24 sc in BLO (24)
Round 6-8 :
Work 24 sc in each round (24)
Round 9 :
Switch to burgundy and work 24 sl st around the rim. Fasten off.
— 9. Dog Treat (Bone) :
Round 1 :
With white yarn, work 6 sc into a MR (6)
Round 3 :
2 inc, 3 sc, 3 inc, 3 sc, inc (18)
Round 5 :
(1 sc, dec) 6 times (12)
Round 7-10 :
Work 6 sc in each round (6)
Round 11 :
Work 6 inc (12)
Round 12 :
(1 sc, inc) 6 times (18)
Round 13 :
Work 18 sc (18)
Round 14 :
2 dec, 3 sc, 3 dec, 3 sc, dec (12)
Info :
Fasten off and weave in ends. Use a bit of yarn to pinch and tighten the ends of the bone to give it more shape.
— 10. House - Side Walls (Make 2) :
Info :
Crochet 4 identical yellow pieces in total to make 2 double-layered walls.
Row 1 :
Ch 22. Starting in the 2nd ch: 21 sc, turn (21)
Row 2-16 :
Ch 1, 21 sc, turn (21)
Info :
Place a plastic rectangle between two pieces. Crochet through both layers to join: 19 sc, inc in corner, 15 sc, inc in corner, 19 sc, inc in corner, 15 sc, inc in corner.
— 11. House - Bottom :
Info :
Crochet 2 identical yellow pieces.
Row 1 :
Ch 25. Starting in the 2nd ch: 24 sc, turn (24)
Row 2-22 :
Ch 1, 24 sc, turn (24)
Info :
Place plastic between the two pieces and join by crocheting through both: 23 sc, inc in corner, 21 sc, inc in corner, 23 sc, inc in corner, 21 sc, inc in corner.
— 12. House - Front Wall :
Info :
Crochet 2 identical yellow pieces.
Row 1 :
Ch 2, work inc in the 2nd ch from hook, turn (2)
Row 2 :
Ch 1, 2 inc, turn (4)
Row 3 :
Ch 1, inc, 2 sc, inc, turn (6)
Row 4 :
Ch 1, inc, 4 sc, inc, turn (8)
Row 5 :
Ch 1, inc, 6 sc, inc, turn (10)
Row 6 :
Ch 1, inc, 8 sc, inc, turn (12)
Row 7 :
Ch 1, inc, 10 sc, inc, turn (14)
Row 8 :
Ch 1, inc, 12 sc, inc, turn (16)
Row 9 :
Ch 1, inc, 14 sc, inc, turn (18)
Row 10 :
Ch 1, inc, 16 sc, inc, turn (20)
Row 11 :
Ch 1, inc, 18 sc, inc, turn (22)
Row 12 :
Ch 1, inc, 20 sc, inc, turn (24)
Row 13 :
Ch 1, 24 sc, turn (24)
Row 14 (Side A) :
Ch 1, 8 sc, turn (8)
Row 15 (Side A) :
Ch 1, dec, 6 sc, turn (7)
Row 16 (Side A) :
Ch 1, 5 sc, dec, turn (6)
Row 17 (Side A) :
Ch 1, dec, 4 sc, turn (5)
Row 18-29 (Side A) :
Ch 1, 5 sc, turn (12 rows total)
Info :
Fasten off. Skip the middle 8 stitches of Row 13 for the door, then attach yarn to start the second side.
Row 14 (Side B) :
Ch 1, 8 sc, turn (8)
Row 15 (Side B) :
Ch 1, 6 sc, dec, turn (7)
Row 16 (Side B) :
Ch 1, dec, 5 sc, turn (6)
Row 17 (Side B) :
Ch 1, 4 sc, dec, turn (5)
Row 18-29 (Side B) :
Ch 1, 5 sc, turn (12 rows total)
Info :
Layer the two pieces with plastic inside and join with sc around the edges as before.
— 13. House - Back Wall :
Info :
Crochet 2 identical yellow pieces.
Row 1-12 :
Follow the same increase instructions as the Front Wall (24)
Row 13-29 :
Ch 1, 24 sc, turn (17 rows total)
Info :
Join the two pieces with plastic inside using sc around the border.
— 14. House - Roof (Make 2) :
Info :
Crochet 4 identical burgundy pieces.
Row 1 :
Ch 29. Starting in the 2nd ch: 28 sc, turn (28)
Row 2-20 :
Ch 1, 28 sc, turn (19 rows total)
Info :
Join pairs with plastic inside using sc around the border. Then, join the two finished roof panels along one long side using 28 rsc.
I hope you have the most wonderful time bringing this little pup to life! There's something so special about finishing a project that has so many tiny, thoughtful components. From the little bone to the structured house, every stitch adds a bit more character. I can't wait to see your finished Dog PuPa and the colors you choose for his cozy home. Happy crafting, and may your stitches always be even and your yarn never tangle! 🧶 ✨