🧢 Beautiful ✨ Detailed πŸ’ Adorable

Festive Holiday Gnomes Amigurumi Pattern

Festive Holiday Gnomes Amigurumi Pattern
4.5β˜…Rating
3-5 HoursTime Needed
1.7KMade This
βœ‚οΈ

Intermediate Level

Ideal for those with basic crocheting experience, featuring slightly more advanced stitches and techniques to expand your skills.

⏱️

Quick Craft

Fits nicely into a free afternoon β€” 2 to 5 hours of focused, enjoyable crocheting.

πŸ₯

Charming Critter

Delightful animal designs with sweet details that capture the essence of your favorite woodland and farmyard friends.

About This Festive Holiday Gnomes Amigurumi Pattern

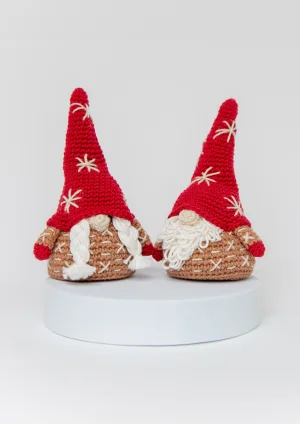
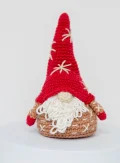
Festive Holiday Gnomes Amigurumi Pattern crochet pattern - detailed view

These gnomes make wonderful desk companions or festive shelf sitters, and their flat cardboard-reinforced bases mean they will stay upright while spreading holiday cheer throughout your home.

Why You'll Love This Festive Holiday Gnomes Amigurumi Pattern

I honestly could not stop smiling while making these! The loop stitch for the beard is such a fun technique to master, and seeing their little noses peek out from under those oversized red hats is just the cutest thing. It is the perfect project for using up those beautiful cotton scraps in your stash.

Festive Holiday Gnomes Amigurumi Pattern step 1 Festive Holiday Gnomes Amigurumi Pattern step 2 Festive Holiday Gnomes Amigurumi Pattern step 3 Festive Holiday Gnomes Amigurumi Pattern step 4

Switch Things Up

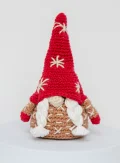
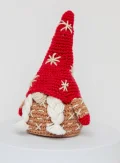
I have always felt that gnomes are the unsung heroes of holiday decor. They have this quirky, silent personality that just makes a room feel cozier! When I was working through this design, I found myself getting really excited about the textures. The body has this lovely 'X' embroidery that looks like little woven stitches, and it really elevates the simple single crochet base into something that looks much more intricate.

One thing I highly recommend is not skipping the cardboard base. I know it feels like an extra step when you just want to get to the stuffing, but it makes such a difference in how they sit on a shelf. Without it, they tend to get a bit 'roly-poly' and might lean over. I actually used an old cereal box for mine and it worked perfectly!

If you want to put your own spin on these, try playing with the hat colors! While I love the classic Red Wine shade, a deep forest green or even a sparkly tinsel yarn would look incredible. These gnomes are also the perfect size to use as a centerpiece for a winter wreath. I can't wait to see how yours turn outβ€”they really are a joy to assemble once all the pieces are ready!

Common Mistakes & How to Fix Them

βœ— If you do not pull the lp st loops to a consistent length on the beard, it can look a bit patchy and uneven once attached.βœ— Forgetting to insert the cardboard circle before the body narrows at Round 15 will make it impossible to get that perfectly flat, sturdy base.βœ— When embroidering the X pattern on the body using Color C, keep your tension loose or you might accidentally pucker the crochet fabric.βœ— Placing the hat too high on the head will hide the nose; make sure it sits low enough to rest right on top of the nose and arms for that classic gnome look.

Festive Holiday Gnomes Amigurumi Pattern

These little guys are the perfect way to add some handmade charm to your mantle this winter! Whether you want a bearded fellow or a braided friend, this pattern covers both styles so you can make a matching pair. You will love how the textured embroidery on the body and the unique loop stitch beard bring these characters to life. They are quick enough to whip up as last-minute gifts but detailed enough to look like heirloom decorations you will pull out year after year.

Intermediate 3-5 Hours

Materials Needed for Festive Holiday Gnomes Amigurumi Pattern

β€” Main Fabric

  • 01
    One 50g ball of Cotton DK yarn in light brown for the main body
  • 02
    One 50g ball of Cotton DK yarn in deep red for the hat and hands
  • 03
    One 50g ball of Cotton DK yarn in cream for the nose and embroidery
  • 04
    One 50g ball of Cotton DK yarn in bright white for the beard or braids

β€” Tools Required

  • 01
    3mm (US D-3) crochet hook
  • 02
    High-quality polyester toy stuffing
  • 03
    Sharp embroidery scissors
  • 04
    Large-eyed yarn needle for assembly and embroidery
  • 05
    Stiff cardboard circle approximately 2.5 inches (6-7cm) in diameter

Progress Tracker

0% Complete

β€” 1. Body :

Round 1 :

Using Color A, create 6 sc into a magic adjustable ring (6)

Round 2 :

Work 1 inc into every st around the circle (12)

Round 3 :

Work [1 sc, 1 inc] 6 times (18)

Round 4 :

Work [2 sc, 1 inc] 6 times (24)

Round 5 :

Work [3 sc, 1 inc] 6 times (30)

Round 6 :

Work [4 sc, 1 inc] 6 times (36)

Round 7 :

Work [5 sc, 1 inc] 6 times (42)

Round 8 :

Work [6 sc, 1 inc] 6 times (48)

Round 9 :

Working in the blo only, sc in each st around (48)

Round 10-14 :

sc in every st around (48)

Info :

Place your cardboard circle inside the bottom of the piece to create a flat base before continuing.

Round 15 :

Work [6 sc, 1 dec] 6 times (42)

Round 16 :

sc in every st around (42)

Round 17 :

Work [5 sc, 1 dec] 6 times (36)

Round 18 :

sc in every st around (36)

Round 19 :

Work [4 sc, 1 dec] 6 times (30)

Round 20-22 :

sc in every st around (30)

Round 23 :

Work [3 sc, 1 dec] 6 times (24)

Round 24 :

Work [2 sc, 1 dec] 6 times (18)

Info :

Firmly stuff the body, ensuring the base remains flat against the cardboard.

Round 25 :

Work [1 sc, 1 dec] 6 times (12)

Round 26 :

Work 1 dec 6 times around (6)

Info :

Fasten off and hide the yarn tail. Use Color C to stitch decorative 'X' patterns across the body.

β€” 2. Hands and Arms (Make 2) :

Round 1 :

Using Color B, make 6 sc into a magic ring (6)

Round 2 :

sc in every st around (6)

Round 3 :

Work [1 sc, 1 inc] 3 times (9)

Colour Change :

Cut Color B and join Color A to begin the arm section.

Round 4-9 :

sc in every st around (9)

Info :

Fasten off with a long tail. Embroider small decorative patterns on the arms with Color C. Sew the arms between Rounds 17 and 18 of the body, leaving a gap of 14 sts between them.

β€” 3. Beard :

Row 1 :

Using Color D, ch 4. Starting in the 2nd ch from the hook, sc in each of the next 3 ch, then turn (3)

Row 2 :

Work 3 lp st across, then turn (3)

Row 3 :

Work 1 inc, 1 sc, 1 inc, then turn (5)

Row 4 :

Work 5 lp st across, then turn (5)

Row 5 :

Work 1 inc, [1 sc, 1 inc] twice, then turn (8)

Row 6 :

Work 8 lp st across, then turn (8)

Row 7 :

Work [1 inc, 1 sc] 4 times, then turn (12)

Row 8 :

Work 12 lp st across, then turn (12)

Row 9 :

Work [1 inc, 2 sc] 4 times, then turn (16)

Row 10 :

Work 16 lp st across (16)

Info :

Fasten off and leave a tail for sewing. Position and sew the beard between the arms, covering Rounds 12 through 21 of the body.

β€” 4. Braids (Alternative to Beard) :

Info :

Cut 27 strands of Color D, each 12 inches long. Group them into three bundles and create a thick braid. Secure each end with a 2-inch scrap of yarn to create tassels, then trim the ends to half an inch. Fold the braid in half and secure the center point to Rounds 25-26 of the body.

β€” 5. Nose :

Round 1 :

Using Color C, work 6 sc into a magic ring (6)

Round 2 :

Work [1 sc, 1 inc] 3 times (9)

Round 3 :

sc in every st around (9)

Info :

Fasten off with a sewing tail. For the bearded gnome, sew the nose to the top center of the beard. For the braided gnome, sew it between the braids at Rounds 17-19.

β€” 6. Hat :

Round 1 :

Using Color B, work 6 sc into a magic ring (6)

Round 2 :

sc in every st around (6)

Round 3 :

Work [1 sc, 1 inc] 3 times (9)

Round 4-6 :

sc in every st around (9)

Round 7 :

Work [2 sc, 1 inc] 3 times (12)

Round 8-10 :

sc in every st around (12)

Round 11 :

Work [3 sc, 1 inc] 3 times (15)

Round 12-14 :

sc in every st around (15)

Round 15 :

Work [4 sc, 1 inc] 3 times (18)

Round 16-17 :

sc in every st around (18)

Round 18 :

Work [5 sc, 1 inc] 3 times (21)

Round 19-20 :

sc in every st around (21)

Round 21 :

Work [6 sc, 1 inc] 3 times (24)

Round 22 :

sc in every st around (24)

Round 23 :

Work [7 sc, 1 inc] 3 times (27)

Round 24 :

sc in every st around (27)

Round 25 :

Work [8 sc, 1 inc] 3 times (30)

Round 26 :

Work [9 sc, 1 inc] 3 times (33)

Round 27 :

Work [10 sc, 1 inc] 3 times (36)

Round 28 :

Work [11 sc, 1 inc] 3 times (39)

Round 29 :

Work [12 sc, 1 inc] 3 times (42)

Round 30 :

Work [13 sc, 1 inc] 3 times (45)

Round 31 :

Work [14 sc, 1 inc] 3 times (48)

Round 32 :

Work [15 sc, 1 inc] 3 times (51)

Info :

Fasten off and leave a long tail. Use Color C to embroider large snowflake-style stars randomly across the hat. Place the hat on the body so it sits just above the arms and nose, then sew it securely in place.

Assembly Instructions

  • Start by embroidering the decorative 'X' stitches across the light brown body and arms using the cream-colored yarn for a rustic, woven look.
  • Sew the arms to the sides of the body between Rounds 17 and 18, ensuring they are spaced evenly with about 14 stitches between them at the front.
  • For the bearded version, center the loop-stitch beard between the arms and sew it across Rounds 12 to 21; for the braided version, attach the center of the braid to the top of the body.
  • Position the cream nose so it sits either right on top of the beard or nestled between the two braids, then stitch it firmly to the body.
  • Add the decorative stars to the red hat using the cream yarn before attaching it, as it is much easier to embroider while the hat is flat.
  • Slide the hat over the top of the body, pulling it down until the brim touches the top of the nose and arms, then sew around the edge to secure it.

Important Notes

  • πŸ’‘Always use a stitch marker to keep track of your rounds, as the spiral construction can make it easy to lose your place.
  • πŸ’‘When working the loop stitches for the beard, try to keep your finger tension consistent so all the loops are the same length.
  • πŸ’‘The cardboard base is essential for stability; if you skip it, the gnome will have a rounded bottom and may not stand upright on its own.
  • πŸ’‘Don't overstuff the very top of the hat, as you want it to have a slight, natural-looking point rather than being perfectly stiff.
  • πŸ’‘If you find the embroidery difficult after stuffing, you can do the 'X' stitches on the body before you reach the final decrease rounds.

I hope you have as much fun making these little festive gnomes as I did! They really bring such a playful, handmade energy to holiday decorating. Whether you make a whole village of them in different colors or just a single pair for a friend, they are sure to be a hit. Don't forget to take a second to fluff out those loop stitches on the beard once you're finishedβ€”it really makes the texture pop! Happy crocheting, and may your holiday season be filled with cozy stitches and warm memories. 🧢 ✨ πŸŽ„

You ask,

we answer.

FAQs

What is the best way to cut the cardboard circle for the base?

Trace the bottom of your gnome after Round 8 onto a piece of sturdy shipping box cardboard. Cut it slightly smaller than your tracing so it fits snugly inside the 'lip' created by the back-loop-only round.

Can I use safety eyes instead of hiding the face under the hat?

While the traditional gnome look hides the eyes, you could certainly add small 6mm safety eyes just above the nose before you sew the hat down if you prefer a more 'doll-like' face.

My loop stitches are unraveling, how do I fix this?

Ensure you are completing the single crochet part of the loop stitch fully. The loop is held by the stitch itself; if it feels loose, try using a slightly smaller hook for the beard section to keep the tension tight.

Is cotton yarn necessary or can I use acrylic?

You can use acrylic, but cotton provides better stitch definition for the embroidery and a sturdier structure that helps the gnomes stand upright without sagging.