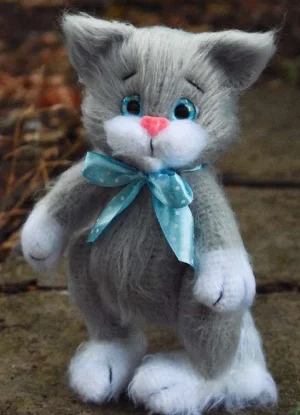
Get ready to create the softest little companion you've ever held! Tishka isn't just any ordinary crochet cat; he's a project full of personality and tactile delight. By using fuzzy yarn and some clever sculpting techniques, you'll transform simple stitches into a lifelike feline friend with expressive eyes and a sweet, posable body. It is a joy to watch his character emerge as you brush out the fur and add those final tiny details.
Progress Tracker
0% Complete
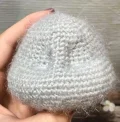
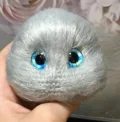
— 1. Head :
Info :
Use the grey yarn for this section. Keep your stitch marker aligned with the center of the back of the head.
Round 1 :
Start with 6 sc in a mr (6)
Round 3 :
Repeat (1 sc, inc) 6 times (18)
Round 4 :
Repeat (2 sc, inc) 6 times (24)
Round 5 :
Repeat (3 sc, inc) 6 times (30)
Round 6 :
Repeat (4 sc, inc) 6 times (36)
Round 7 :
Repeat (5 sc, inc) 6 times (42)
Round 8-9 :
sc in every stitch around (42)
Round 10 :
Repeat (6 sc, inc) 6 times (48)
Round 11-12 :
sc in every stitch around (48)
Round 13 :
Repeat (7 sc, inc) 6 times (54)
Round 14-15 :
sc in every stitch around (54)
Round 16 :
sc 16, work 8 inc, sc 6, work 8 inc, sc 16 (70)
Round 17-21 :
sc in every stitch around (70)
Round 22 :
sc 16, repeat (1 sc, dec) 6 times, sc 2, repeat (1 sc, dec) 6 times, sc 16 (58)
Round 23-24 :
sc in every stitch around (58)
Round 25 :
sc 2, repeat (7 sc, dec) 6 times, sc 2 (52)
Round 26 :
sc 2, repeat (6 sc, dec) 6 times, sc 2 (46)
Round 27 :
sc 2, repeat (5 sc, dec) 6 times, sc 2 (40)
Round 28 :
Repeat (6 sc, dec) 5 times (35)
Round 29 :
Repeat (5 sc, dec) 5 times (30). Stuff the head firmly.
Round 30 :
Repeat (4 sc, dec) 5 times (25). Insert the plastic joint into the opening.
Round 31 :
Repeat (3 sc, dec) 5 times (20)
Round 32 :
Repeat (2 sc, dec) 5 times (15)
Round 33 :
Repeat (1 sc, dec) 5 times (10)
Round 34 :
Work 5 dec and close the remaining hole.
— 2. Muzzle :
Info :
Use white yarn for this part. You will make two identical circles first.
Round 1 :
Start 6 sc in a mr (6)
Round 3 :
Repeat (1 sc, inc) 6 times (18)
Info :
After completing the second part, do not cut the yarn.
Joining :
Connect the two parts using a sl st, then work 36 sc around the perimeter of both pieces, skipping the sl st.
— 3. Lip :
Row 1 :
Work 5 sc into a mr, but do not join the circle. ch 1 and turn.
Row 2 :
sc 1, work 3 inc, sc 1.
— 4. Ears :
Info :
Make two using the grey yarn.
Round 1 :
Start 6 sc in a mr (6)
Round 2 :
sc in every stitch around (6)
Round 4 :
sc in every stitch around (12)
Round 5 :
Repeat (1 sc, inc) 6 times (18)
Round 6-7 :
sc in every stitch around (18)
Round 8 :
Repeat (2 sc, inc) 6 times (24)
Round 9 :
sc in every stitch around (24)
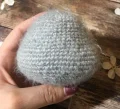
— 5. Body :
Info :
Use grey yarn. The body is worked from the neck down to the tail. Place your marker in the center of the back.
Round 1 :
Start 6 sc in a mr (6)
Round 3 :
Repeat (1 sc, inc) 6 times (18)
Round 4 :
Repeat (2 sc, inc) 6 times (24)
Round 5 :
Repeat (3 sc, inc) 6 times (30)
Round 6 :
Repeat (4 sc, inc) 6 times (36)
Round 7-13 :
sc in every stitch around (36). Secure the plastic head joint into Round 7.
Round 14 :
Repeat (5 sc, inc) 6 times (42)
Round 15 :
sc in every stitch around (42)
Round 16 :
Repeat (6 sc, inc) 6 times (48)
Round 17 :
sc in every stitch around (48)
Round 18 :
sc 16, repeat (1 sc, inc) 8 times, sc 16 (56). These increases form the belly.
Round 19-25 :
sc in every stitch around (56)
Round 26 :
Repeat (5 sc, dec) 8 times (48)
Round 27-30 :
sc in every stitch around (48)
Round 31 :
Repeat (6 sc, dec) 6 times (42)
Round 32 :
Repeat (5 sc, dec) 6 times (36)
Round 33 :
Repeat (4 sc, dec) 6 times (30)
Round 34 :
Repeat (3 sc, dec) 6 times (24)
Round 35 :
Repeat (2 sc, dec) 6 times (18). Stuff the body well.
Round 36 :
Repeat (1 sc, dec) 6 times (12)
Round 37 :
Work 6 dec and finish off.
— 6. Tail :
Info :
Alternate 4 rounds of grey and 2 rounds of white throughout.
Round 1 :
Using white, start 7 sc in a mr (7)
Round 3-4 :
sc in every stitch around (14)
Round 5 :
Repeat (6 sc, inc) twice (16)
Round 6 :
sc in every stitch around (16)
Round 7-10 :
Switch to grey, sc in every stitch around (16)
Round 11-12 :
Switch to white, sc in every stitch around (16)
Round 13-16 :
Switch to grey, sc in every stitch around (16)
Round 17-18 :
Switch to white, sc in every stitch around (16)
Round 19-22 :
Switch to grey, sc in every stitch around (16)
Round 23-24 :
Switch to white, sc in every stitch around (16)
Round 25-28 :
Switch to grey, sc in every stitch around (16)
Round 29-30 :
Switch to white, sc in every stitch around (16)
Round 31-32 :
Switch to grey, sc in every stitch around (16). Stuff lightly.
Row 33 :
Flatten the opening and work 8 sc through both layers to close.
— 7. Front Paws :
Info :
Make two paws, starting with white yarn.
Round 1 :
Start 6 sc in a mr (6)
Round 3 :
Repeat (1 sc, inc) 6 times (18)
Round 4 :
Repeat (2 sc, inc) 6 times (24)
Round 5-6 :
sc in every stitch around (24)
Round 7 :
Repeat (dec, 1 sc) 4 times, then sc 12 (20)
Round 8 :
sc in every stitch around (20)
Round 9 :
sc 1, work 4 dec, then sc 11 (16)
Round 10 :
sc in every stitch around, then change to grey yarn (16)
Round 11-25 :
sc in every stitch around (16)
Round 26 :
Repeat (2 sc, dec) 4 times (12)
Round 27 :
Work 6 dec and close.
— 8. Back Paws - Foot :
Info :
Make two feet using white yarn.
Round 1 :
Start 7 sc in a mr (7)
Round 3 :
Repeat (1 sc, inc) 7 times (21)
Round 4-12 :
sc in every stitch around (21)
Round 13 :
Repeat (5 sc, dec) 3 times (18)
Round 14-15 :
sc in every stitch around (18)
Round 16 :
Repeat (4 sc, dec) 3 times (15). Stuff lightly.
Round 17 :
Repeat (1 sc, dec) 5 times (10)
Round 18 :
Work 5 dec and close.
— 9. Back Paws - Leg :
Info :
Join grey yarn to the 16th row of the white foot. You will work in a clockwise direction.
Pickup :
Crochet 5 sc horizontally, 2 sc vertically, another 5 sc horizontally, and 2 sc vertically to establish a base of 14 sc.
Round 1-5 :
sc in every stitch around (14)
Round 6 :
sc 7, work 5 inc, sc 2 (19). These increases form the knee at the front.
Round 7 :
sc in every stitch around (19)
Round 8 :
sc 7, repeat (1 sc, inc) 5 times, sc 2 (24). These also form the knee area.
Round 9-18 :
sc in every stitch around (24). Stuff as you go.
Round 19 :
Repeat (6 sc, dec) 3 times (21)
Round 20 :
Repeat (1 sc, dec) 7 times (14). Stuff the leg, but leave the top part soft.
Round 21 :
Work 7 dec and close.
I'm so excited for you to finish your Tishka! There is nothing quite like the feeling of brushing out that final bit of fur and seeing a character emerge from your crochet hooks. This little cat has such a gentle soul, and I hope he brings a sense of calm and creativity to your home. Don't be afraid to experiment with different eye colors or even a little ribbon around his neck to give him his own unique personality. Thank you for letting me be a part of your crafting journey today. Happy hooking, and enjoy your new fluffy friend! 🧶✨