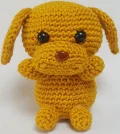
Meet your new favorite desk buddy! This little golden pup is designed to look like a sweet Labrador Retriever, reaching out for a big hug. You'll love how the muzzle gives him so much personality. He's small enough to fit in your palm but packed with character, making him a perfect afternoon project when you need a little creative win. He's worked in a beautiful golden-yellow yarn that just radiates warmth.
Progress Tracker
0% Complete
— 1. Muzzle :
Info :
The muzzle is worked first to help you place the eyes correctly later on.
Round 1 :
ch 7, work 2 sc in the 2nd ch from hook. sc in next 4 sts, 5 sc in the final ch. Working along the back of the chain: sc in next 4 loops, 3 sc in the last loop. Join with a sl st to the first st. (18)
Round 2 :
inc in the same st as the join, sc in next 6 sts, inc in next st, 1 sc, inc in next st, sc in next 6 sts, inc in next st, 1 sc. Join with a sl st. (22)
Round 3 :
Work in BLO: 1 sc in every st around, join with a sl st. (22)
Round 4 :
1 sc in every st around. (22)
Round 5 :
1 sc in every st around. (22)
Info :
Cut the yarn but leave a long tail for sewing. Place your safety nose in the center of a long side, just above the BLO ridge. Use the narrower part of the nose at the front to avoid distorting the shape. Stuff lightly as you sew it to the head later.
— 2. Head :
Round 1 :
Create a MR and work 6 sc into it. (6)
Round 2 :
Work 2 sc in each st around. (12)
Round 3 :
(1 sc, inc) repeat 6 times. (18)
Round 4 :
(2 sc, inc) repeat 6 times. (24)
Round 5 :
(3 sc, inc) repeat 6 times. (30)
Round 6 :
(4 sc, inc) repeat 6 times. (36)
Round 7 :
(5 sc, inc) repeat 6 times. (42)
Round 8 :
(6 sc, inc) repeat 6 times. (48)
Round 9 :
1 sc in every st around. (48)
Round 10 :
1 sc in every st around. (48)
Round 11 :
1 sc in every st around. (48)
Round 12 :
1 sc in every st around. (48)
Round 13 :
1 sc in every st around. (48)
Round 14 :
1 sc in every st around. (48)
Round 15 :
1 sc in every st around. (48)
Info :
Note: The source pattern mentions 6 rows for this section, but the round count 9-15 indicates 7 rounds. Follow the round count for the best shape.
Round 16 :
(6 sc, dec) repeat 6 times. (42)
Round 17 :
(5 sc, dec) repeat 6 times. (36)
Round 18 :
(4 sc, dec) repeat 6 times. (30)
Round 19 :
(3 sc, dec) repeat 6 times. (24)
Round 20 :
(2 sc, dec) repeat 6 times. (18)
Info :
Pause here to attach the muzzle between Rounds 12 and 18. Fix safety eyes between Rounds 11 and 12, roughly 5 sts apart, or wherever they look best relative to your muzzle placement. Stuff the head firmly.
Round 21 :
(1 sc, dec) repeat 6 times. (12)
Round 22 :
Work 6 dec. (6)
Info :
Fasten off, leaving a long tail for assembly.
— 3. Ears :
Round 1 :
Work 6 sc into a MR. (6)
Round 2 :
Work 2 sc in each st around. (12)
Round 3 :
(1 sc, inc) repeat 6 times. (18)
Round 4 :
(2 sc, inc) repeat 6 times. (24)
Round 5 :
(3 sc, inc) repeat 6 times. (30)
Round 6 :
(4 sc, inc) repeat 3 times, then stop—do not finish the full round. (33)
Info :
Leave a tail for sewing. Fold the ear in half so the extra stitches from the half-row sit against the other side. Stitch through the top to keep it flat.
— 4. Body :
Round 1 :
Work 6 sc into a MR. (6)
Round 2 :
Work 2 sc in each st around. (12)
Round 3 :
(1 sc, inc) repeat 6 times. (18)
Round 4 :
(2 sc, inc) repeat 6 times. (24)
Round 5 :
(3 sc, inc) repeat 6 times. (30)
Round 6 :
(4 sc, inc) repeat 6 times. (36)
Round 7 :
1 sc in every st around. (36)
Round 8 :
1 sc in every st around. (36)
Round 9 :
1 sc in every st around. (36)
Round 10 :
1 sc in every st around. (36)
Round 11 :
1 sc in every st around. (36)
Round 12 :
1 sc in every st around. (36)
Round 13 :
(4 sc, dec) repeat 6 times. (30)
Round 14 :
1 sc in every st around. (30)
Round 15 :
(3 sc, dec) repeat 6 times. (24)
Round 16 :
1 sc in every st around. (24)
Info :
Stuff the body moderately—avoid overstuffing the bottom so it stays flat. Sew the body to the head at Round 19, matching the 24 stitches.
— 5. Tail :
Round 1 :
Work 3 sc into a MR. (3)
Round 2 :
Work 2 sc in each st around. (6)
Round 3 :
1 sc in every st around. (6)
Round 4 :
1 sc in every st around. (6)
Round 5 :
1 sc in every st around. (6)
Round 6 :
1 sc in every st around. (6)
Round 7 :
1 sc in every st around. (6)
Round 8 :
1 sc in every st around. (6)
Round 9 :
1 sc in every st around. (6)
Round 10 :
1 sc in every st around. (6)
Round 11 :
1 sc in every st around. (6)
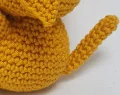
Info :
Fasten off and leave a tail. Flatten the end where you finished and sew it to the back of the body near Round 6.
— 6. Front Paws :
Info :
Make two front paws.
Round 1 :
Work 6 sc into a MR. (6)
Round 2 :
(1 sc, inc) repeat 3 times. (9)
Round 3 :
1 sc in every st around. (9)
Round 4 :
1 sc in every st around. (9)
Round 5 :
1 sc in every st around. (9)
Round 6 :
1 sc in every st around. (9)
Info :
Fasten off and leave a tail for sewing.
— 7. Back Paws :
Info :
Make two back paws.
Round 1 :
Work 6 sc into a MR. (6)
Round 2 :
(1 sc, inc) repeat 3 times. (9)
Round 3 :
1 sc in every st around. (9)
Round 4 :
1 sc in every st around. (9)
Round 5 :
1 sc in every st around. (9)
Info :
Fasten off and leave a tail for sewing.
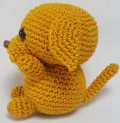
I hope you have the best time bringing this little golden friend to life! There's something so rewarding about seeing that tiny face start to peek back at you as you sew on the muzzle and eyes. Whether he's destined for a gift or a permanent spot on your desk, he's sure to bring a smile to anyone who sees him. Don't forget to give him a little pat on the head when you're done—he's earned it! Happy crocheting, and may your tension be perfect and your yarn never tangle. 🧶🐶✨