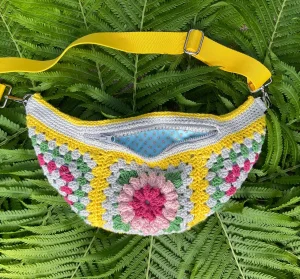
Get ready for your new favorite summer accessory! This Floral Crossbody Bag is the perfect blend of vintage charm and modern functionality. Whether you're hitting the local farmers market or dancing at a music festival, this hands-free beauty keeps your essentials close while showing off your crochet skills. You'll love the way the bold floral motif pops against the classic granny square backdrop. It's a fun, engaging project that comes together faster than you'd think, making it a great choice for a productive weekend at home.
Progress Tracker
0% Complete
— 1. Regular Granny Square (Make 3) :
Set-up Rnd :
Using the light gray yarn, ch 4 and join with a sl st to the first ch to form a center ring.
Round 1 :
Ch 3 (this is your first dc), work 2 dc into the ring. [Ch 2, then work 3 dc into the ring] 3 times. To close, hdc into the top of your starting ch-3.
Round 2 :
Using the same color, ch 3 (counts as dc), 2 dc into the corner sp just made. *Skip the next 3 dc, then work [3 dc, ch 2, 3 dc] in the next corner sp. Repeat from * twice more. Skip the next 3 dc, work 3 dc into the first corner sp, then hdc into the top of the ch-3 to join. Before finishing the join, pull through with dark pink to change colors, but do not cut the gray yarn.
Round 3 :
With dark pink, ch 3 (counts as dc), 2 dc in the corner sp. *Skip 3 dc, 3 dc into the sp before the next cluster, skip 3 dc, [3 dc, ch 2, 3 dc] in the corner sp. Repeat from * twice more. Skip 3 dc, 3 dc in the sp before the next cluster, skip 3 dc, 3 dc in the first corner sp, then hdc into the top of the ch-3 to join. Fasten off the pink.
Round 4 :
Pick up the light gray yarn in any corner, ch 3 (counts as dc), 2 dc in the same corner sp. *Work 3 dc into every sp between clusters across to the next corner, then [3 dc, ch 2, 3 dc] in the corner sp. Repeat from * twice more. Work 3 dc into every sp across to the start, 3 dc in the first corner sp, then hdc into the top of the ch-3 to join. Pull through with grass green at the very end of the join but do not cut the gray.
Round 5 :
With grass green, ch 3 (counts as dc), 2 dc in the corner sp. *Work 3 dc into every sp between clusters across to the next corner, then [3 dc, ch 2, 3 dc] in the corner sp. Repeat from * twice more. Work 3 dc into every sp across to the start, 3 dc in the first corner sp, then hdc into the top of the ch-3 to join. Fasten off the green.
Round 6 :
Pick up the light gray yarn in any corner, ch 3 (counts as dc), 2 dc in the same corner sp. *Work 3 dc into every sp between clusters across to the next corner, then [3 dc, ch 2, 3 dc] in the corner sp. Repeat from * twice more. Work 3 dc into every sp across to the start, 3 dc in the first corner sp, then hdc into the top of the ch-3 to join. Pull through with bright yellow at the end of the join.
Round 7 :
With bright yellow, ch 3 (counts as dc), 2 dc in the corner sp. *Work 3 dc into every sp between clusters across to the next corner, then [3 dc, ch 2, 3 dc] in the corner sp. Repeat from * twice more. Work 3 dc into every sp across to the start, 3 dc in the first corner sp, then hdc into the top of the ch-3 to join. Fasten off, leaving a long tail for assembly.
— 2. Floral Granny Square (Make 1) :
Set-up Rnd :
Using dark pink, ch 6 and join with a sl st to the first ch to create a ring.
Round 1 :
Ch 3 (does not count as a st), [work 1 pp, then 1 tr] 8 times into the center of the ring. Join with a sl st to the top of the first tr. Fasten off. You should have 8 petals and 8 tr.
Round 2 :
Join pale pink with a sl st to any tr from the previous round. Ch 3 (does not count as a st), then work [1 pp, 1 tr, 1 pp, 1 tr] into every tr around. Join with a sl st to the first tr. Fasten off. You should have 16 petals and 16 tr.
Round 3 :
Join grass green with a sl st to any tr from Rnd 1. In that same st, work [beg 3-dc cl, ch 2, 3-tr cl, ch 2, 3-dc cl] to form a corner. Place a marker in that second ch-2 sp. *Ch 12, skip the next 4 petals and 3 tr, then work [3-dc cl, ch 2, 3-tr cl, ch 2, 3-dc cl] in the next tr. Repeat from * twice more. Ch 12, skip the remaining sts, and join with a sl st to the top of the beg 3-dc cl. Fasten off.
Round 4 :
Join light gray with a sl st in the marked corner ch-2 sp. Ch 1 (does not count as a st), 3 sc in the same sp. *Skip the next cluster, and working over the ch-12 to encase it, work 3 dc into each of the next 3 tr from Rnd 2. Skip the next cluster, 3 sc in the next ch-2 sp, ch 2, skip the 3-tr cl, 3 sc in the next ch-2 sp. Repeat from * twice more. Skip the next cluster, work the encased dc groups as before, skip the cluster, 3 sc in the final ch-2 sp, then hdc into the first sc to join.
Round 5 :
Still with gray, ch 2 (counts as dc), 2 dc in the corner sp. *Skip 3 sc, [3 dc in the next sp, skip 3 sts] 3 times, 3 dc in the sp before the next 3 sc, skip 3 sc, then [3 dc, ch 2, 3 dc] in the corner ch-2 sp. Repeat from * twice more. Work the dc groups across the side as established, 3 dc in the first corner, then hdc into the top of the ch-2 to join. Fasten off.
Round 6 :
Join bright yellow with a sl st in any corner sp. Ch 2 (counts as dc), 2 dc in the same sp. *Skip 3 dc, [3 dc in the next sp, skip 3 dc] 5 times, then [3 dc, ch 2, 3 dc] in the corner sp. Repeat from * twice more. Work the dc groups across the final side, 3 dc in the first corner, then hdc into the top of the ch-2 to join. Fasten off, leaving a tail for sewing.
— 3. Square Assembly :
Info :
Lay your squares out in a 'T' shape: place the three regular squares in a horizontal row, then attach the floral square to the bottom of the middle regular square.
Info :
Using a whipstitch and the long yarn tails, sew the edges together to secure the 'T' shape. Once the 'T' is finished, fold the outer two regular squares upward and sew their side edges to the sides of the floral square, creating the bag pouch.
— 4. Top Border :
Round 1 :
Join bright yellow in any corner ch-2 sp of the bag's top edge. Ch 1 (no count), sc in the same sp. Work sc into every dc across, and put 2 sc into every corner sp where squares meet. Join with a sl st to the first sc. (146 sts). Fasten off.
Round 2 :
Join light gray in the first st of the previous round. Ch 1 (no count), sc in every st around. Join with a sl st to the first sc. Do not fasten off; place a marker in the loop.
Round 3 :
Pick up the gray loop, ch 1, sc in every st around. Join with a sl st.
Round 4 :
This round creates the zipper gap. Ch 1, sc in each st until you reach your first zipper marker. Skip all sts between your markers, and ch the exact same number of sts you just skipped. Sc into the second marker and continue sc in every st to the end of the round. Join with a sl st.
Round 5 :
Ch 1, sc in every st around, making sure to work into each individual ch from the previous round rather than around the ch-space. Join with a sl st.
Round 6 :
Ch 1, sc in every st around. Join and fasten off.
Round 7 :
Join bright yellow at the far right corner of the bag's front. Ch 1, sc in every st around. Join with a sl st. Keep the loop on your hook for the final top seam.
— 5. D-Ring Attachment Pieces (Make 2) :
Row 1 :
Using light gray, ch 7. Sc in the 2nd ch from the hook and in every ch across. (6 sts).
Row 2 :
Ch 1, turn, sc in each st across. (6 sts).
Row 3 :
Ch 1, turn, sc in each st across. (6 sts).
Row 4 :
Ch 1, turn, sc in each st across. (6 sts).
Row 5 :
Ch 1, turn, sc in each st across. (6 sts).
Row 6 :
Ch 1, turn, sc in each st across. (6 sts). Fasten off, leaving a long tail.
— 6. Finishing :
Info :
Fold the bag flat. Using the yellow loop from the border, sl st through both the front and back layers of the very top edge to close the bag above the zipper opening. Fasten off and weave in ends.
Info :
Slide a D-ring onto each attachment tab. Fold the tabs in half and sew them securely to the back of the bag at the top corners of the border.
Info :
Sew the zipper into the opening using a backstitch for strength. Create your fabric lining by tracing the bag shape, sewing the curved bottom, and then hand-stitching the top edge of the lining just below the zipper teeth inside the bag.
I am so excited for you to finish your bag and take it out into the world! There is nothing quite like the feeling of wearing something you made with your own two hands, especially when it is as stylish and practical as this crossbody. Whether you stick with my sunny color palette or create something totally unique from your scrap basket, your finished bag is going to be a showstopper. Don't forget to take a moment to admire that beautiful lining and the sturdy zipper—you've created a high-quality accessory that will last for years. Happy crocheting, and enjoy every adventure with your new floral companion! 🧶✨