About This Frankenstein Monster Amigurumi Pattern
He makes a wonderful Halloween decoration or a thoughtful handmade gift for anyone who loves quirky, spooky-cute things — the kind of piece people actually keep out year-round.
Ideal for those with basic crocheting experience, featuring slightly more advanced stitches and techniques to expand your skills.
Fits nicely into a free afternoon — 2 to 5 hours of focused, enjoyable crocheting.
Playful characters full of personality, designed to spark imagination and become cherished playtime favorites.
He makes a wonderful Halloween decoration or a thoughtful handmade gift for anyone who loves quirky, spooky-cute things — the kind of piece people actually keep out year-round.
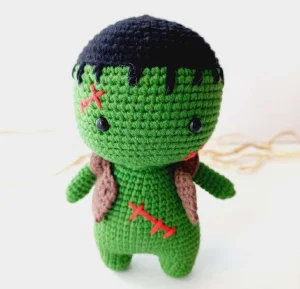
I love this one because it scratches that Halloween itch without being a huge time commitment. The color change moment where you switch from dark to green yarn is so satisfying — you can literally watch Frankenstein come to life round by round. The sweater piece is worked separately and just slipped on, which I thought was such a clever little detail. And those embroidered scars? Takes two minutes and makes the whole thing. I've made a few of these as October gifts and every single person has loved them.
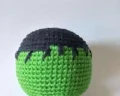
I made my first Frankenstein amigurumi on a rainy October afternoon with a mug of tea going cold next to me, and honestly — I didn't expect to like it as much as I did.
There's something about the color change moment in this pattern that gets me every time. You're working all these rounds in dark yarn, just making what looks like a regular little ball, and then suddenly you switch to green and start working through the back loops — and boom, there he is. The hairline appears. The monster takes shape. It's one of those satisfying crochet moments that never gets old no matter how many times you've done color changes before.
If you want to switch things up, try using a variegated green yarn for the body — something with a bit of depth to the color gives the finished figure this great textured look, almost like you can see the stitching more clearly. You could also make his sweater in a rust orange or deep purple instead of brown for a more vibrant Halloween palette.
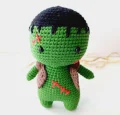
The sweater construction is something I really want to point out because it's clever and easy to underestimate. You work it completely flat, then just slip it over the assembled figure through the armhole gaps. No complicated seaming, no sewing it in place. It just sits there naturally and looks completely intentional. First time I did it I kind of couldn't believe it worked that well.
I've gifted this little guy three times now. Every single person has kept him on their desk year-round.
This little guy has so much personality packed into such a tiny frame — flat-top hair, stitched scars, and that iconic green skin all worked up in the cutest chibi style. If you love Halloween crafts, this is the kind of project you'll want to make every October. The construction flows really naturally from head to legs, and the little brown sweater detail gives him so much character. Your finished Frankenstein will stand on his own two feet and look absolutely perfect on a shelf, a desk, or wrapped up as a handmade gift.
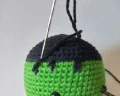
Begin with dark yarn (color 126). The hair section is worked in dark yarn for Rounds 1–11, then you switch to green yarn (color 493) at the end of Round 11. The BLO instruction on Round 12 forms the visible ridge that creates the flat-top hairline look.
Start with a mr, work 6 sc into the ring. (6)
Work inc in each st around. (12)
Work (sc, inc) around. (18)
Work (inc, 2 sc) x6 around. (24)
Work (3 sc, inc) x6 around. (30)
2 sc, inc, then (4 sc, inc) x5, finish with 2 sc. (36)
Work (5 sc, inc) around. (42)
3 sc, inc, then (6 sc, inc) x5, finish with 3 sc. (48)
Work (7 sc, inc) x6 around. (54)
4 sc, inc, then (8 sc, inc) x5, finish with 4 sc. (60)
Sc in every st around, switching to green yarn (color 493) at the end of this round. (60)
Working through the BLO only, sc in every st around. (60)
Sc in every st around. (60)
Sc in every st around. (60)
Sc in every st around. (60)
Sc in every st around. (60)
Sc in every st around. (60)
Sc in every st around. (60)
Sc in every st around. (60)
Sc in every st around. (60)
Sc in every st around. (60)
Sc in every st around. (60)
Sc in every st around. (60)
Before continuing with the decreases, attach your 6 mm safety eyes between Rounds 17 and 18, spaced evenly apart. Embroider the red cross-stitch scar marks on the face now, while the head is still easy to hold.
Work (3 sc, dec) x12 around. (48)
Work (2 sc, dec) x12 around. (36)
2 sc, dec, then (4 sc, dec) x5, finish with 2 sc. (30)
Work (3 sc, dec) x6 around. (24)
Sc in every st around. Begin stuffing the head firmly before the opening gets too small. (24)
Fasten off and leave a long tail for attaching to the body later. Finish stuffing if needed.
Work both legs in green yarn (color 493). After finishing the first leg, cut the yarn and fasten off. When making the second leg, do NOT cut the yarn — you'll continue directly into the body.
Start with a mr, work 7 sc into the ring. (7)
Work inc in each st around. (14)
Sc in every st around. (14)
Sc in every st around. (14)
Sc in every st around. (14)
The body is worked continuously from the second leg. Keep working in green yarn (color 493).
Ch 4, then join to the first leg with a sc. On the first leg work: 2 sc, (inc, 5 sc) x2. On the chain bridge work: inc, 2 sc, inc. On the second leg work: (5 sc, inc) x2, 2 sc. On the remaining chain sts work: 4 sc. (42)
Work (13 sc, inc) x3 around. (45)
Sc in every st around. (45)
Sc in every st around. (45)
Sc in every st around. (45)
Sc in every st around. (45)
Sc in every st around. (45)
Work (13 sc, dec) x3 around. (42)
Sc in every st around. (42)
Sc in every st around. (42)
Sc in every st around. (42)
Work (5 sc, dec) x6 around. (36)
Sc in every st around. (36)
Sc in every st around. (36)
Sc in every st around. (36)
Work (4 sc, dec) x6 around. (30)
Sc in every st around. (30)
Sc in every st around. (30)
Sc in every st around. (30)
Work (3 sc, dec) x6 around, then finish with a sl st. (24)
Fasten off and leave a long yarn tail for sewing. Stuff the body firmly before closing. Sew the head onto the body using the tail from the head.
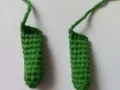
Work both arms in green yarn (color 493). These are left unstuffed — do not add fiberfill.
Start with a mr, work 6 sc into the ring. (6)
Work (sc, inc) x3 around. (9)
Sc in every st around. (9)
Sc in every st around. (9)
Sc in every st around. (9)
Sc in every st around. (9)
Sc in every st around. (9)
Sc in every st around. (9)
Sc in every st around. (9)
Sc in every st around. (9)
Sc in every st around. (9)
Fasten off leaving a tail for sewing. Flatten the open end slightly before attaching to the body.
The sweater is worked flat in rows using brown yarn (color 60), with a turning chain 1 at the end of each row. It is made separately and placed on the body after assembly.
Ch 25 to start, then work (sc, inc) x12 across. Ch 1, turn. (36)
Work (2 sc, inc) x12 across. Ch 1, turn. (48)
Sc in every st across. Ch 1, turn. (48)
Work 7 sc, ch 3, skip the next 10 sts, work 14 sc, ch 3, skip the next 10 sts, work 7 sc. Ch 1, turn. (This creates the two armhole openings.)
Sc in every st across, working into the ch-3 bridges as regular sts. Ch 1, turn. (34)
Sc in every st across. Ch 1, turn. (34)
Sc in every st across. Ch 1, turn. Fasten off and weave in all ends. (34)
There's something really special about a handmade Halloween figure — especially one this small and full of charm. 🧶 Your Frankenstein monster is the kind of thing that earns a permanent spot on the shelf, not just a seasonal box. Whether you gifted him to someone or kept him for yourself (no judgment!), I hope the making was just as fun as the finished result. He might be a creature of stitches and yarn, but honestly? He's got more personality than most. Happy crocheting! ✨🧵
Absolutely — the pattern is designed for cotton yarn at a fine weight with a 2.00 mm hook, but you can scale up. If you use DK weight with a 3.00–3.5 mm hook, the finished figure will be noticeably larger and the fabric will be a bit stretchier. Just keep your tension tight enough that the stuffing doesn't show through.
The key is two things: starting the head in dark yarn and working the first 11 rounds in it, then making sure you work Round 12 strictly through the back loops only after the color change. That BLO round creates the ridge that separates the hair from the green face. If you miss it, the hair blends in instead of sitting on top.
Round 6 is the trickiest in the whole pattern because you're working across two legs and a chain bridge. Count your stitches in sections: 14 on the first leg (with 2 increases), 4 on the chain bridge (with 2 increases), and 14 on the second leg (with 2 increases) = 42 total. If you're off, check that you worked both increases on the chain bridge.
It's a good next step, but you'll want to be comfortable crocheting in the round and making invisible decreases before starting. The head involves a lot of shaping rounds, and the leg-to-body join in Round 6 can be a bit fiddly your first time through amigurumi construction.
Use a length of red yarn and a blunt needle. Bring the needle up through the fabric, make one diagonal stitch, then cross back over it in the opposite direction to form an X shape. Do two or three of these close together for the face scar and one for the body. Anchor the ends on the inside with a couple of small knots — red yarn can slip if you just weave it in.
