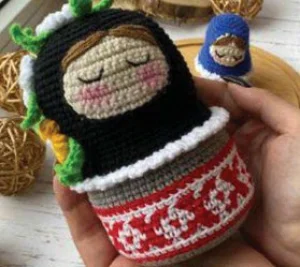
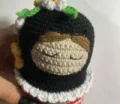
There is something truly magical about a toy that hides a surprise inside, and these nesting Matryoshka dolls are the ultimate handmade treasure. You will love the process of watching three distinct personalities come to life, each one perfectly sized to fit within the next. It is a wonderful way to play with color and practice your tension while creating a set that feels like a modern heirloom. Whether you are making them for a nursery or as a conversation piece for your living room, these dolls bring a touch of whimsical folklore to your home.
Progress Tracker
0% Complete
— 1. Little Matryoshka Doll Body :
Round 1 :
Using Brown yarn, create a MR and work 6 sc into it (6)
Round 2 :
Work 6 inc around (12)
Round 3 :
(1 sc, 1 inc) repeat 6 times (18)
Round 4 :
Work 18 sc into the BLO (18)
Round 5 :
Switch to Black yarn. In BLO, work (2 sc, 1 inc) repeat 6 times (24)
Round 6 :
Using jacquard technique, alternate 1 sc in Black and 1 sc in Yellow for the entire round (24)
Round 7 :
Using Black yarn, work 24 sc (24)
Round 8 :
Switch to Yellow yarn. Work 24 sc into the BLO (24)
Info :
Cut a small plastic circle and place it inside at the bottom. Start adding stuffing as you go.
Round 9-10 :
Work 24 sc around for two full rounds (24)
Round 11 :
Switch to Red yarn. In BLO, work (2 sc, 1 dec) repeat 6 times (18)
Round 12 :
(1 sc, 1 dec) repeat 6 times (12)
Round 13 :
Work 12 inc around (24)
Round 14-18 :
Work 24 sc around for five full rounds (24)
Round 19 :
(2 sc, 1 dec) repeat 6 times (18)
Round 20 :
(1 sc, 1 dec) repeat 6 times (12)
Info :
Finish stuffing the doll firmly.
Round 21 :
Work 6 dec to close (6)
Info :
Fasten off and hide your yarn tail.
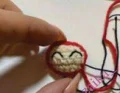
— 2. Little Doll Details & Face :
Top Edging :
Go back to the FLO of Round 11. Using White yarn, join with a ch 1, then work (3 sc in one stitch, 1 sc) repeat 12 times. Fasten off.
Bottom Edging :
Go back to the FLO of Round 4. Using White yarn, join with a ch 1, then work 18 reverse sc (crab stitch) around. Fasten off.
Row 1 :
Using Milky yarn, ch 4. Starting in 2nd ch from hook: 1 inc, 1 sc, 1 inc, turn (5)
Row 2 :
ch 1, 1 inc, 3 sc, 1 inc, turn (7)
Row 3-4 :
ch 1, 7 sc, turn (7)
Row 5 :
ch 1, 1 dec, 3 sc, 1 dec, turn (5)
Row 6 :
ch 1, 1 dec, 1 sc, 1 dec (3)
Face Border :
Using Red yarn, join at the bottom right corner and work 20 sl st evenly around the edge of the face. Leave a long tail for sewing.
— 3. Medium Matryoshka Upper Part :
Round 1 :
Using Blue yarn, work 6 sc into a MR (6)
Round 3 :
(1 sc, 1 inc) repeat 6 times (18)
Round 4 :
(2 sc, 1 inc) repeat 6 times (24)
Round 5 :
(3 sc, 1 inc) repeat 6 times (30)
Round 6-12 :
Work 30 sc around for seven rounds (30)
Round 13 :
(4 sc, 1 inc) repeat 6 times (36)
Round 14-16 :
Work 36 sc around for three rounds (36)
Round 17 :
Switch to White yarn. Work (3 sc in one stitch, 1 sl st) repeat 18 times. Fasten off.
— 4. Medium Matryoshka Lower Part :
Info :
Crochet two identical circles in Black yarn following rounds 1-4.
Round 3 :
(1 sc, 1 inc) repeat 6 times (18)
Round 4 :
(2 sc, 1 inc) repeat 6 times (24)
Info :
Place a plastic circle between the two black circles and join them by crocheting through both layers.
Round 5 :
Work 24 sc through both layers to join (24)
Round 6 :
Work 24 sc in BLO (24)
Round 7 :
Switch to White yarn. In BLO, work (3 sc, 1 inc) repeat 6 times (30)
Round 8 :
Jacquard: (1 sc in White, 1 sc in Blue) repeat 15 times (30)
Round 9 :
Jacquard: (1 sc in Blue, 1 sc in White) repeat 15 times (30)
Round 10 :
Using White yarn, work 30 sc (30)
Round 11 :
Switch to Black yarn. Work 30 sc in BLO (30)
Round 12-14 :
Work 30 sc around for three rounds (30)
Edging :
Join Blue yarn to the FLO of Round 6 and work 24 reverse sc around. Fasten off.
— 5. Medium Doll Face :
Row 1 :
Using Milky yarn, ch 4. Start in 2nd ch: 1 inc, 1 sc, 1 inc, turn (5)
Row 2 :
ch 1, 1 inc, 3 sc, 1 inc, turn (7)
Row 3 :
ch 1, 1 inc, 5 sc, 1 inc, turn (9)
Row 4-5 :
ch 1, 9 sc, turn (9)
Row 6 :
ch 1, 1 dec, 5 sc, 1 dec, turn (7)
Row 7 :
ch 1, 1 dec, 3 sc, 1 dec, turn (5)
Row 8 :
ch 1, 1 dec, 1 sc, 1 dec (3)
Face Border :
Using Blue yarn, work 22 sl st around the face edge. Leave tail for sewing.
— 6. Big Matryoshka Inner Pocket :
Round 1 :
Using Gray yarn, work 6 sc in MR (6)
Round 3 :
(1 sc, 1 inc) repeat 6 times (18)
Round 4 :
(2 sc, 1 inc) repeat 6 times (24)
Round 5 :
(3 sc, 1 inc) repeat 6 times (30)
Round 6 :
(4 sc, 1 inc) repeat 6 times (36)
Round 7 :
(5 sc, 1 inc) repeat 6 times (42)
Round 8-28 :
Work 42 sc around for 21 rounds (42)
Round 29 :
In BLO, work (6 sc, 1 inc) repeat 6 times (48)
Round 30 :
(7 sc, 1 inc) repeat 6 times (54)
Round 31 :
Work 54 sc in BLO (54)
Info :
Turn this piece inside out so the 'wrong' side is on the interior.
— 7. Big Matryoshka Body :
Round 32-34 :
Continue with Gray yarn, work 54 sc around for three rounds (54)
Round 35 :
Switch to Red yarn. In BLO, work (8 sc, 1 inc) repeat 6 times (60)
Round 36 :
Switch to White yarn. Work 60 sc in BLO (60)
Round 37 :
Jacquard: BLO (2 sc in White, 1 sc in Red) repeat 20 times (60)
Round 38 :
Jacquard: 1 sc in Red, (3 sc in White, 3 sc in Red) repeat 9 times, then 3 sc in White, 2 sc in Red (60)
Round 39 :
Jacquard: (2 sc in White, 1 sc in Red) repeat 20 times (60)
Round 40 :
Repeat Round 38 jacquard pattern (60)
Round 41 :
Repeat Round 39 jacquard pattern (60)
Round 42 :
Using White yarn, work 60 sc in BLO (60)
Round 43 :
Using Red yarn, work 60 sc in BLO (60)
Round 44 :
Using Gray yarn, work 60 sc in BLO (60)
Round 45-48 :
Work 60 sc around for four rounds (60)
Round 49 :
Switch to Black yarn. Work 60 sc in BLO (60)
Round 50 :
(8 sc, 1 dec) repeat 6 times (54)
Round 51-52 :
Work 54 sc around for two rounds (54)
Round 53 :
(8 sc, 1 inc) repeat 6 times (60)
Round 54-66 :
Work 60 sc around for 13 rounds (60)
Round 67 :
(8 sc, 1 dec) repeat 6 times (54)
Round 68 :
(7 sc, 1 dec) repeat 6 times (48)
Round 69 :
(6 sc, 1 dec) repeat 6 times (42)
Round 70 :
(5 sc, 1 dec) repeat 6 times (36)
Round 71 :
(4 sc, 1 dec) repeat 6 times (30)
Round 72 :
(3 sc, 1 dec) repeat 6 times (24)
Round 73 :
(2 sc, 1 dec) repeat 6 times (18)
Round 74 :
(1 sc, 1 dec) repeat 6 times (12)
Round 75 :
Work 6 dec (6). Fasten off and weave in ends.
— 8. Big Doll Details & Flowers :
Apron Edging :
Join White yarn to the FLO of Round 49. ch 1, (3 dc in one stitch, 1 sc) repeat 30 times, sl st to join. Fasten off.
Big Face Row 1 :
Using Milky yarn, ch 9. Start in 2nd ch: 1 inc, 6 sc, 1 inc, turn (10)
Big Face Row 2 :
ch 1, 1 inc, 8 sc, 1 inc, turn (12)
Big Face Row 3 :
ch 1, 1 inc, 10 sc, 1 inc, turn (14)
Big Face Row 4-7 :
ch 1, 14 sc, turn (14)
Big Face Row 8 :
ch 1, 1 dec, 10 sc, 1 dec, turn (12)
Big Face Row 9 :
ch 1, 1 dec, 8 sc, 1 dec, turn (10)
Big Face Row 10 :
ch 1, 1 dec, 6 sc, 1 dec (8)
Face Border :
Work 38 sl st around the edge with Black yarn. Leave a tail.
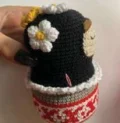
Leaves :
Make 9. Using Green yarn, ch 8. Start in 2nd ch: 1 sl st, 1 sc, 3 dc, 2 sc. Leave tail.
Flowers :
Make 5 (3 White with Yellow center, 2 Yellow with White center). Rnd 1: 5 sc in MR. Rnd 2: 5 inc (10). Rnd 3: (4-tr cluster, ch 1, 1 sc) repeat 5 times.
I hope you have as much fun making this little family as I did! There is something so rewarding about finishing the final doll and seeing them all tucked away inside one another. These Matryoshka dolls are more than just a project; they are a piece of handmade art that will surely be passed down or gifted with love. Don't forget to share your finished dolls with the community — I can't wait to see the color palettes you choose! Happy crocheting, and may your stitches be as sweet as these dolls. 🧶✨💖