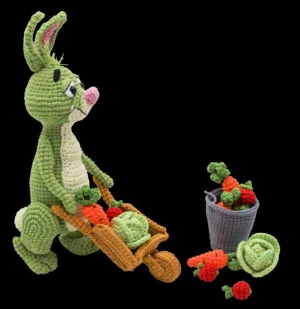
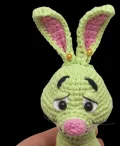
Get ready to meet your most hardworking garden companion! This charming rabbit isn't just a toy; he's a tiny character with a whole world of his own. I've designed this pattern to include everything he needs for a busy day in the dirt, from his trusty wheelbarrow to a full harvest of fresh veggies. You'll love the way his expressive little face comes together, and the thread-jointed limbs give him such a sweet, poseable personality. Whether he's sitting on your shelf or helping out in a nursery, he's sure to bring a smile to anyone who sees him. Grab your hook and let's get planting!
Progress Tracker
0% Complete
— 1. Eye Whites :
Info :
Make two details using white yarn.
Round 1 :
Starting in the 2nd ch from hook: 2 sc, 4 sc into the last ch, turn to work on the other side: 2 sc (7)
Info :
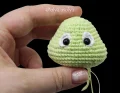
Close the oval with a ss, leave a long tail for sewing, and pull it through to the back. Insert your safety eyes into the lower part of these ovals, shifted slightly toward the center, but don't secure the backings yet.
— 2. Head & Body :
Info :
The head and body are worked as one continuous piece in green yarn. Stuff as you go.
Round 1 :
6 sc into a MR (6)
Round 3 :
(1 sc, inc) * 6 (18)
Round 4 :
(2 sc, inc) * 6 (24)
Round 6 :
(3 sc, inc) * 6 (30)
Round 7 :
(4 sc, inc) * 6 (36)
Note :
At Round 10, place a marker at the start. This marks the center of the back of the head. Use shifting stitches as needed to keep this marker aligned straight down the back.
Round 10 :
5 sc, (1 sc, inc) * 4, 9 sc, (1 sc, inc) * 4, 6 sc (44)
Round 11 :
5 sc, (2 sc, inc) * 4, 10 sc, (inc, 2 sc) * 4, 5 sc (52)
Info :
Insert the eyes (with the white ovals) between Rounds 9 and 10, spaced about 6 stitches apart. Secure the backings.
Round 15 :
5 sc, (2 sc, dec) * 4, 10 sc, (dec, 2 sc) * 4, 5 sc (44)
Round 16 :
5 sc, (1 sc, dec) * 4, 9 sc, (1 sc, dec) * 4, 6 sc (36)
Round 17 :
(4 sc, dec) * 6 (30)
Round 18 :
(3 sc, dec) * 6 (24)
Round 19 :
(2 sc, dec) * 6 (18)
Info :
Stuff the head firmly, especially the cheeks, keeping the front and back slightly flatter to create a triangular profile.
Round 23 :
(5 sc, inc) * 3 (21)
Round 24 :
(6 sc, inc) * 3 (24)
Round 25 :
6 sc, (1 sc, inc) * 6, 6 sc (30)
Round 30 :
2 sc, (1 sc, inc) * 2, (2 sc, dec) * 4, 1 sc, (1 sc, inc) * 2, 3 sc (30)
Round 32 :
3 sc, (2 sc, inc) * 3, 6 sc, (inc, 2 sc) * 3, 3 sc (36)
Round 34 :
3 sc, (3 sc, inc) * 3, 6 sc, (inc, 3 sc) * 3, 3 sc (42)
Round 49 :
(5 sc, dec) * 6 (36)
Round 50 :
(4 sc, dec) * 6 (30)
Round 51 :
(3 sc, dec) * 6 (24)
Round 52 :
(2 sc, dec) * 6 (18)
Round 53 :
(1 sc, dec) * 6 (12)
Info :
Fasten off, tighten the opening, and weave in your end.
— 3. Muzzle :
Info :
Start with ivory yarn.
Round 1 :
8 sc into a MR (8)
Round 2 :
(1 sc, 3 sc in the next st) * 4 (16)
Round 3 :
10 sc, 3 sc in next st, 3 x inc, 3 sc in next st, 1 sc (23)
Round 4 :
Change to green: 10 sc. Change to ivory: 13 sc (23)
Round 5 :
Change to green: 10 sc (leave tail for sewing). Change to ivory: 12 sc, ss (23)
Info :
Fasten off and leave a long tail for assembly.
— 4. Nose :
Info :
Use pink yarn. Do not stuff.
Round 1 :
Starting in 2nd ch from hook: 2 sc, 3 sc in the last ch, turn to work on other side: 3 sc in the same st, inc (10)
Info :
Fasten off with ss and leave a tail for sewing.
— 5. Ears :
Info :
Make two inner parts (pink) and two external parts (green). Work in rows with a turning ch at the end of each row.
Row 1 :
Starting in 2nd ch from hook: inc (2)
Info :
For the green parts, do not cut the thread. Place the pink part on top of the green part and sc them together around the edge, working 3 sc in the corners. Fold the base in half and work 3 ss across to shape it.
— 6. Tummy Patch :
Info :
Use ivory yarn. Work in rows with a turning ch.
Row 1 :
Starting in 2nd ch: 2 sc (2)
Row 6 :
inc, 2 sc, inc (6)
Row 7 :
inc, 4 sc, inc (8)
Row 10 :
skip 1 st, 5 sc, dec (6)
Row 12 :
inc, 4 sc, inc (8)
Row 13 :
inc, 6 sc, inc (10)
Row 28 :
skip 1 st, 7 sc, dec (8)
Row 29 :
skip 1 st, 5 sc, dec (6)
Row 30 :
skip 1 st, 3 sc, dec (4)
Info :
sc around the entire edge, working 3 sc in the upper corners. Leave a long tail for sewing.
— 7. Arms :
Info :
Make two using green yarn. Only stuff the upper part.
Round 1 :
6 sc into a MR (6)
Round 13 :
3 sc, 2 x inc, 2 sc (9)
Round 21 :
4 x dec (do not finish round) (5)
Info :
Close the hole and hide the thread inside.
— 8. Legs - Hips :
Info :
Make two in green. Stuff at the very end so they stay flat.
Round 1 :
Starting in 2nd ch: 5 sc, 5 sc into the last ch, turn: 4 sc, inc (16)
Round 2 :
inc, 4 sc, 5 x inc, 4 sc, 2 x inc (24)
Round 3 :
1 sc, inc, 4 sc, (1 sc, inc) * 5, 4 sc, (1 sc, inc) * 2 (32)
Round 4 :
2 sc, inc, 4 sc, (2 sc, inc) * 5, 4 sc, (2 sc, inc) * 2 (40)
Round 5 :
3 sc, inc, 4 sc, (3 sc, inc) * 5, 4 sc, (3 sc, inc) * 2 (48)
Round 7 :
3 sc, dec, 4 sc, (3 sc, dec) * 5, 4 sc, (3 sc, dec) * 2 (40)
Round 8 :
2 sc, dec, 4 sc, (2 sc, dec) * 5, 4 sc, (2 sc, dec) * 2 (32)
Round 9 :
1 sc, dec, 4 sc, (1 sc, dec) * 5, 4 sc, (1 sc, dec) * 2 (24)
Round 10 :
dec, 4 sc, 5 x dec, 4 sc, 2 x dec (16)
Info :
Sew the hole closed in a straight line.
— 9. Legs - Feet :
Info :
Make two in green. Stuff as you go, keeping them flat.
Round 1 :
6 sc into a MR (6)
Round 3 :
(3 sc, 3 x inc) * 2 (18)
Round 4 :
3 sc, (1 sc, inc) * 3, 3 sc, (1 sc, inc) * 3 (24)
Round 5 :
5 sc, (1 sc, dec) * 5, 4 sc (19)
Round 7 :
5 sc, 5 x dec, 4 sc (14)
Round 9 :
2 sc, 4 x dec, 4 sc (10)
Info :
Close the hole and leave a tail for sewing.
— 10. Tail :
Info :
Use ivory yarn. Stuff lightly.
Round 1 :
6 sc into a MR (6)
Round 3 :
(1 sc, inc) * 6 (18)
Round 7 :
(1 sc, dec) * 6 (12)
Info :
Close hole and leave tail for sewing.
— 11. Wheelbarrow :
Info :
Bottom: Use brown yarn. Work 29 rows of 14 sc starting from a ch 15. Fold in half and sc the sides together.
Info :
Side Walls (Make 2): Start with ch 15. Row 1-2: 14 sc. Row 3: skip 1, 13 sc. Row 4: 11 sc, dec. Row 5: skip 1, 11 sc. Row 6: 11 sc. Row 7: inc, 10 sc. Row 8: 11 sc, inc. Row 9: inc, 12 sc. Row 10: 14 sc. Fold and sc sides together.
Info :
Front Wall: Start with ch 15. Work 10 rows of 14 sc. Fold and sc sides together.
Wheel :
Rd 1: 8 sc in MR. Rd 2: 8 inc. Rd 3: (1 sc, inc) * 8. Rd 4: 24 bpsc. Rd 5: 24 sc. Rd 6: 24 bpsc. Rd 7: (1 sc, dec) * 8. Rd 8: 8 dec. Stuff flat and close.
Info :
Handles: Rd 1: 6 sc in MR. Rd 2-10: 6 sc. Make two.
— 12. Bucket :
Info :
Use dark grey yarn.
Round 3 :
(1 sc, inc) * 8 (24)
Round 4 :
(2 sc, inc) * 8 (32)
Round 8 :
(7 sc, inc) * 4 (36)
Round 12 :
(8 sc, inc) * 4 (40)
Round 16 :
(9 sc, inc) * 4 (44)
Round 19 :
flo: 44 sc (44)
Info :
Create a handle by attaching yarn to Round 18. Work flo: 32 sc around the free loops of Round 4 to create a bottom rim.
— 13. Cabbage :
Base :
Rd 1: 6 sc in MR. Rd 2: 6 inc. Rd 3: (1 sc, inc) * 6. Rd 4: 18 sc. Rd 5: (4 sc, dec) * 3. Rd 6: (3 sc, dec) * 3. Rd 7: (2 sc, dec) * 3. Rd 8: (1 sc, dec) * 3. Close and hide tail.
Small Leaf :
Rd 1: 6 sc in MR. Rd 2: 6 inc. Rd 3: (1 sc, inc) * 6. Make three.
Large Leaf :
Rd 1: 6 sc in MR. Rd 2: 6 inc. Rd 3: (1 sc, inc) * 6. Rd 4: (2 sc, inc) * 6. Make three or four.
— 14. Carrots :
Small Carrot :
Rd 1: 6 sc in MR. Rd 2: 6 sc. Rd 3: (1 sc, inc) * 3. Rd 4: 9 sc. Rd 5: (2 sc, inc) * 3. Rd 6-9: 12 sc. Rd 10: 6 dec.
Large Carrot :
Rd 1: 6 sc in MR. Rd 2: (1 sc, inc) * 3. Rd 3-4: 9 sc. Rd 5: (2 sc, inc) * 3. Rd 6-7: 12 sc. Rd 8: (3 sc, inc) * 3. Rd 9-10: 15 sc. Rd 11: (4 sc, inc) * 3. Rd 12-13: 18 sc. Rd 14: (5 sc, inc) * 3. Rd 15-24: 21 sc. Rd 25: 10 dec, 1 sc. Rd 26: 5 dec.
— 15. Garden Tools :
Shaft :
Rd 1: 6 sc in MR. Rd 2-33: 6 sc (brown). Rd 34: 6 sc (grey). Rd 35: dec, 4 sc. Rd 36-38: 5 sc. Insert wire if desired.
Shovel :
Start ch 10. Row 1: 9 sc. Row 2-8: 9 sc. Row 9: skip 1, 6 sc, dec. Row 10: skip 1, 4 sc, dec. Row 11: skip 1, 2 sc, dec. Row 12: skip 1, dec. Make two and sc together.
I hope you enjoyed every single stitch of this garden-themed adventure! There is something truly magical about watching a tiny character like this come to life, especially when he has his own little world of accessories to play with. Your rabbit is now ready to tend to his yarn harvest and bring a touch of handmade joy to your home. Don't forget to give him a name and maybe even stitch him a tiny straw hat! Happy crafting, and I can't wait to see your finished gardener and his veggie patch. 🥕🧶✨