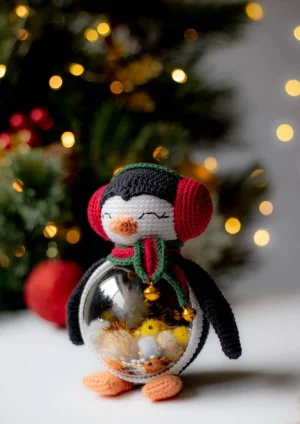
You're going to love how this little guy comes together! It's a clever mix of traditional amigurumi and a clear plastic ornament, making for a truly unique holiday decoration. Whether you're making him for your own tree or as a thoughtful handmade gift, he's sure to be the star of the show. I just love how the light catches the sequins inside his belly!
Progress Tracker
0% Complete
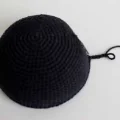
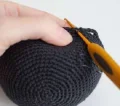
— 1. Body :
Info :
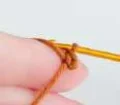
Start with black yarn to create the hemisphere that will hold the ornament.
Round 1 :
6 sc in a magic ring (6)
Round 3 :
(1 sc, inc) x 6 (18)
Round 4 :
1 sc, (inc, 2 sc) x 5, inc, 1 sc (24)
Round 5 :
(3 sc, inc) x 6 (30)
Round 6 :
2 sc, (inc, 4 sc) x 5, inc, 2 sc (36)
Round 7 :
(5 sc, inc) x 6 (42)
Round 8 :
3 sc, (inc, 6 sc) x 5, inc, 3 sc (48)
Round 9 :
(7 sc, inc) x 6 (54)
Round 10 :
4 sc, (inc, 8 sc) x 5, inc, 4 sc (60)
Round 11 :
60 sc around (60)
Round 12 :
(9 sc, inc) x 6 (66)
Round 13 :
5 sc, (inc, 10 sc) x 5, inc, 5 sc (72)
Round 14-23 :
72 sc around for 10 rounds (72)
Round 24 :
5 ch, skip 3 sc on the main piece, then sc in the remaining 69 stitches (74)
Round 25 :
74 sc around (74)
Colour Change :
Switch to white yarn and fasten off the black.
Round 26-28 :
74 sc around for 3 rounds (74)
Info :
End with a sl st. Leave a long tail to attach the head later.
— 2. Wings (Make 2) :
Round 1 :
6 sc in a magic ring (6)
Round 3-5 :
12 sc around for 3 rounds (12)
Round 6 :
(1 sc, inc) x 6 (18)
Round 7-9 :
18 sc around for 3 rounds (18)
Round 10 :
(2 sc, inc) x 6 (24)
Round 11-13 :
24 sc around for 3 rounds (24)
Round 14 :
(2 sc, dec) x 6 (18)
Round 15-21 :
18 sc around for 7 rounds (18)
Round 22 :
(1 sc, dec) x 6 (12)
Round 23-24 :
12 sc around for 2 rounds (12)
Info :
Flatten the wing and sc through both layers with 6 stitches to close. Leave a tail for sewing.
— 3. Feet (Make 2) :
Round 1 :
Create a 7 ch using the double chain method.
Round 2 :
Starting in the 2nd ch from hook: 5 sc, 3 sc in the last ch, turn to work on opposite side: 5 sc, 3 sc in the final loop (16)
Round 3-6 :
16 sc around for 4 rounds (16)
Round 7 :
(6 sc, dec) x 2 (14)
Round 8-10 :
14 sc around for 3 rounds (14)
Round 11 :
(5 sc, dec) x 2 (12)
Round 12 :
12 sc around (12)
Info :
Stuff lightly as you go. Fasten off and hide the yarn tail.
— 4. Tail :
Round 1 :
6 sc in a magic ring (6)
Round 2 :
(1 sc, inc) x 3 (9)
Round 3 :
(2 sc, inc) x 3 (12)
Round 4 :
12 sc around (12)
Round 5 :
(3 sc, inc) x 3 (15)
Info :
Finish with a sl st and leave a tail for sewing.
— 5. Head - White Component :
Round 1 :
6 sc in a magic ring (6)
Round 3 :
(1 sc, inc) x 6 (18)
Round 4 :
1 sc, (inc, 2 sc) x 5, inc, 1 sc (24)
Round 5 :
(3 sc, inc) x 6 (30)
Round 6 :
2 sc, (inc, 4 sc) x 5, inc, 2 sc (36)
Round 7 :
(5 sc, inc) x 6 (42)
Round 8 :
3 sc, (inc, 6 sc) x 5, inc, 3 sc (48)
Round 9 :
(7 sc, inc) x 6 (54)
Round 10-19 :
54 sc around for 10 rounds (54)
Round 20 :
(7 sc, dec) x 6 (48)
Round 21 :
3 sc, (dec, 6 sc) x 5, dec, 3 sc (42)
Round 22 :
(5 sc, dec) x 6 (36)
Round 23 :
2 sc, (dec, 4 sc) x 5, dec, 2 sc (30)
Round 24 :
(3 sc, dec) x 6 (24)
Round 25 :
1 sc, (dec, 2 sc) x 5, dec, 1 sc (18)
Round 26 :
(1 sc, dec) x 6 (12)
Round 27-28 :
12 sc around for 2 rounds (12)
Info :
Close the hole. Pull a thread from the closed top through to the magic ring at the base to create a small indentation for the neck.
— 6. Head - Black Component :
Round 1-9 :
Repeat Rounds 1 through 9 of the White Component (54)
Round 10-18 :
54 sc around for 9 rounds (54)
Round 19 :
13 sc, 5 hdc, 7 dc, 1 tr, 1 dtr, 1 tr, 7 dc, 5 hdc, 14 sc (54)
Round 20 :
20 sc, 5 hdc, 1 dc, 1 tr, 1 dc, 5 hdc, 21 sc (54)
Info :
Finish with a sl st and fasten off.
— 7. Beak :
Round 1 :
6 sc in a magic ring (6)
Round 2 :
(1 sc, inc) x 3 (9)
Round 3 :
(2 sc, inc) x 3 (12)
Round 4 :
12 sc around (12)
Info :
Fasten off with a sl st and leave a long tail for sewing.
— 8. Headphones & Accessories :
Earmuffs :
Round 1-6: Repeat Rounds 1-6 of the head (36). Round 7-9: 36 sc around (36). Make 2 in red.
Band :
Using green, 20 ch. Starting in 2nd ch, work 1 row of 19 hdc. Fasten off.
Scarf Row 1 :
Using green, 71 ch.
Scarf Row 2 :
Work 70 hdc starting in 2nd ch from hook. Change to red.
Scarf Row 3-4 :
1 ch, 70 hdc in the back loops only for 2 rows. Change to green.
Scarf Row 5 :
1 ch, 70 hdc in the back loops only. Fasten off.
I hope you enjoy making this little penguin as much as I did! There's something so satisfying about the way he hugs the ornament, and he always gets so many compliments when guests see him on the tree. Don't forget to take a photo of your finished project—I’d love to see what festive fillers you chose for his belly! Happy crocheting, and may your holidays be filled with handmade joy and cozy stitches! 🧶 ✨