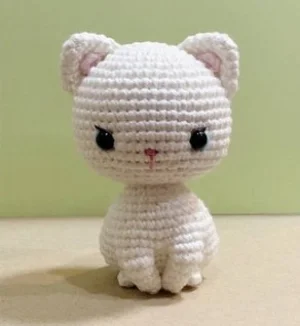
There is something so special about a classic white kitten, and this little project captures that sweet, innocent charm perfectly. You are going to love how this tiny feline comes together, from her chubby little cheeks to that elegant lace collar. I designed this pattern to be a relaxing yet engaging make, using clever shaping techniques to give her a really professional, high-end look. Whether you are making her for a nursery shelf or as a desk buddy for a fellow cat lover, she is sure to bring a smile to anyone's face.
Progress Tracker
0% Complete
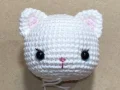
— 1. Head :
Info :
Use the 2.5 mm hook and white yarn. Work in a continuous spiral.
Round 1 :
6 sc into a magic ring (6)
Round 2 :
inc in every st around (12)
Round 3 :
(1 sc, inc) x 6 (18)
Round 4 :
1 sc, inc, (2 sc, inc) x 5, 1 sc (24)
Round 5 :
(3 sc, inc) x 6 (30)
Round 6 :
2 sc, inc, (4 sc, inc) x 5, 2 sc (36)
Round 7 :
(5 sc, inc) x 6 (42)
Round 8 :
3 sc, inc, (6 sc, inc) x 5, 3 sc (48)
Round 9-15 :
sc in each st around (48)
Round 16 :
3 sc, inv dec, (6 sc, inv dec) x 5, 3 sc (42)
Round 17 :
(5 sc, inv dec) x 6 (36)
Round 18 :
2 sc, inv dec, (4 sc, inv dec) x 5, 2 sc (30)
Round 19 :
(3 sc, inv dec) x 6 (24)
Info :
Begin packing the head firmly with fiberfill.
Round 20 :
1 sc, inv dec, (2 sc, inv dec) x 5, 1 sc (18)
Round 21 :
(1 sc, inv dec) x 6 (12)
Round 22 :
inv dec x 6 (6)
Info :
Add a bit more stuffing to ensure the head is chubby. Cut the yarn, leaving a long tail. Thread the tail through the front loops of the last 6 sts and pull tight to close.
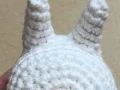
— 2. Outer Ears :
Info :
Make 2 using white yarn and the 2.5 mm hook.
Round 1 :
6 sc into a magic ring (6)
Round 2 :
(1 sc, inc) x 3 (9)
Round 3 :
1 sc, inc, (2 sc, inc) x 2, 1 sc (12)
Round 4 :
(3 sc, inc) x 3 (15)
Round 5 :
2 sc, inc, (4 sc, inc) x 2, 2 sc (18)
Info :
Fasten off and leave a length of yarn for attaching to the head.
— 3. Inner Ear Accents :
Info :
Make 2 using light pink yarn and the 2.25 mm hook.
Row 1 :
ch 2, starting in the second ch from hook work (1 sc, 1 hdc, 1 sc) all into that same st (3)
Info :
Fasten off and hide the yarn ends.
— 4. Front Legs :
Info :
Make 2 using white yarn and the 2.25 mm hook. These will be joined to the body later.
Round 1 :
4 sc into a magic ring (4)
Round 2 :
(1 sc, inc) x 2 (6)
Round 4 :
inc, inv dec, 4 sc (7)
Info :
Fasten off and leave a tail. You will need this to sew the gap closed after joining.
— 5. Back Paws :
Info :
Make 2 using white yarn and the 2.25 mm hook.
Row 1 :
ch 2, starting in the second ch from hook work (1 sc, 2 dc, 1 sc) all into that same st (4)
Info :
Fasten off with a long tail. Weave the tail through the front loops and pull tight to create a small rounded paw shape.
— 6. Body :
Info :
Use the 2.5 mm hook and white yarn.
Round 1 :
6 sc into a magic ring (6)
Round 2 :
inc in every st around (12)
Round 3 :
(1 sc, inc) x 6 (18)
Round 4 :
1 sc, inc, (2 sc, inc) x 5, 1 sc (24)
Round 5 :
(3 sc, inc) x 6 (30)
Round 6 :
2 sc, inc, (4 sc, inc) x 5, 2 sc (36)
Round 7-8 :
sc in each st around (36)
Round 9 :
1 sc, (inv dec, 5 sc) x 2, work 7 sc across the 1st front leg, skip 2 sts on that leg and skip 2 sts on the body, 1 sc on body, work 7 sc across the 2nd front leg, skip 2 sts on that leg and skip 2 sts on the body, (5 sc, inv dec) x 2, 2 sc (42)
Round 10 :
(5 sc, inv dec) x 6 (36)
Round 11 :
sc in each st around (36)
Round 12 :
2 sc, inv dec, (4 sc, inv dec) x 5, 2 sc (30)
Info :
Lightly stuff the legs and the bottom of the body.
Round 13 :
sc in each st around (30)
Round 14 :
(3 sc, inv dec) x 6 (24)
Round 15 :
sc in each st around (24)
Round 16 :
1 sc, inv dec, (2 sc, inv dec) x 5, 1 sc (18)
Info :
Finish stuffing the body firmly. Fasten off and leave a long tail for sewing. Use the leftover leg tails to sew the small gaps closed under the front legs.
— 7. Lace Collar :
Info :
Use the 2.25 mm hook and light blue yarn.
Row 1 :
ch 28, start in 3rd ch from hook: (1 dc, dc inc) x 13 (39)
Row 2 :
(1 sc, inc, 3-sc inc, inc) x 9, 1 sc, inc, 3-sc inc (78)
Info :
Fasten off and leave a tail for sewing the ends together.
— 8. Tail :
Info :
Use the 2.25 mm hook and white yarn.
Round 1 :
6 sc into a magic ring (6)
Round 2-22 :
sc in each st around (6)
Info :
Fasten off and leave a sewing tail.
You've done it! Your little white kitten is finally ready to meet the world. I hope you enjoyed the process of bringing her to life as much as I did — there's just something so rewarding about seeing that little face emerge after the indentation steps. Feel free to play around with different collar colors or even add a tiny bell for extra cuteness. I'd love to see your finished Kitty, so don't be shy about sharing her with your fellow crafters. Happy crocheting, and may your new little friend bring you lots of joy! 🧶 ✨ 🐱