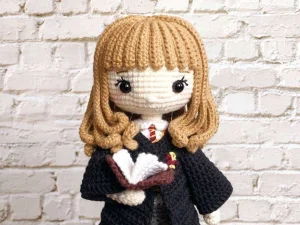
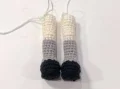
Step into the wizarding world with your very own handmade version of everyone's favorite brightest witch! This detailed project captures all the charm of the iconic character, from her signature bushy hair to her tiny school robes. You'll love seeing her come together piece by piece, and of course, no Hermione would be complete without her grumpy but lovable orange cat, Crookshanks, and her favorite textbook.
Progress Tracker
0% Complete
— 1. Left Arm :
Info :
Using the 2.5 mm hook and skin-toned yarn.
Round 1 :
6 sc into a magic ring (6)
Round 2 :
(1 sc, 1 inc) x 3 (9)
Round 3 :
sc in every stitch around (9)
Round 4 :
3 sc, 1 puff stitch, 1 sc, 1 inv dec, 2 sc (8)
Round 5-19 :
Switch to grey yarn. sc in every stitch around (8)
Info :
Fill with stuffing. Fasten off, leaving a tail for attachment.
— 2. Right Arm :
Info :
Using the 2.5 mm hook and skin-toned yarn.
Round 1 :
6 sc into a magic ring (6)
Round 2 :
(1 sc, 1 inc) x 3 (9)
Round 3 :
sc in every stitch around (9)
Round 4 :
1 inv dec, 1 sc, 1 puff stitch, 5 sc (8)
Round 5-19 :
Switch to grey yarn. sc in every stitch around (8)
Info :
Fill with stuffing. Fasten off, leaving a tail for attachment.
— 3. Inner Neck Support :
Info :
Using the 2.25 mm hook and skin-toned yarn.
Round 1 :
6 sc into a magic ring (6)
Round 2-10 :
sc in every stitch around (6)
Info :
Stuff firmly. Fasten off and use a needle to weave through the front loops, pulling tight to close.
— 4. Left Leg :
Info :
Using the 2.5 mm hook and black yarn.
Round 1 :
ch 7. Starting in 2nd ch from hook: 1 inc, 4 sc, 5 sc in the last ch. Working down other side: 4 sc, 1 inc (17)
Round 2 :
1 sc, 1 inc, 4 sc, 5 x 1 inc, 4 sc, 1 inc, 1 sc (24)
Round 3 :
BLO sc in every stitch around (24)
Round 4 :
sc in every stitch around (24)
Round 5 :
7 sc, 5 x 1 inv dec, 7 sc (19)
Round 6 :
Switch to grey yarn. 5 sc, 2 x 1 inv dec, 1 sc, 2 x 1 inv dec, 5 sc (15)
Round 7 :
3 sc, 2 x 1 hdc dec, 1 hdc, 2 x 1 hdc dec, 3 sc (11)
Round 8-10 :
sc in every stitch around (11)
Round 11 :
1 inc, 10 sc (12)
Round 12 :
sc in every stitch around (12)
Round 13 :
1 sc, 1 inc, 10 sc (13)
Round 14 :
sc in every stitch around (13)
Round 15 :
Switch to skin-toned yarn. 2 sc, BLO 1 inv dec, BLO 9 sc (12)
Round 16 :
BLO 2 sc, then through both loops: 10 sc (12)
Round 17 :
2 sc, 1 inv dec, 3 sc, 3 x 1 inc, 2 sc (14)
Round 18 :
2 sc, 1 inc, 3 sc, 3 x 1 inv dec, 2 sc (12)
Round 19 :
2 sc, 1 inc, 9 sc (13)
Round 20 :
sc in every stitch around (13)
Round 21 :
5 sc, 1 inc, 4 sc, 1 inc, 2 sc (15)
Round 22-23 :
sc in every stitch around (15)
Round 24 :
5 sc, switch to white yarn: 10 sc (15)
Info :
Fasten off and stuff with fiberfill.
— 5. Right Leg & Shoe Soles :
Right Leg :
Repeat Rounds 1 through 24 as done for the left leg, but do not cut the yarn after Round 24.
Sole of Shoe :
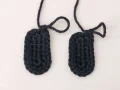
Using black yarn, ch 7. Rnd 1: 1 inc, 4 sc, 5 sc in last ch, 4 sc, 1 inc (17). Rnd 2: 1 sc, 1 inc, 4 sc, 5 x 1 inc, 4 sc, 1 inc, 1 sc (24). Make two and slst them to the BLO of Round 3 on the legs.
— 6. Body Construction :
Round 25 :
Continuing from right leg: 9 sc, ch 3. Join to the 2nd stitch of the left leg.
Round 26 :
15 sc on left leg, 3 sc across ch, 15 sc on right leg, 3 sc across other side of ch (36)
Round 27 :
7 sc, 1 inv dec, 16 sc, 1 inv dec, 9 sc (34)
Round 28 :
sc in every stitch around (34)
Round 29 :
Switch to grey yarn. sc in every stitch around (34)
Round 30 :
BLO 6 sc, 1 inv dec, 15 sc, 1 inv dec, 9 sc (32)
Round 31 :
Switch to red yarn. sc in every stitch around (32)
Round 32 :
Switch to grey yarn. sc in every stitch around (32)
Round 33 :
6 sc, 1 inv dec, 14 sc, 1 inv dec, 8 sc (30)
Round 34-35 :
sc in every stitch around (30)
Round 36 :
6 sc, 1 inv dec, 13 sc, 1 inv dec, 7 sc (28)
Round 37 :
sc in every stitch around (28)
Round 38 :
6 sc, 1 inv dec, 11 sc, 1 inv dec, 7 sc (26)
Round 39 :
5 sc, 1 inv dec, 11 sc, 1 inv dec, 6 sc (24)
Round 40 :
Join arms: 5 sc on body, 7 sc on left arm (start at 2nd st of arm, skip last st of arm and 1 st on body), 11 sc on body, 7 sc on right arm (start at 6th st of arm, skip last st of arm and 1 st on body), 6 sc on body (36)
Round 41 :
2 sc, 1 inv dec, (4 sc, 1 inv dec) x 2, 1 sc, switch to white: 2 sc, switch to grey: 1 sc, 1 inv dec, (4 sc, 1 inv dec) x 2, 2 sc (30)
Round 42 :
Grey: 13 sc, white: 4 sc, grey: 13 sc (30)
Round 43 :
Grey: (3 sc, 1 inv dec) x 2, 2 sc, white: 1 sc, 1 inv dec, 3 sc, grey: 1 inv dec, (3 sc, 1 inv dec) x 2 (24)
Round 44 :
Switch to white yarn. (2 sc, 1 inv dec) x 6 (18)
Round 45 :
(1 sc, 1 inv dec) x 6 (12)
Round 46 :
Switch to skin-toned yarn. BLO (4 sc, 1 inv dec) x 2 (10)
Round 47-48 :
sc in every stitch around (10)
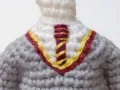
— 7. Shirt Collar & Tie :
Info :
Use 1.6 mm hook. Surface crochet around the white section with yellow thread, then red thread directly below it.
Necktie :
Embroider a red tie with yellow diagonal stripes over the white chest area.
Collar Round 1 :
Using 2.25 mm hook and white yarn at the center of Rnd 46: ch 1, (2 sc, 1 inc) x 2, 1 sc, 1 inc, 2 sc, 1 inc, 1 sc, 1 sc in same st as start, turn (17)
Collar Round 2 :
ch 1, 8 sc, 1 inc, 8 sc (18). Fasten off.
— 8. Head :
Info :
Insert the inner neck support into the body before starting. Continue from the body with skin-toned yarn.
Round 49 :
FLO 10 x 1 inc (20)
Round 50 :
(1 sc, 1 inc) x 10 (30)
Round 51 :
2 sc, 1 inc, (4 sc, 1 inc) x 5, 2 sc (36)
Round 52 :
(5 sc, 1 inc) x 6 (42)
Round 53 :
3 sc, 1 inc, (6 sc, 1 inc) x 5, 3 sc (48)
Round 54 :
(7 sc, 1 inc) x 6 (54)
Round 55-65 :
sc in every stitch around (54)
Round 66 :
(7 sc, 1 inv dec) x 6 (48)
Round 67 :
3 sc, 1 inv dec, (6 sc, 1 inv dec) x 5, 3 sc (42)
Round 68 :
(5 sc, 1 inv dec) x 6 (36)
Round 69 :
2 sc, 1 inv dec, (4 sc, 1 inv dec) x 5, 2 sc (30)
Round 70 :
(3 sc, 1 inv dec) x 6 (24)
Round 71 :
1 sc, 1 inv dec, (2 sc, 1 inv dec) x 5, 1 sc (18)
Round 72 :
(1 sc, 1 inv dec) x 6 (12)
Round 73 :
6 x 1 inv dec (6)
Info :
Fasten off and pull the tail through front loops to close the head.
— 9. Ears & Skirt :
Ears :
Make 2. ch 2, in 2nd ch: (1 sc, 2 hdc, 1 sc). Fasten off.
Skirt Row 1 :
Using dark grey yarn, ch 9. Start in 2nd ch: 5 sc, 3 hdc, turn (8)
Skirt Row 2 :
ch 2, BLO 6 hdc, 2 sc, turn (8)
Skirt Row 3 :
ch 1, BLO 5 sc, 3 hdc, turn (8)
Skirt Row 4-31 :
Repeat Rows 2 and 3 until you have 31 rows total.
Skirt Row 32 :
ch 2, BLO 6 hdc, 2 sc (8). Join to Row 1 with slst to form a circle.
Skirt Top :
Crochet 32 slst around the top edge. Sew to the body using yellow and grey surface stitches for detail.
— 10. Gryffindor Robe :
Row 1 :
Using black yarn, ch 35. Start in 3rd ch: 33 hdc, turn (33)
Row 2 :
ch 5, starting in the last st of Row 1: (1 hdc inc, 15 hdc) x 2, 1 hdc inc, turn (36)
Row 3 :
ch 2, 1 hdc inc, 31 hdc, switch to yellow: 1 hdc, red: 1 hdc, black: 1 hdc, 1 hdc inc, turn (38)
Row 4 :
ch 1, 1 inc, 1 sc, yellow: 1 sc, red: 1 sc, black: 2 sc, ch 6, skip 8 sts, 10 sc, ch 6, skip 8 sts, 5 sc, 1 inc, turn (24)
Row 5 :
ch 2, 7 hdc, 6 hdc in ch, 10 hdc, 6 hdc in ch, 7 hdc, turn (36)
Row 6 :
ch 2, 1 hdc inc, 34 hdc, 1 hdc inc, turn (38)
Row 7 :
ch 2, hdc in each stitch across, turn (38)
Row 8 :
ch 2, 1 hdc inc, 36 hdc, 1 hdc inc, turn (40)
Row 9 :
ch 2, hdc in each stitch across, turn (40)
Row 10 :
ch 2, 1 hdc inc, 38 hdc, 1 hdc inc, turn (42)
Row 11 :
ch 2, hdc in each stitch across, turn (42)
Row 12 :
ch 2, 1 hdc inc, 40 hdc, 1 hdc inc, turn (44)
Row 13 :
ch 2, hdc in each stitch across, turn (44)
Row 14 :
ch 2, 1 hdc inc, 42 hdc, 1 hdc inc, turn (46)
Row 15 :
ch 2, hdc in each stitch across, turn (46)
Row 16 :
ch 2, 1 hdc inc, 44 hdc, 1 hdc inc, turn (48)
Row 17 :
ch 2, hdc in each stitch across, turn (48)
Row 18 :
ch 2, 1 hdc inc, 46 hdc, 1 hdc inc, turn (50)
Row 19 :
ch 2, hdc in each stitch across, turn (50)
Row 20 :
ch 1, 1 inc, 48 sc, 1 inc, turn (52)
Row 21 :
ch 1, 4 sc, 4 hdc, 4 dc, 28 tr, 4 dc, 4 hdc, 4 sc, turn (52)
Row 22 :
ch 1, 1 inc, 4 sc, 4 hdc, 3 dc, 1 dc inc, 6 dc, 1 dc inc, 12 dc, 1 dc inc, 6 dc, 1 dc inc, 3 dc, 4 hdc, 4 sc, 1 inc (58)
Sleeves :
Join black yarn to armhole. Rnd 1-2: 18 hdc (18). Rnd 3-4: 20 hdc (20). Rnd 5-6: 22 hdc (22). Rnd 7-8: 24 hdc (24). Rnd 9: 24 sc (24). Rnd 10: 2 dc, 16 dc, 2 hdc, 4 sc, 2 hdc (24). Fasten off.
— 11. Scarf :
Round 1 :
Using red yarn, ch 6. Start in 3rd ch: 4 hdc, turn (4)
Round 2 :
ch 2, 4 hdc, turn (4)
Round 3-4 :
Switch to yellow yarn. ch 2, 4 hdc, turn (4)
Round 5-6 :
Switch to red yarn. ch 2, 4 hdc, turn (4)
Info :
Repeat color changes every 2 rounds until you have 50 rounds total. Add 1 cm tassels to the ends.
— 12. Hairpiece :
Round 1 :
Using brown yarn, 7 sc into a magic ring (7)
Round 2 :
BLO 7 x 1 inc (14)
Round 3 :
(1 sc, 1 inc) x 7 (21)
Round 4 :
1 sc, 1 inc, (2 sc, 1 inc) x 6, 1 sc (28)
Strand 1 :
ch 42, start in 3rd ch: 40 hdc, slst into 28th st of Rnd 4 (40)
Strands 2-16 :
ch 42, start in 3rd ch: 40 hdc, slst into next st of Rnd 4 (40 each)
Strand 17 :
ch 16, start in 3rd ch: 14 hdc, slst into 12th st of Rnd 4 (14)
Strand 18 :
ch 42, start in 3rd ch: 40 hdc, slst into 11th st of Rnd 4 (40)
Strands 19-26 :
ch 13, start in 3rd ch: 11 hdc, slst into next st of Rnd 4 (11 each)
Strand 27 :
ch 42, start in 3rd ch: 40 hdc, slst into 2nd st of Rnd 4 (40)
Strand 28 :
ch 16, start in 3rd ch: 14 hdc, slst into 1st st of Rnd 4 (14)
Hair Round 2 :
Join yarn to FLO of Rnd 2, st 7. Strands 1-8: ch 42, start in 3rd ch: 40 hdc. Slst into same st for odd strands, next st for even strands.
— 13. Book :
Pages :
Make 3. ch 7. Rnd 1: 6 sc, turn. Rnd 2-6: 6 sc, turn. Sew together.
Cover Rnd 1-6 :
Using dark brown yarn, ch 8. 7 sc across, turn. Repeat for 6 rows.
Cover Rnd 7-8 :
Rnd 7: FLO 7 tr, turn. Rnd 8: FLO 7 sc, turn.
Cover Rnd 9-13 :
7 sc across, turn. Repeat for 5 rows. Glue pages inside.
— 14. Crookshanks (Cat) :
Head Rnd 1-6 :
MR 6 sc, 6 inc (12), (1 sc, 1 inc) x 6 (18), (2 sc, 1 inc) x 6 (24), (3 sc, 1 inc) x 6 (30), (4 sc, 1 inc) x 6 (36).
Head Rnd 7-16 :
Rnd 7-11: 36 sc. Rnd 12: (4 sc, 1 inv dec) x 6 (30). Rnd 13: (3 sc, 1 inv dec) x 6 (24). Rnd 14: (2 sc, 1 inv dec) x 6 (18). Rnd 15: (1 sc, 1 inv dec) x 6 (12). Rnd 16: 6 inv dec (6).
Body Rnd 1-6 :
MR 6 sc, 6 inc (12), (1 sc, 1 inc) x 6 (18), (2 sc, 1 inc) x 6 (24), Rnd 5-6: 24 sc.
Body Rnd 7 :
Join front legs: 2 sc, 2 inv dec, 2 sc, 5 sc on 1st leg, 1 sc on body, 5 sc on 2nd leg, 2 inv dec, 1 sc (26).
Body Rnd 8-11 :
Rnd 8: Decrease to 21. Rnd 9: 21 sc. Rnd 10: 18 sc. Rnd 11: 12 sc.
Tail :
MR 5 sc. Rnd 2-14: 5 sc. Insert wire and attach to body.
You've done it! You’ve brought a little bit of magic into the world with your finished Hermione and Crookshanks. There is something so special about seeing all those tiny details — the little book, the striped scarf, and those bushy curls — finally come together. Whether she’s sitting on your bookshelf or being gifted to a fellow fan, she’s sure to be cherished. I hope you enjoyed this enchanting project as much as I did. Happy crafting, and may your stitches always be magical! 🧶✨📖