About This Ginanita Hexagon Tote Pattern
This tote is a fantastic gift for the person who has everything. It is sturdy enough for daily errands but stylish enough to be a statement piece in any wardrobe.
Ideal for those with basic crocheting experience, featuring slightly more advanced stitches and techniques to expand your skills.
Requires 8-10 hours, ideal for a full day of immersive crocheting.
An elegant detail to elevate any look, combining traditional techniques with contemporary design sensibilities.
This tote is a fantastic gift for the person who has everything. It is sturdy enough for daily errands but stylish enough to be a statement piece in any wardrobe.
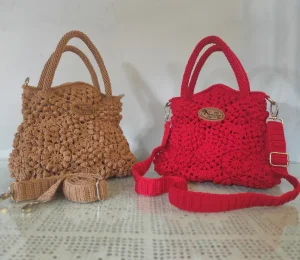
I absolutely adore how this bag looks once all the pieces are joined—it feels like magic! As a fellow crafter, I think you will really enjoy the portability of this project; you can whip up the individual hexagons while you are out and about, then save the assembly for a cozy evening at home. Plus, that final row of crab stitch gives it such a professional, polished finish that you will be so proud of.
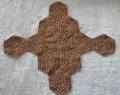
I’ve always found something so incredibly soothing about repetitive motifs. There is a specific kind of magic that happens when you sit down with a pile of yarn and slowly watch eleven simple hexagons transform into a structured, functional tote. The Ginanita Bag is named after the Sanskrit word for counting, and honestly, it’s the perfect name. You’ll find yourself falling into a lovely rhythm as you count out those popcorn stitches and watch the floral centers bloom.
When I first made this, I was struck by how much the choice of yarn changes the whole vibe. Using a sturdy cotton gives it that classic market bag feel, while a softer acrylic or wool blend makes it feel like a cozy autumn accessory. I personally love making the handles just a tiny bit longer so it sits comfortably on the shoulder. Don’t be intimidated by the assembly—once you lay those hexagons out in the 1-2-5-2-1 formation, it all just clicks into place like a beautiful fiber-arts puzzle. It’s the kind of project that feels substantial and impressive once finished, yet the individual pieces are small enough to take with you on the go. I can't wait to see the color combinations you choose for yours!
Get ready to create a stunning, textured accessory that is as fun to make as it is to wear. This project guides you through crafting eleven beautiful hexagons that come together to form a sturdy and stylish tote. You will love the rhythmic flow of the popcorn stitches and the satisfaction of seeing the floral motifs bloom under your hook. It is the perfect way to use your favorite yarn to make something truly special for your wardrobe.
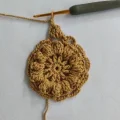
Create a MR and work 12 sc into the center, then join with a sl st. (12)
ch 5 (this counts as your first dc and a ch-2 space), then work 1 dc followed by ch 2 into every sc from the previous round. (36)
sl st into the first ch-2 space. Work {1 popcorn, 1 dc, ch 2} into every ch-2 space around. (48)
sl st into the next ch-2 space. Work {1 sc, ch 5} into every ch-2 space around. (72)
sl st into the ch-5 space. Work { (1 popcorn & 1 dc) in the space, ch 2, then in the next ch-5 space work a corner of (3 dc, ch 2, 3 dc), ch 2 } repeat this sequence 6 times total. (84)
sl st into the ch-2 space. Work { (1 popcorn & 1 dc) in the space, ch 2, work a corner of (3 dc, ch 2, 3 dc) in the corner space, ch 2, (1 popcorn & 1 dc) in the next ch-2 space, ch 1 } repeat 6 times total. (102)
sl st into the ch-2 space. Work { (1 popcorn & 1 dc) in the space, ch 2, work a corner of (3 dc, ch 2, 3 dc) in the corner space, ch 2, [ (1 popcorn & 1 dc) in the next ch-1 space, ch 1 ] repeat the brackets twice } repeat the whole sequence 6 times total. (120)
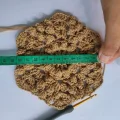
Note: While the pattern mentions a maximum of 8 rows for sizing, these 7 rounds complete the standard hexagon. Ensure all 11 pieces are identical in size before beginning assembly.
Attach yarn to the top opening of the assembled bag and work 1 sc into every stitch around the entire upper edge.
Work a second round of 1 sc into every stitch from the previous round to create a sturdy border.
Finish the edge by working 1 crab st into every stitch around, then fasten off and weave in your ends.
ch 60 to 80 depending on your preferred length. hdc in the second ch from hook and in each ch across. In the final ch, work 3 hdc. Turn to work along the opposite side of the foundation chain, hdc in each ch, and work 2 hdc in the very first ch. Join with a sl st.
ch 2, work 1 hdc in each stitch along the straight sides, and work 3 inc (2 hdc in one stitch) at each curved end of the handle. Join with a sl st.
Continue working rounds of hdc with increases at the ends until the handle reaches your desired width, then fasten off leaving a long tail for sewing.
Watching this bag come together is such a rewarding experience. From that first magic ring to the final row of crab stitch edging, every step adds a bit of personality to the finished piece. I really hope you enjoy the process of joining these hexagons as much as I do—it’s like putting together a puzzle where the end result is a stylish new accessory! Once you've finished, give it a light steam block to really let those popcorn stitches shine. Happy hooking, and I can't wait to see your version! 🧶✨
Absolutely! Using DK weight yarn will give you a larger tote, while fine weight yarn creates a smaller handbag. Just remember to match your hook size to your yarn choice.
Work 5 dc into the same stitch, then remove your hook from the loop. Insert the hook into the first dc of the group, grab the dropped loop, and pull it through to close the cluster.
While not strictly required, lining the bag with fabric will prevent it from stretching out over time and keep smaller items from slipping through the gaps between stitches.
The whip stitch is recommended for this pattern because it creates a flat, secure seam that doesn't add extra bulk to the geometric design.
