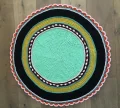
Imagine bringing a blooming meadow right into your living room! This stunning rug is a true labor of love, combining a sturdy base with dozens of delicate, 3D floral elements. You will enjoy the rhythmic nature of the circular base before getting lost in the creative joy of crafting rosebuds, leaves, and layered petals. It is the perfect project for when you want to create a legacy piece that will be talked about for years.
Progress Tracker
0% Complete
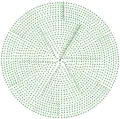
— 1. Central Base Panel :
Info :
Use 3 strands of Mint Green yarn held together and the 8 mm hook for this section.
Foundation :
ch 3, join with ss to form a loop.
Round 1 :
ch 1, 6 x sc into the ring, ss to join (6)
Round 2 :
ch 1, 6 x inc around, ss to join (12)
Round 3 :
ch 1, *1 x inc, 1 x sc*, repeat from * to * around, ss to join (18)
Round 4 :
ch 1, *1 x inc, 2 x sc*, repeat from * to * around, ss to join (24)
Round 5 :
ch 1, *1 x inc, 3 x sc*, repeat from * to * around, ss to join (30)
Round 6 :
ch 1, *1 x inc, 4 x sc*, repeat from * to * around, ss to join (36)
Round 7 :
ch 1, *1 x inc, 5 x sc*, repeat from * to * around, ss to join (42)
Round 8 :
ch 1, *1 x inc, 6 x sc*, repeat from * to * around, ss to join (48)
Round 9 :
ch 1, *1 x inc, 7 x sc*, repeat from * to * around, ss to join (54)
Round 10 :
ch 1, *1 x inc, 8 x sc*, repeat from * to * around, ss to join (60)
Round 11 :
ch 1, *1 x inc, 9 x sc*, repeat from * to * around, ss to join (66)
Round 12 :
ch 1, *1 x inc, 10 x sc*, repeat from * to * around, ss to join (72)
Round 13 :
ch 1, *1 x inc, 11 x sc*, repeat from * to * around, ss to join (78)
Round 14 :
ch 1, *1 x inc, 12 x sc*, repeat from * to * around, ss to join (84)
Round 15 :
ch 1, *1 x inc, 13 x sc*, repeat from * to * around, ss to join (90)
Round 16 :
ch 1, *1 x inc, 14 x sc*, repeat from * to * around, ss to join (96)
Round 17 :
ch 1, *1 x inc, 15 x sc*, repeat from * to * around, ss to join (102)
Info :
To keep the circle round, we will now shift the starting point. Fasten off and weave in ends. Join the same color 8 stitches forward from where you just finished.
Round 18 :
ch 1, *1 x inc, 16 x sc*, repeat from * to * around, ss to join (108)
Round 19 :
ch 1, *1 x inc, 17 x sc*, repeat from * to * around, ss to join (114)
Round 20 :
ch 1, *1 x inc, 18 x sc*, repeat from * to * around, ss to join (120)
Round 21 :
ch 1, *1 x inc, 19 x sc*, repeat from * to * around, ss to join (126)
Round 22 :
ch 1, *1 x inc, 20 x sc*, repeat from * to * around, ss to join (132)
Round 23 :
ch 1, *1 x inc, 21 x sc*, repeat from * to * around, ss to join (138)
Round 24 :
ch 1, *1 x inc, 22 x sc*, repeat from * to * around, ss to join (144)
Round 25 :
ch 1, 144 x sc around, ss to join (144)
Info :
Shift starting point again. Fasten off. Count 11 stitches forward and join with Orange yarn (3 strands).
Round 26 :
ch 1, *1 x inc, 23 x sc*, repeat from * to * around, ss to join (150)
Round 27 :
ch 1, *1 x inc, 24 x sc*, repeat from * to * around, ss to join (156)
Round 28 :
ch 1, *1 x inc, 25 x sc*, repeat from * to * around, ss to join (162)
Info :
Shift starting point. Fasten off. Count 10 stitches forward and join with Yellow-Green yarn (3 strands).
Round 29 :
ch 1, *1 x inc, 26 x sc*, repeat from * to * around, ss to join (168)
Round 30 :
ch 1, *1 x inc, 27 x sc*, repeat from * to * around, ss to join (174)
Round 31 :
ch 1, *1 x inc, 28 x sc*, repeat from * to * around, ss to join (180)
Round 32 :
ch 1, *1 x inc, 29 x sc*, repeat from * to * around, ss to join (186)
Round 33 :
ch 1, *1 x inc, 30 x sc*, repeat from * to * around, ss to join (192)
Info :
Shift starting point. Fasten off. Count 11 stitches forward and join with Black yarn (3 strands).
Round 34 :
ch 1, *1 x inc, 31 x sc*, repeat from * to * around, ss to join (198)
Round 35 :
ch 1, *1 x inc, 32 x sc*, repeat from * to * around, ss to join (204)
Round 36 :
ch 1, *1 x inc, 33 x sc*, repeat from * to * around, ss to join (210)
Round 37 :
ch 1, *1 x inc, 34 x sc*, repeat from * to * around, ss to join (216)
Round 38 :
ch 1, *1 x inc, 35 x sc*, repeat from * to * around, ss to join (222)
Info :
Shift starting point. Fasten off. Count 10 stitches forward and join with Black yarn (3 strands).
Round 39 :
ch 1, *1 x inc, 36 x sc*, repeat from * to * around, ss to join (228)
Round 40 :
ch 1, *1 x inc, 37 x sc*, repeat from * to * around, ss to join (234)
Round 41 :
ch 1, *1 x inc, 38 x sc*, repeat from * to * around, ss to join (240)
Round 42 :
ch 1, *1 x inc, 39 x sc*, repeat from * to * around, ss to join (246)
Round 43 :
ch 1, *1 x inc, 40 x sc*, repeat from * to * around, ss to join (252)
Round 44 :
Join Orange yarn with ss. ch 2, 1 x dc in 1st st, 1 x dc in next st, ch 2, ss in next st. *sk 2, ss in next, ch 2, 1 x dc in next, 1 x dc in next, ch 2, ss in next st*. Repeat from * to * around. Fasten off.
Round 45 :
Join Peach yarn. Work 5 x sc around each scalloped arch and 1 x ss in the gaps between scallops around. Fasten off.
— 2. Surface Crochet Borders :
Info :
Use 2 strands of yarn and the 8 mm hook. Work surface single crochet stitches along the color change lines on the right side of the rug.
Border 1 :
Use Peach yarn along the transition between Mint Green and Orange.
Border 2 :
Use Black yarn next to Border 1. Catch the Rico Pompon yarn every 2 stitches so the poms pop out.
Border 3 :
Use Black yarn along the transition between Orange and Yellow-Green.
Border 4 :
Use Dark Green yarn right alongside Border 3.
Border 5 :
Use Dark Green yarn between the Yellow-Green and Black sections.
Border 6 :
Use Peach yarn between the Black section and the Orange scalloped edge.
Border 7 :
Use Dark Green yarn right alongside Border 6.
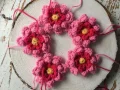
— 3. Large Flower :
Info :
Make 28 for the edge (2 strands, 7 mm hook) and 5 for the center (1 strand, 3.5 mm hook). Use Fuchsia or Medium Pink.
Foundation :
ch 3, ss to join.
Round 1 :
ch 1, 7 x sc in ring, ss to join.
Round 2 :
ch 2 (counts as dc), 1 x dc in same ch, 2 x dc in every st around, ss to join (16)
Round 3 :
*ch 3, sk 1, ss in next*, repeat around (8 loops).
Round 4 :
In each ch-3 loop: [1 x ss, ch 1, 1 x dc, 1 x tc, 1 x dc, 1 x sc]. ss into each ss from Rnd 3. Join last ss into the back loop of Rnd 3 ss.
Round 5 :
Work 8 x ch-4 loops on the back, closing each with a ss into the back bumps of Rnd 3 ss.
Round 6 :
In each ch-4 loop: [1 x ss, ch 1, 1 x dc, 2 x tc, 1 x dc, 1 x sc]. ss into each ss from Rnd 5. Fasten off.
Round 7 :
Change color. Surface sc into the gaps between Rnds 1 and 2 (8 surface sc).
Round 8 :
ch 3, ss into next st. Create 5 x ch-3 loops around Rnd 7 at irregular intervals.
Round 9 :
In each ch-3 loop, repeat the petal sequence from Rnd 4. Fasten off.
— 4. Heart of Large Flower :
Info :
Use Light Blue (2 strands, 5 mm hook) or Yellow (1 strand, 3.5 mm hook).
Foundation :
ch 3, ss to join.
Round 1 :
ch 2, 7 x dc in ring, ss to join. Stuff lightly if desired and sew to flower center.
— 5. Double Leaves :
Info :
Make 28 using Mint Green (1 strand, 3.5 mm hook).
Leaf 1 :
ch 9, turn. sc in 3rd ch from hook, 1 x dc, [1 x dc & 1 x tc in next], [1 x tc & 1 x dc in next], 1 x dc, 1 x sc, 3 x sc in last ch. Work back: 1 x sc, 1 x dc, [1 x dc & 1 x tc in next], [1 x tc & 1 x dc in next], 1 x dc, 1 x sc, ss in last st.
Stem & Leaf 2 :
ch 12. Use the last 9 chains to repeat the Leaf 1 instructions. Fasten off.
— 6. Rosebuds :
Info :
Make 40 total in various colors (1 strand, 3.5 mm hook).
Row 1 :
ch 29, sc in 2nd ch and across (28).
Row 2 :
ch 2, 1 x dc in 1st st, 1 x dc, ch 2, ss in next. *ss in next, ch 2, 1 x dc in next, 1 x dc, ch 2, ss in next*. Repeat for 4 green leaves, then change color and repeat for 10 petals. Roll up and sew base.
You have just created a blooming masterpiece! This rug is a true testament to your patience and skill. I hope every time you see it on your floor, it reminds you of the quiet, creative moments you spent bringing it to life. It's more than just a rug; it's a garden that never wilts. I can't wait for you to feel that sense of pride as you lay it down for the first time. Happy stitching and enjoy your new floral sanctuary! 🧶✨🌸