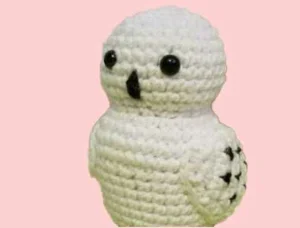
There's something so satisfying about crocheting a round little owl that actually looks like an owl — and this pattern nails it. The body and head are worked as one continuous piece, which means no awkward seaming between the two main parts. You'll use a clever front-loop-only technique to create that signature chest puff, and the wings come together in rows with charming black accent stitches that mimic real feather markings. Whether you're making this for a shelf, a gift bag, or just because you needed a new hook project this weekend — you're going to love how this one turns out.
Progress Tracker
0% Complete
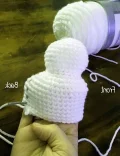
— 1. Body & Head (worked in continuous rounds) :
Info :
The entire owl — head and body — is crocheted as one continuous piece worked in spiral rounds without joining. Use a scrap of yarn as a stitch marker to keep your place. Do not join at the end of each round.
Round 1 :
Start with MR, work 6 SC into the ring. (6)
Round 2 :
2SC in every stitch around. (12)
Round 3 :
*SC, 2SC* — repeat from * to * around. (18)
Round 4 :
*SC 2, 2SC* — repeat from * to * around. (24)
Round 5 :
*SC 3, 2SC* — repeat from * to * around. (30)
Round 6 :
SC in every stitch around. (30)
Round 7 :
SC in every stitch around. (30)
Round 8 :
SC in every stitch around. (30)
Round 9 :
SC in every stitch around. (30)
Round 10 :
SC in every stitch around. (30)
Round 11 :
*SC 2, DEC* — repeat from * to * around, then SC in the last 2 stitches. (23)
Round 12 :
*SC 5, DEC* — repeat from * to * around, then SC in the last 2 stitches. (20)
Round 13 :
*SC, 2SC* — repeat from * to * around. (30)
Round 14 :
*SC 2, 2SC* — repeat from * to * around. (40)
Round 15 :
SC in every stitch around. (40)
Round 16 :
SC in every stitch around. (40)
Round 17 :
*SC, 2SC* — repeat from * to * a total of 3 times. SC in the next 12 stitches. *DEC, SC* — repeat from * to * a total of 4 times. SC in the last 10 stitches. (39)
Round 18 :
SC in every stitch around. (39)
Round 19 :
SC in every stitch around. (39)
Round 20 :
*SC 2, DEC* — repeat from * to * a total of 2 times. SC in every remaining stitch. (37)
Round 21 :
*SC, DEC* — repeat from * to * a total of 2 times. SC in every remaining stitch. (35)
Round 22 :
SC in every stitch around. (35)
Round 23 :
SC in every stitch around. (35)
Info :
At this point you should be able to identify the front chest of the owl. Before continuing, insert the safety eyes through to the inside — aim for around Round 7 on the head section, placing them roughly 5 stitches apart. Slightly off-center placement looks more natural, as if the owl is turning its head. Also embroider the beak now while you can still reach inside: thread black yarn onto your needle, position it centered below the eyes in the same row, and wrap straight downward over 2 rows, going around 3 to 4 times. Fasten off securely.
Round 24 :
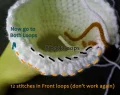
Working in FLO: *SC, 2SC* — repeat from * to * a total of 4 times. Switch to both loops for the rest of the round: SC in next 8, DEC 6 times, SC in last 7. (33)
Info :
After Round 24, you'll have 8 unworked back loops left from that round — these form the base of the next round. There will also be 12 front loops that were worked; do not return to those.
Round 25 :
Begin in the 8 unworked back loops from Round 24, then continue through both loops of the remaining stitches: *SC 3, DEC* — repeat from * to * around. SC in last 4. (24)
Round 26 :
*SC 2, DEC* — repeat from * to * around. (18)
Info :
Add polyester stuffing now, before the opening gets too small to work with comfortably.
Round 27 :
*SC, DEC* — repeat from * to * around. (12)
Round 28 :
DEC in every stitch around. (6)
Info :
Fasten off, leaving a long yarn tail. Use it to sew the remaining hole shut. Add any final stuffing if needed, then weave in all ends.
— 2. Left Wing (worked in rows) :
Info :
Wings are worked flat in rows. Each row ends with CH 1 and turn. The black feather markings can be added two ways: (1) embroider V-shaped specks with a needle and black yarn after the wing is complete, or (2) use a black pull-through technique as you go — insert your hook into the stitch, yarn over with black, pull through, then yarn over with white and pull through to finish the SC. Carry the unused color along the wrong side between stitches. The wrong side will face the owl body once sewn on, so any untidy color changes won't show.
Info :
CH 3 to begin the left wing.
Row 1 :
SC in the 2nd chain from hook, SC in next chain. (2)
Row 3 :
2SC, SC, SC, 2SC. (6)
Row 4 :
SC across — work 2 black pull-through stitches spaced out across the row. (6)
Row 5 :
2SC in first stitch, SC in last 5. (7)
Row 6 :
SC 6, 2SC in last stitch — work 3 black pull-through stitches evenly spaced. (8)
Row 8 :
SC across — work 4 black pull-through stitches evenly spaced. (8)
Row 9 :
DEC, DEC, SC in last 4. (6)
Row 10 :
SC 4, DEC — work 2 black pull-through stitches. (5)
Row 11 :
DEC, DEC, SC in last stitch. (3)
Row 12 :
SC across — work 1 black pull-through stitch. (3)
Row 15 :
SC evenly around the entire outer edge of the wing, then SS to the first SC. Fasten off, leaving a long tail for sewing.
— 3. Right Wing (worked in rows) :
Info :
The right wing mirrors the left wing. Same black pull-through stitch counts per row apply. CH 3 to begin.
Row 1 :
SC in the 2nd chain from hook, SC in next chain. (2)
Row 3 :
2SC, SC, SC, 2SC. (6)
Row 4 :
SC across — work 2 black pull-through stitches spaced out across the row. (6)
Row 5 :
SC 5, 2SC in last stitch. (7)
Row 6 :
2SC in first stitch, SC in last 6 — work 3 black pull-through stitches evenly spaced. (8)
Row 8 :
SC across — work 4 black pull-through stitches evenly spaced. (8)
Row 9 :
SC 4, DEC, DEC. (6)
Row 10 :
DEC, SC in last 4 — work 2 black pull-through stitches. (5)
Row 11 :
SC, DEC, DEC. (3)
Row 12 :
SC across — work 1 black pull-through stitch. (3)
Row 15 :
SC evenly around the entire outer edge of the wing, then SS to the first SC. Fasten off, leaving a long tail for sewing.
By the time you sew on those last little wings, you'll have a completely handmade snowy owl sitting in your palm — round, plump, and ridiculously charming. This pattern is the kind you finish in one sitting and immediately want to make again in a different color. Brown yarn turns it into a barn owl. Tan and cream makes a great horned owl. The construction is so satisfying once you understand how the head and body flow together, and that front-loop chest trick will become one of your favorite shaping techniques. Grab your hook, put on something good to watch, and enjoy every round. 🧶✨