About This Herbie Hedgehog Amigurumi Pattern
Herbie makes a genuinely lovely handmade gift — sweet enough for a baby shower, a get-well basket, or a nature-loving friend who collects things that make them smile.
Ideal for those with basic crocheting experience, featuring slightly more advanced stitches and techniques to expand your skills.
Fits nicely into a free afternoon — 2 to 5 hours of focused, enjoyable crocheting.
Playful characters full of personality, designed to spark imagination and become cherished playtime favorites.
Herbie makes a genuinely lovely handmade gift — sweet enough for a baby shower, a get-well basket, or a nature-loving friend who collects things that make them smile.
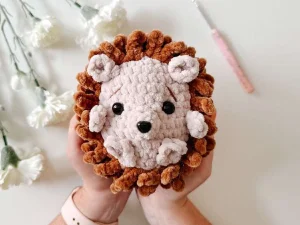
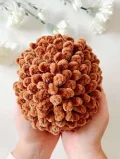
I'll be honest — I didn't expect the spike section to be as satisfying as it is. There's something almost meditative about working those little chain-4 spikes around and around the body, watching the texture build up into this dense, fluffy hedgehog coat. It looks so impressive when it's done, but the technique itself is dead simple once you get your rhythm. I also love that this pattern uses velvet yarn — it hides any tension wobbles beautifully, so even if your stitches aren't perfectly even, the finished piece still looks polished and plush.
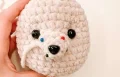
I almost didn't make Herbie. I had three other projects queued up and a yarn stash situation that was getting out of hand — the last thing I needed was another amigurumi. But then I saw that picture of his little face peering out from that ring of brown velvet spikes and I was absolutely done for.
The thing that surprised me most was the spike section. I expected it to be fiddly and tedious, but it's honestly one of the more satisfying techniques I've done in a while. Once you get the rhythm of chain-4, slst-slst-slst, skip a stitch, anchor — it becomes this almost automatic motion and you can just watch the texture build up around the body in real time. It looks incredibly complex but it's genuinely just the same small motion repeated over and over.
One tip I'd pass along: don't skip the spike framing step. I know it feels like unnecessary prep work, but it's what keeps the spikes from creeping down onto Herbie's little face. The first time I made him I was impatient and eyeballed it, and the spikes ended up way too close to his eyes. The second time I took five minutes to stitch the framing line and the result was so much cleaner.
If you want to try a color variation, Herbie looks incredible in grey velvet with white spikes — almost like a little snow hedgehog. A deep rust orange body with cream spikes also gives him a very cozy autumn feeling. The color combination is really where you can make him entirely your own.
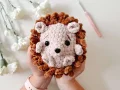
Meet Herbie — a squishy, spike-covered hedgehog who fits right in the palm of your hand. This pattern walks you through every step of building his plush body, sculpted face, and that irresistible crown of velvet spikes that makes him look like a tiny woodland king. Your finished Herbie will measure about 6 inches tall and wide, making him the perfect size to sit on a shelf, nestle in a basket, or get gifted to someone who needs a little softness in their day. The combination of beige and warm brown velvet yarn gives him an almost lifelike coziness — the kind of texture you'll want to keep squishing long after he's done.
Use the 5.5mm hook and Color A bulky velvet yarn throughout this section. Work in a continuous spiral and use a stitch marker to track your rounds.
Start with a MR, then work 8 sc into the ring. (8)
Work an inc in each stitch around. (16)
[sc, inc] repeated 8 times around. (24)
sc evenly across all 24 stitches. (24)
[sc 2, inc] repeated 8 times around. (32)
sc across all 32 stitches. (32)
sc across all 32 stitches. (32)
sc across all 32 stitches. (32)
sc across all 32 stitches. (32)
sc across all 32 stitches. (32)
sc across all 32 stitches. (32)
sc across all 32 stitches. (32)
sc across all 32 stitches. (32)
sc across all 32 stitches. (32)
sc across all 32 stitches. (32)
[sc 2, dec] repeated 8 times around. (24)
sc evenly across all 24 stitches. (24)
Begin stuffing with fiberfill after Round 17. Continue adding stuffing as you complete each remaining round so the shape stays firm and even.
Before continuing, insert the 14mm safety eyes between rounds 9 and 10, leaving 4–5 stitches of space between them.
[sc, dec] repeated 8 times around. (16)
[dec] repeated 8 times around. (8)
Slst into the next stitch, then thread your yarn tail through the outer loops of the 8 remaining stitches and pull snug to close the opening. Tie off and weave in all ends.
Use a darning needle and Color D (black) medium yarn for the eye shaping steps below.
Thread your darning needle with Color D yarn and push it into the top inner corner of one eye.
Guide the needle across from the top of the first eye over to the top of the second eye, so a single strand of yarn bridges between both eyes.
Re-insert the needle into the bottom inner corner of the same eye you started with.
Push the needle all the way through the body and out through the back of the head.
Repeat steps 3 and 4 on the second eye. Once both eyes are shaped to your liking, tie the two yarn tails together at the back and weave in the ends securely.
Use the 5.5mm hook and Color A medium yarn. Leave a 12-inch tail when you tie off so you have enough yarn to sew the nose onto the face.
Start with a MR and work 4 sc into the ring. (4)
[sc, inc] repeated 2 times. (6)
[sc 2, inc] repeated 2 times. (8)
Slst and tie off, leaving a long tail for sewing. Attach the safety nose to the top of Round 1 of this piece before sewing it onto the head.
Pin the nose onto the head/body between rounds 9 and 12, centered between the eyes. Sew it on with your darning needle. When the piece is about halfway attached, add a small pinch of fiberfill inside if needed, then finish sewing. If you don't have a safety nose, you can embroider a nose using dark yarn in the same position.
Use a darning needle and Color C (brown) medium yarn for the eyebrows.
Insert the darning needle into the top of round 9, one stitch to the side of the top of the eye.
Bring the needle up two rounds higher and shift it 1–2 stitches to the side so it exits in line with the top center of the eye, forming a diagonal brow shape.
Push the needle back over and mirror the same steps on the opposite eye to complete the second eyebrow.
Use a darning needle and any scrap of medium yarn in a contrasting color. This framing thread is temporary — it guides where your spikes will begin and is removed once the spikes are complete.
Insert the darning needle into the bottom of round 3, centered between the eyes. This marks the top starting point of the spike section.
Continue threading the marker yarn around the head to outline the full spike area. The framing should sit about 2–3 stitches away from the corner of each eyebrow, roughly 5 stitches away from the nose on the front, and trace along the bottom of round 16 on the underside.
Use the 3.5mm hook and Color B bulky velvet yarn for all spikes.
Make a slip knot with Color B yarn onto the 3.5mm hook.
Using the spike framing as your guide, insert the hook at the top center point at the bottom of round 3 and make a slst to anchor the yarn.
ch 4. Skip the very first chain, then work one slst into each of the next 3 chains to form a spike.
Back on the head, skip one stitch and work a slst into the following stitch to anchor the spike and move forward.
Repeat steps 3 and 4 continuously, spiraling all the way around the head until the entire back and top surface is covered with spikes.
Once the first spiral is finished, begin the next spiral immediately alongside it, keeping the rows as close together as possible to prevent gaps. Offset each new spike slightly from the previous row to create a fuller, more layered look. Remove the spike framing yarn once all spirals are complete.
Use the 5.5mm hook and Color A bulky velvet yarn. Make two identical ears. Leave a 12-inch yarn tail on each for sewing.
Start with a MR, then work 4 sc into the ring. (4)
Work an inc in each stitch around. (8)
Slst and tie off, leaving a long sewing tail. Pinch each ear flat and use the darning needle to sew across one end to hold the pinched shape. Pin both ears to rounds 4 and 5 of the head, nestled directly against the spikes on either side. Sew them on securely with the darning needle.
Use the 5.5mm hook and Color A bulky velvet yarn. Make two identical leg/foot ovals. Leave a 12-inch yarn tail on each for sewing.
Make a slip knot and ch 5. (5)
Skip the first chain, then sc across the remaining 4 chains along the top, then turn and work 4 sc into the bottom loops of the same 4 chains to complete the oval shape. (8)
Slst and tie off with a 12-inch sewing tail. Pin both feet to the very bottom of the head/body, sitting directly against the lower edge of the spikes, with 2–3 stitches of space between them. Sew on with the darning needle. To secure each foot more firmly, insert the needle 2 rows above the attachment point, then push it back down one stitch over to anchor the foot flat. Tie off and weave in ends.
Use the 5.5mm hook and Color A bulky velvet yarn. Make two identical arm ovals. Leave a 12-inch yarn tail on each for sewing.
Make a slip knot and ch 4. (4)
Skip the first chain, sc across the top of the remaining 3 chains, then work 3 sc into the bottom loops of those same 3 chains to form a small oval. (6)
Slst and tie off with a 12-inch sewing tail. Pin both arms to rounds 11 and 12 on the sides of the head/body, placing them right up against the spikes. Sew on securely with the darning needle. Tie off and weave in all ends.
Herbie might be small enough to sit in a coffee cup, but he's got an enormous amount of personality packed into that squishy velvet frame. 🦔 Whether you make him for yourself or wrap him up for someone who loves woodland creatures, he's the kind of finished project that makes people stop and say "wait, you made that?" And yes — you absolutely did. Every spike, every careful stitch around that little face, every tiny oval foot is yours. That's something worth being proud of. Now go find him a good spot on a shelf and enjoy what your hands made. ✨🧶
Yes — any size 6 velvet or chenille yarn will work for the head/body and ears. The key thing is matching the weight, not the brand. Just keep in mind that some velvet yarns are thicker or stretchier than others, which can affect how dense the spikes look. If your Color B yarn is much thicker than the pattern's original, your spikes may come out larger and you'll need fewer of them to cover the body.
Start at the top center of the head at the bottom of round 3, which is where you placed the top point of the spike framing. Make your first slst there to anchor Color B, then work your chain-4 spike immediately. From that anchor point you spiral outward and downward toward round 16 at the bottom. The framing thread is your map — stay within it and you'll be fine.
The pattern calls for approximately 24oz total, which is quite a lot for a 6-inch piece — but the velvet yarn and tight tension create a fabric that needs firm stuffing to hold its round shape. If you under-stuff, Herbie will feel squishy and flatten when set down. Add fiberfill in stages starting after round 17, pushing it in firmly with a pencil or dowel to pack the bottom corners of the sphere.
The pattern mentions embroidering a nose as an alternative, and it works really well. Use dark brown or black medium weight yarn and a darning needle to work a few satin stitches in a small triangular shape, centered on the crocheted nose piece in the same position the safety nose would go. It looks just as cute and is actually safer for gifts intended for very young children.
No — the ears are pinched and folded flat, then sewn closed, so they're meant to be flat little rounds rather than dimensional pieces. The arms and legs are worked as simple ovals with no stuffing either. Only the main head/body is stuffed with fiberfill.
