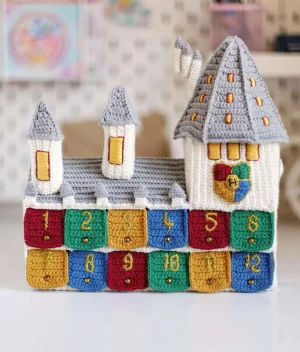
Bring a bit of wizarding wonder into your home this holiday season with a project that is as functional as it is magical. You are not just making a toy here; you are crafting a 12-day countdown filled with secret compartments and architectural details. It is the kind of project that keeps you engaged from the first brick to the final tower peak, resulting in a stunning heirloom piece your family will cherish every December.
Progress Tracker
0% Complete
— 1. Main Walls and Floor :
Row 1 :
ch 25, starting in the second ch from the hook, work 24 sc, then turn (24 st)
Row 2 :
ch 1, turn, 22 sc, inc in the next 2 st (26 st)
Row 3 :
ch 1, turn, inc, 25 sc (27 st)
Row 4 :
ch 1, turn, 25 sc, inc in the next 2 st (29 st)
Row 5 :
ch 1, turn, inc, 28 sc (30 st)
Row 6 :
ch 1, turn, 28 sc, inc in the next 2 st (32 st)
Row 7 :
ch 1, turn, inc, 31 sc (33 st)
Row 8 :
ch 1, turn, 31 sc, inc in the next 2 st (35 st)
Row 9 :
ch 1, turn, inc, 34 sc (36 st)
Row 10 :
ch 1, turn, 34 sc, inc in the next 2 st (38 st)
Row 11 :
ch 1, turn, inc, 37 sc (39 st)
Row 12 :
ch 1, turn, 37 sc, dec (38 st)
Row 13 :
ch 1, turn, dec twice, 34 sc (36 st)
Row 14 :
ch 1, turn, 34 sc, dec (35 st)
Row 15 :
ch 1, turn, dec twice, 31 sc (33 st)
Row 16 :
ch 1, turn, 31 sc, dec (32 st)
Row 17 :
ch 1, turn, dec twice, 28 sc (30 st)
Row 18 :
ch 1, turn, 28 sc, dec (29 st)
Row 19 :
ch 1, turn, dec twice, 25 sc (27 st)
Row 20 :
ch 1, turn, 25 sc, dec (26 st)
Row 21 :
ch 1, turn, dec twice, 22 sc (24 st)
Row 22 :
ch 21, turn, 44 sc along the previous row and the new chain (44 st)
Row 23 :
ch 21, turn, 64 sc along the previous row and the new chain (64 st)
Row 24-73 :
ch 1, turn, 64 sc (64 st)
Row 74 :
ch 1, turn, 44 sc, leave the remaining stitches unworked (44 st)
Row 75 :
ch 23, turn, 66 sc across the previous row and the new chain (66 st)
Row 76-98 :
ch 1, turn, 66 sc (66 st)
Row 99 :
ch 1, turn, 46 sc, leave the rest unworked (46 st)
Row 100-122 :
ch 1, turn, 46 sc (46 st)
Row 123 :
ch 1, turn, 22 sc, leave the rest unworked (22 st)
Row 124-169 :
ch 1, turn, 22 sc (22 st)
Info :
Fasten off with a very long tail for assembly. Embroider the door and windows using satin stitch as shown in the reference photos before assembling the walls.
— 2. The Clock :
Round 1 :
Using Yarn A, make 6 sc into a magic ring (6 st)
Round 2 :
inc in every st around (12 st)
Round 3 :
[1 sc, inc] x 6 (18 st)
Round 4 :
Switch to Yarn B. To blend the colors, work each sc by starting the stitch with Yarn A and finishing it with Yarn B: [2 sc, inc] x 6 (24 st)
Round 5 :
Using only Yarn B: [3 sc, inc] x 6 (30 st)
Info :
Fasten off with a tail. Use black embroidery floss to add the clock hands and hour markers, then sew it onto the wall above the main door.
— 3. House Crest :
Row 1 :
Using Yarn C: ch 3, turn, 2 sc starting in second ch (2 st)
Row 2 :
ch 4, turn, 4 sc, inc (6 st)
Row 3 :
ch 1, turn, dec, 4 sc (5 st)
Row 4 :
ch 1, turn, 3 sc, dec (4 st)
Row 5 :
ch 1, turn, 4 sc (4 st)
Row 6 :
Change to Yarn D. Blend the colors by starting each sc with Yarn C and finishing with Yarn D: ch 1, turn, 4 sc (4 st)
Row 7 :
Using Yarn D: ch 1, turn, 4 sc (4 st)
Row 8 :
ch 1, turn, 3 sc, inc (5 st)
Row 9 :
ch 1, turn, inc, 4 sc (6 st)
Row 10 :
ch 1, turn, 4 sc, dec (5 st)
Row 11 :
ch 1, turn, 2 sc, leave the rest unworked (2 st)
Row 12 :
Change direction. Work 5 sc using a blend of Yarn C & E, then 5 sc using a blend of Yarn D & F (10 st)
Row 13 :
ch 1, turn, 5 sc with Yarn F, 5 sc with Yarn E (10 st)
Row 14 :
ch 1, turn, inc, 4 sc with Yarn E, 4 sc, inc with Yarn F (12 st)
Row 15 :
ch 1, turn, 6 sc with Yarn F, 6 sc with Yarn E (12 st)
Row 16 :
ch 1, turn, 2 sl st, 4 sc with Yarn E, 4 sc with Yarn F, leave the rest unworked
Row 17 :
ch 1, turn, 4 sc with Yarn F, 4 sc with Yarn E (8 st)
Row 18 :
ch 1, turn, dec twice with Yarn E, dec twice with Yarn F (4 st)
Row 19 :
ch 1, turn, dec with Yarn F, dec with Yarn E (2 st)
Row 20 :
ch 1, turn, dec. Change to golden metallic thread.
Info :
Using a jacquard technique, sc around the entire edge of the crest using the colors that match each section blended with the golden thread: 10 sc (F+Gold), 11 sc (D+Gold), 11 sc (C+Gold), 10 sc, sl st into the first dec (E+Gold) (43 st). Steam flat with an iron.
— 4. Crest Center Square :
Row 1 :
Using golden thread: ch 4, turn, 3 sc starting in second ch (3 st)
Row 2-3 :
ch 1, turn, 3 sc (3 st)
Round 4 :
Work around the edge: 3 sc down, 3 sc across the bottom, 3 sc up, 3 sc across the top (12 st)
Info :
Fasten off. Embroider a black 'H' in the center, then sew this square to the middle of the house crest.
— 5. Internal Partitions (Make 2) :
Row 1 :
Using Yarn A: ch 5, turn, 4 sc starting in second ch (4 st)
Row 2-72 :
ch 1, turn, 4 sc (4 st)
Info :
Fasten off, leaving a tail for sewing.
— 6. Structural Crossbar :
Info :
Use Yarn A, but split the strand in half so you are working with only two plies and a 1.5 mm hook.
Round 1 :
Make 4 sc into a magic ring (4 st)
Info :
Insert the floral wire into this tube. Use a needle to create holes in the cardboard frame and secure the wire ends as described in the assembly guide.
— 7. Advent Doors (Make 12) :
Info :
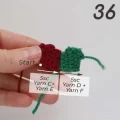
Make 3 doors in each of the four house colors: Yarn C, D, E, and F.
Row 1 :
ch 11, turn, 10 sc starting in second ch (10 st)
Row 2 :
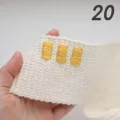
ch 1, turn, 4 sc, ch 2, skip 2 st, 4 sc (10 st). This creates the buttonhole for the bead handle.
Row 3-10 :
ch 1, turn, 10 sc (10 st)
Round 11 :
Work around the perimeter: [9 sc, inc] x 3 in the door color, then for the final side, work 9 sc, inc using a blend of the door color and Yarn A (44 st)
Info :
Embroider numbers 1 through 12 using the golden thread and water-soluble canvas for accuracy.
— 8. Main Roof :
Row 1 :
Using Yarn B: ch 49, turn, 48 sc starting in second ch (48 st)
Row 2-36 :
ch 1, turn, 48 sc in BLO (48 st)
Info :
Fasten off and prepare for assembly over the cardboard frame.
— 9. Roof Peaks (Make 5) :
Info :
Split Yarn B in half (two plies) and use a 1.5 mm hook.
Round 1 :
Make 4 sc into a magic ring (4 st)
Round 2 :
[1 sc, inc] x 2 (6 st)
Round 3 :
[2 sc, inc] x 2 (8 st)
Round 4 :
[3 sc, inc] x 2 (10 st)
Round 5 :
[4 sc, inc] x 2 (12 st)
Round 6 :
[5 sc, inc] x 2 (14 st). Change to Yarn A.
Round 7 :
Work sc using a blend of Yarn B & A: 5 sc, skip 2, 5 sc, skip 2 (10 st)
Round 8-10 :
Using only Yarn A: 10 sc (10 st)
Round 11 :
2 sc, leave the rest unworked. Fasten off.
— 10. Small Tower (Make 2) :
Row 1 :
Using Yarn A: ch 11, turn, 10 sc starting in second ch (10 st)
Row 2 :
ch 1, turn, 8 sc, inc twice (12 st)
Row 3 :
ch 1, turn, 12 sc (12 st)
Row 4 :
ch 1, turn, 10 sc, inc twice (14 st)
Row 5 :
ch 1, turn, 14 sc (14 st)
Row 6 :
ch 1, turn, 12 sc, inc twice (16 st)
Row 7-13 :
ch 1, turn, 16 sc (16 st)
Row 14 :
ch 1, turn, 12 sc, dec twice (14 st)
Row 15 :
ch 1, turn, 14 sc (14 st)
Row 16 :
ch 1, turn, 10 sc, dec twice (12 st)
Row 17 :
ch 1, turn, 12 sc (12 st)
Row 18 :
ch 1, turn, 8 sc, dec twice (10 st)
Row 19-25 :
ch 1, turn, 10 sc (10 st)
— 11. Small Tower Roof Sectors (Make 4) :
Row 1 :
Using Yarn B: ch 9, turn, 8 sc starting in second ch (8 st)
Row 2 :
ch 1, turn, 8 sc in BLO (8 st)
Row 3 :
ch 1, turn, dec, 4 sc, dec in BLO (6 st)
Row 4 :
ch 1, turn, 6 sc in BLO (6 st)
Row 5 :
ch 1, turn, dec, 2 sc, dec in BLO (4 st)
Row 6 :
ch 1, turn, 4 sc in BLO (4 st)
Row 7 :
ch 1, turn, dec twice in BLO (2 st)
Row 8-9 :
ch 1, turn, 2 sc in BLO (2 st)
Row 10 :
ch 1, turn, dec in BLO (1 st)
Info :
Join all 4 sectors together using 11 sc with a hook to form the roof cone.
— 12. Big Tower Roof Sectors (Make 8) :
Row 1 :
Using Yarn B: ch 15, turn, 14 sc starting in second ch (14 st)
Row 2 :
ch 1, turn, 14 sc in BLO (14 st)
Row 3 :
ch 1, turn, dec, 10 sc, dec in BLO (12 st)
Row 4-5 :
ch 1, turn, 12 sc in BLO (12 st)
Row 6 :
ch 1, turn, dec, 8 sc, dec in BLO (10 st)
Row 7-11 :
ch 1, turn, 10 sc in BLO (10 st)
Row 12 :
ch 1, turn, dec, 6 sc, dec in BLO (8 st)
Row 13-17 :
ch 1, turn, 8 sc in BLO (8 st)
Row 18 :
ch 1, turn, dec, 4 sc, dec in BLO (6 st)
Row 19-23 :
ch 1, turn, 6 sc in BLO (6 st)
Row 24 :
ch 1, turn, dec, 2 sc, dec in BLO (4 st)
Row 25-26 :
ch 1, turn, 4 sc in BLO (4 st)
Row 27 :
ch 1, turn, dec twice in BLO (2 st)
Row 28-29 :
ch 1, turn, 2 sc in BLO (2 st)
Row 30 :
ch 1, turn, dec in BLO (1 st)
Info :
Join all 8 sectors with 31 sc to form the large cone. Crochet along the open edges with 31 sc on each side to finish.
— 13. Triple Tower Detail (Make 3 Pieces) :
Info :
Use split Yarn A and a 1.5 mm hook for these three small turrets.
Part 1 (Make 2) :
Round 1: 4 sc in magic ring. Round 2: inc x 4 (8 st). Round 3: 8 sc in BLO. Rounds 4-10: 8 sc. Change to Yarn B. Round 11: 8 sc (blend A+B). Round 12: 8 sc (Yarn B). Round 13: [2 sc, dec] x 2 (6 st). Round 14: 6 sc. Round 15: [1 sc, dec] x 2 (4 st).
Part 2 (Make 1) :
Round 1: 3 sc in magic ring. Round 2: inc, 2 sc (4 st). Round 3: 1 sc, inc, 2 sc (5 st). Round 4: 2 sc, inc, 2 sc (6 st). Round 5: 3 sc, inc, 2 sc (7 st). Round 6: 4 sc, inc, 2 sc (8 st). Rounds 7-16: 8 sc. Change to Yarn B. Round 17: 8 sc (blend A+B). Round 18: 8 sc (Yarn B). Round 19: [2 sc, dec] x 2 (6 st). Round 20: 6 sc. Round 21: [1 sc, dec] x 2 (4 st).
I hope this project brings a massive dose of magic to your holiday season! There is something truly special about a countdown that you have built with your own two hands, stitch by stitch. Whether you are filling those little pockets with chocolate frogs or tiny notes, this castle is sure to become a centerpiece of your celebrations. Don't forget to take your time with the assembly—the cardboard frame is the 'skeleton' that makes the magic happen. Happy crafting, and may your holidays be absolutely spellbinding! 🧶✨🏰