🧶 Beautiful ✨ Detailed 💝 Adorable

Hoppy Spring Bunny Wreath Pattern

Hoppy Spring Bunny Wreath Pattern
4.8★Rating
5-7 HoursTime Needed
2.3KMade This
✂️

Intermediate Level

Ideal for those with basic crocheting experience, featuring slightly more advanced stitches and techniques to expand your skills.

⏱️

Weekend Treat

Takes 5-7 hours, making it an enjoyable project to finish over a couple of days.

🌸

Spring Bloom

Light and fresh designs for warmer days, capturing the renewal and brightness of the season.

About This Hoppy Spring Bunny Wreath Pattern
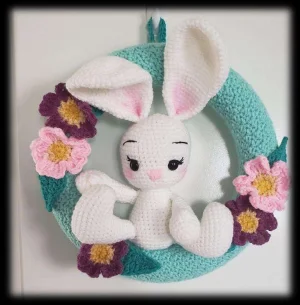
Hoppy Spring Bunny Wreath Pattern crochet pattern - detailed view

This wreath is the ultimate way to welcome guests with a touch of handmade charm. It’s a wonderful gift for a housewarming or a nursery, adding a soft, whimsical vibe to any wall or door.

Why You'll Love This Hoppy Spring Bunny Wreath Pattern

I honestly can't get enough of the texture on this wreath! Using a mix of single and double crochets creates this beautiful, pebbled look that is so satisfying to touch. Plus, the flowers are worked in rounds with quick color changes, so you get that instant gratification as each little bloom pops off your hook. It's the kind of project that feels like a breath of fresh air.

Hoppy Spring Bunny Wreath Pattern step 1 Hoppy Spring Bunny Wreath Pattern step 2 Hoppy Spring Bunny Wreath Pattern step 3 Hoppy Spring Bunny Wreath Pattern step 4

Switch Things Up

There’s something so refreshing about switching out a heavy winter wreath for something bright and floral. I remember the first time I tried the 'sc, dc' combo used for this wreath cover—it’s often called the lemon peel stitch, and the texture is just incredible for hiding any foam underneath. It’s meditative, too! You can just zone out while working those 99 rows.

When it comes to the flowers, don't feel like you have to stick to my color palette. I used bright yellows and purples, but a monochromatic ombre or even some wild variegated yarn would look stunning. If you're feeling extra creative, you can even use a bit of dry brushing with acrylic paint on the bunny's cheeks to give it that 'boutique' look. It's those tiny, personal touches that really make a project sing. I love hanging mine where it catches the morning sun—it’s a little reminder that warmer days are finally here. Grab your favorite 4mm hook and let’s get some spring vibes going on your doorstep!

Common Mistakes & How to Fix Them

✗ If your wreath cover feels baggy, you might have missed the instruction to check the fit after Row 2; remember that the pattern works in multiples of 2, so you can easily subtract stitches to make it snug.✗ When working the flowers, it's easy to accidentally skip the chain-1 spaces from Round 2—these are essential for placing your double crochet stitches in the next round.✗ Make sure you don't twist the wreath cover when joining the ends with slip stitches, or you'll end up with a permanent spiral that won't sit flat on the foam.✗ For the leaves, when you rotate to work on the opposite side of the chain, ensure you're working into the bottom loops of the foundation chain to avoid creating large gaps in the center.

Hoppy Spring Bunny Wreath Pattern

Brighten up your front door with a burst of handmade joy! This wreath is such a delight to work on, combining a wonderfully textured cover with dainty, colorful flowers and sweet garden leaves. You'll love how the simple rhythm of the stitches creates a professional, boutique-style finish that looks stunning in any entryway. It's the perfect way to celebrate the changing seasons with your crochet hook.

Intermediate 5-7 Hours

Materials Needed for Hoppy Spring Bunny Wreath Pattern

— Main Fabric

  • 01
    Worsted weight yarn (Size 4) in a soft minty green for the wreath base
  • 02
    Small amounts of bright yellow and light yellow worsted yarn for the flower centers
  • 03
    Worsted weight yarn in light pink and purple for the flower petals
  • 04
    Teal green worsted weight yarn for the decorative leaves
  • 05
    White or cream worsted weight yarn for the bunny accent

— Tools Required

  • 01
    4.0 mm (G) crochet hook
  • 02
    11.75 inch foam wreath form
  • 03
    Fiberfill stuffing for the bunny
  • 04
    Yarn needle for assembly
  • 05
    Sharp scissors
  • 06
    Pink acrylic paint and a stiff dry brush for adding rosy details

Progress Tracker

0% Complete

— 1. Wreath Cover :

Row 1 :

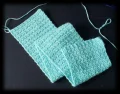
With the minty green yarn, ch 23. Starting in the 2nd ch from your hook, sc 1, then dc 1 in the next st. Repeat the *sc 1, dc 1* pattern until you reach the end of the chain. ch 1 & turn. (22)

Row 2 :

*sc 1, dc 1* across the entire row. ch 1 & turn. (22)

Row 3-99 :

*sc 1, dc 1* across the entire row. ch 1 & turn. (22)

Info :

This is a great time to test the fit around your foam. Wrap the fabric around the wreath; it should meet snugly. If it's too loose, work 2 fewer stitches per row. If it's too tight, add 2 stitches. The pattern must stay in multiples of 2.

Joining :

Bring the short ends (Row 1 and Row 99) together with the right sides facing. Insert your hook through both layers and sl st across to join them into a circle. Fasten off, leaving a very long tail—around 45 inches—to sew the cover onto the wreath later.

— 2. Spring Flowers (Make 5) :

Round 1 :

Using bright yellow yarn, work 10 sc into a mc. Pull the tail to close the center and sl st into the first sc to join. (10)

Round 2 :

Change to the light yellow yarn. *sc 1, ch 1* in every st around the circle. sl st into the first st to join. (10)

Round 3 :

Switch to your petal color (pink or purple). *sl st into the next sc, ch 3, 2 tr in that same st, 1 dc into the ch-1 space, 2 tr in the next sc, ch 3, sl st into that same st* repeat 5 times around to create the petals. Fasten off and leave a tail for attaching.

— 3. Teal Garden Leaves (Make 5) :

Row 1 :

Using teal yarn, ch 9. sl st in the 2nd ch from the hook, sc in the next 2 ch, hdc in the next ch, dc in the next 2 ch, tr in the last 2 ch. In that final ch, work a ch 3 & sl st. Now, rotate the piece to work along the opposite side of the foundation chain. ch 3, tr in that first st, tr in the next, dc in the next 2, hdc in the next, sc in the next 2, and finish with a sl st. Fasten off and weave in your starting tail.

— 4. Hanging Loop :

Step 1 :

Work 20 hdcfs to create a sturdy strap. Fasten off and leave a tail for sewing.

Assembly Instructions

  • Slide the green crochet tube over your foam wreath form, ensuring the right side is facing outward.
  • Using your long yarn tail and a needle, sew the inner edges of the tube together around the foam, carefully matching the rows as you go to maintain the texture.
  • Fold your hanging loop in half and sew both ends securely to the top back of the wreath.
  • Arrange your flowers into three groups: one on each side and one at the bottom. Sew them firmly onto the wreath cover.
  • Tuck the leaves behind and around the flower bunches, sewing them down so they peek out naturally.
  • Position your bunny at the bottom center and sew it by its base to the wreath; if you prefer, sew one ear to the top of the wreath for a playful look.
  • Use a dry brush and a tiny amount of pink paint to lightly shade the bunny's cheeks and the inner ears for a soft, finished appearance.

Important Notes

  • 💡Always finish the final pull-through of your last stitch with the new color to ensure the transitions on your flowers look perfectly clean.
  • 💡When sewing the cover onto the foam, use a whip stitch and keep your tension even so the seam stays neat and tucked toward the back.
  • 💡If you find the 99 rows aren't quite enough to cover your specific brand of foam wreath, feel free to add more rows in multiples of 2 until the ends meet.
  • 💡For the paint details, dab most of the acrylic paint off onto a scrap of paper before touching the yarn to avoid any blotches or stiff spots.
  • 💡Weaving in your ends as you go during the flower rounds will save you a lot of time during the final assembly phase.

I really hope you enjoy making this wreath as much as I did! There is something so satisfying about seeing all those little flowers and leaves come together to create a full, blooming display. Whether you’re making this for your own home or as a special gift for a friend, it’s sure to bring a smile to anyone’s face. Don't forget to take a moment to admire your beautiful stitch work once it's all assembled. Happy crocheting, and may your spring be filled with plenty of yarn and creativity! 🧶✨

You ask,

we answer.

FAQs

Can I use a different size wreath form?

You certainly can! Just remember that the wreath cover is worked in multiples of 2. You can adjust the length by adding or subtracting rows until it fits around your specific form.

What kind of paint is best for the bunny's cheeks?

Simple acrylic craft paint works best. The trick is using a 'dry brush' technique—dip the brush, wipe almost all of it off, and then lightly buff it onto the yarn.

Is the bunny included in this pattern?

This specific pattern covers the wreath, flowers, and leaves. To complete the look shown, you can use any small bunny amigurumi pattern that fits a 4-5 inch scale.

Can I use cotton yarn instead of worsted weight acrylic?

Yes, cotton would give the flowers great definition! Just be sure to check your gauge for the wreath cover, as cotton has less stretch than acrylic and may require more rows.