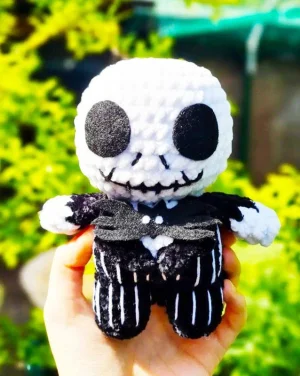
Bring the Pumpkin King to life with this spooky yet sweet amigurumi project. You'll love seeing his iconic pinstriped suit and skeletal grin take shape as you work through the rounds. It's a fantastic way to celebrate your love for classic holiday films while practicing some fun color changes and embroidery details. This little guy is designed to be huggable but still full of that signature character we all adore.
Progress Tracker
0% Complete
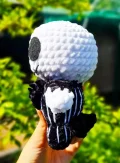
— 1. Head :
Round 1 :
Using white yarn, create a mr and work 8 sc into it (8)
Round 2 :
Work 1 inc into every st around (16)
Round 3 :
Repeat (1 sc, 1 inc) 8 times around the circle (24)
Round 4 :
Repeat (3 sc, 1 inc) 6 times around (30)
Round 5 :
Repeat (2 sc, 1 inc, 2 sc) 6 times around (36)
Round 6 :
Work 1 sc into each st around (36)
Round 7 :
Work 1 sc into each st around (36)
Round 8 :
Work 1 sc into each st around (36)
Round 9 :
Work 1 sc into each st around (36)
Round 10 :
Work 1 sc into each st around (36)
Round 11 :
Repeat (4 sc, 1 dec) 6 times around (30)
Round 12 :
Repeat (3 sc, 1 dec) 6 times around (24)
Round 13 :
Repeat (4 sc, 1 dec) 4 times around (20)
Info :
Cut the yarn and FO using an invisible join. Stuff the head firmly with fiberfill to achieve a nice round shape.
— 2. Legs and Torso :
Round 1 :
Starting with black yarn for the first leg, work 5 sc into a mr (5)
Round 2 :
Work 1 inc into every st around (10)
Round 3 :
Work 1 sc into the BLO of every st around (10)
Round 4 :
Work 1 sc into each st around (10)
Round 5 :
Work 1 sc into each st around (10)
Info :
Cut the yarn and FO the first leg with an invisible join. Repeat Rounds 1-5 to make the second leg, but do not cut the yarn. Instead, ch 2.
Round 6 :
Insert your hook into any st of the first leg to join them. Work 10 sc around the first leg, 2 sc into the ch-2 space, 10 sc around the second leg, and 2 sc into the other side of the ch-2 (24)
Round 7 :
Work (3 sc, 1 inc) twice, then 6 sc, 1 inc, 3 sc, 1 inc, and finish with 5 sc (28)
Round 8 :
Work 1 sc into the BLO of every st around (28)
Round 9 :
Work 1 sc into each st around (28)
Round 10 :
Work 13 sc, cc to white and work 2 sc, then cc back to black and work 13 sc (28)
Round 11 :
Work 12 sc, cc to white and work 4 sc, then cc back to black and work 12 sc (28)
Round 12 :
Using black, (3 sc, dec) twice, 1 sc. Switch to white, 2 sc, 1 dec, 2 sc. Switch back to black, 1 sc, 1 dec, 3 sc, 1 dec, 3 sc (23)
Round 13 :
Using black, 4 sc, 1 dec, 3 sc. Switch to white, 1 sc, 1 dec, 2 sc. Switch back to black, 2 sc, 1 dec, 5 sc (20)
Info :
Stuff the piece as you work, ensuring the feet remain flat. Finish stuffing and cut the yarn, leaving a long tail for attaching the head.
— 3. Arms :
Round 1 :
Using white yarn, work 4 sc into a mr (4)
Round 2 :
Work 1 inc into every st around (8)
Round 3 :
cc to black yarn and work 1 sc into each st around (8)
Round 4 :
Work 1 sc into each st around (8)
Round 5 :
Work 1 sc into each st around (8)
Round 6 :
Flatten the arm and work 4 sc through both layers to close the opening. Cut yarn and leave a tail for sewing.
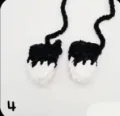
— 4. Jacket Details :
Jacket Front Hem :
Using black yarn, ch 6. Starting in the 2nd ch from hook, work: 1 sc, 1 hdc, ch 2, sl st into the back of the 2nd ch to create a point, then sc in the remaining 3 ch. FO with a sewing tail.
Info :
For the back hem, locate the 8 BLO stitches from Round 8 on the back of the body.
Jacket Back Row 1 :
Join black yarn to a BLO st, ch 5. In 2nd ch from hook, sl st, then work 2 sc in the next 2 ch (Spike 1).
Jacket Back Row 2 :
sl st into the next BLO st on the body, ch 5. In 2nd ch from hook, sl st, then work 3 sc in the next 3 ch (Spike 2).
Jacket Back Row 3 :
sl st into the next BLO st on the body, ch 4. In 2nd ch from hook, sl st, then work 2 sc in the next 2 ch (Spike 3).
Info :
Alternate the patterns for Row 2 and Row 3 until you have a total of 7 spikes across the back. FO and weave in ends.
You've officially brought the Pumpkin King to life! There’s something so satisfying about finishing those final pinstripe details and seeing his personality pop. I hope you enjoyed making this little guy as much as I did—he’s the perfect blend of spooky and sweet. Whether he’s guarding your bookshelf or joining your holiday decor, he’s sure to be a conversation starter. Don't forget to give him a little pat on his round head for a job well done. Happy crafting, and I can't wait to see your finished creations! 🧶✨