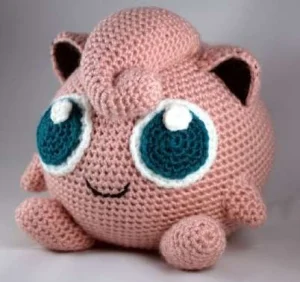
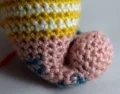
Get ready to bring the most iconic singing Pokémon to life with your crochet hook! This Jigglypuff amigurumi captures that perfectly round, huggable shape we all know and love. It’s a wonderful project for anyone who wants to practice shaping and layered assembly, resulting in a plushie that looks like it stepped right out of the screen and into your home.
Progress Tracker
0% Complete
— 1. Main Body :
Round 1 :
Start with 6 sc into a mr (6)
Round 2 :
Work 1 inc into every st around (12)
Round 3 :
Repeat (1 inc, 1 sc) five times, then finish with 2 inc (19)
Round 4 :
Repeat (1 inc, 2 sc) six times, then add 1 sc (25)
Round 5 :
1 sc, then repeat (1 inc, 3 sc) six times (31)
Round 6 :
3 sc, then repeat (1 inc, 4 sc) five times, 1 inc, 2 sc (37)
Round 7 :
6 sc, then repeat (1 inc, 7 sc, 1 inc, 6 sc) twice, 1 inc (42)
Round 8 :
3 sc, 1 inc, then repeat (6 sc, 1 inc) five times, 3 sc (48)
Round 9 :
5 sc, 1 inc, then repeat (8 sc, 1 inc, 9 sc, 1 inc) twice, 4 sc (53)
Round 10 :
8 sc, 1 inc, then repeat (9 sc, 1 inc, 10 sc, 1 inc) twice, 2 sc (58)
Round 11 :
3 sc, 1 inc, then repeat (10 sc, 1 inc, 11 sc, 1 inc) twice, 8 sc (63)
Round 12 :
Repeat (12 sc, 1 inc, 11 sc, 1 inc) twice, 12 sc, 1 inc (68)
Round 13 :
6 sc, 1 inc, then repeat (16 sc, 1 inc) three times, 10 sc (72)
Round 14 :
11 sc, 1 inc, then repeat (17 sc, 1 inc) three times, 6 sc (76)
Round 15 :
3 sc, 1 inc, then repeat (24 sc, 1 inc) twice, 22 sc (79)
Round 16 :
18 sc, 1 inc, then repeat (25 sc, 1 inc) twice, 8 sc (82)
Round 17 :
6 sc, 1 inc, then repeat (26 sc, 1 inc) twice, 21 sc (85)
Round 18 :
14 sc, 1 inc, then repeat (27 sc, 1 inc) twice, 14 sc (88)
Round 19 :
Repeat (43 sc, 1 inc) twice (90)
Round 20 :
20 sc, 1 inc, 69 sc (91)
Round 21 :
3 sc, 1 inc, 44 sc, 1 inc, 42 sc (93)
Round 22 :
92 sc, 1 inc (94)
Round 23-25 :
Work 1 sc in each st around (94)
Round 26 :
1 dec, 92 sc (93)
Round 27 :
42 sc, 1 dec, 44 sc, 1 dec, 3 sc (91)
Round 28 :
69 sc, 1 dec, 20 sc (90)
Round 29 :
Repeat (1 dec, 43 sc) twice (88)
Round 30 :
14 sc, repeat (1 dec, 27 sc) twice, 1 dec, 14 sc (85)
Round 31 :
21 sc, repeat (1 dec, 26 sc) twice, 1 dec, 6 sc (82)
Round 32 :
8 sc, repeat (1 dec, 25 sc) twice, 1 dec, 18 sc (79)
Round 33 :
22 sc, repeat (1 dec, 24 sc) twice, 1 dec, 3 sc (76)
Round 34 :
6 sc, repeat (1 dec, 17 sc) three times, 1 dec, 11 sc (72)
Round 35 :
10 sc, repeat (1 dec, 16 sc) three times, 1 dec, 6 sc (68)
Round 36 :
1 dec, 12 sc, repeat (1 dec, 11 sc, 1 dec, 12 sc) twice (63)
Round 37 :
8 sc, repeat (1 dec, 11 sc, 1 dec, 10 sc) twice, 1 dec, 3 sc (58)
Round 38 :
2 sc, repeat (1 dec, 10 sc, 1 dec, 9 sc) twice, 1 dec, 8 sc (53)
Round 39 :
4 sc, repeat (1 dec, 9 sc, 1 dec, 8 sc) twice, 1 dec, 5 sc (48)
Round 40 :
3 sc, repeat (1 dec, 6 sc) five times, 1 dec, 3 sc (42)
Round 41 :
1 dec, repeat (6 sc, 1 dec, 7 sc, 1 dec) twice, 6 sc (37)
Round 42 :
2 sc, 1 dec, repeat (4 sc, 1 dec) five times, 3 sc (31)
Round 43 :
Repeat (3 sc, 1 dec) six times, 1 sc (25)
Round 44 :
1 sc, repeat (2 sc, 1 dec) six times (19)
Round 45 :
1 dec, 1 dec, repeat (1 sc, 1 dec) five times (12)
Info :
Fasten off, stuff firmly with Poly-fil, and sew the remaining gap closed.
— 2. Eye Components :
Sclera Round 1 :
Using white, work 6 sc in a mr (6)
Sclera Round 2 :
Work 1 inc in every st (12)
Sclera Round 3 :
Repeat (1 inc, 1 sc) six times (18)
Sclera Round 4 :
Repeat (1 sc, 1 inc, 1 sc) six times (24)
Sclera Round 5 :
Repeat (3 sc, 1 inc) six times (30)
Iris Round 1 :
Using teal, work 6 sc in a mr (6)
Iris Round 2 :
Work 1 inc in every st (12)
Iris Round 3 :
Repeat (1 inc, 1 sc) six times (18)
Iris Round 4 :
Repeat (1 sc, 1 inc, 1 sc) six times (24)
Highlight :
Using white, work 6 sc in a mr and fasten off (6)
Info :
Make two of each component for a total of six circles.
— 3. Ears :
Inner Row 1 :
Using black, ch 7 (6)
Inner Row 2 :
1 sc in 2nd ch from hook, 5 sc, ch 1, turn (6)
Inner Row 3 :
1 dec, 4 sc, ch 1, turn (5)
Inner Row 4 :
1 dec, 3 sc, ch 1, turn (4)
Inner Row 5 :
1 dec, 2 sc (3)
Outer Row 1 :
Using pink, ch 13 (12)
Outer Row 2 :
1 sc in 2nd ch from hook, 11 sc, ch 1, turn (12)
Outer Row 3 :
1 dec, 3 sc, 1 dec, 3 sc, 1 dec, ch 1, turn (9)
Outer Row 4 :
1 dec, 1 sc, 1 dec, 2 sc, 1 dec, ch 1, turn (6)
Outer Row 5 :
Work 3 dec (3)
Info :
Make two inner and two outer pieces. To join, place black over pink and sc through both along the side edges. Leave the bottom open.
— 4. Feet :
Round 1 :
Work 7 sc in a mr (7)
Round 2 :
1 inc, then repeat (1 inc, 1 sc) three times (11)
Round 3 :
1 inc, 1 sc, 1 inc, 4 sc, 1 inc, 3 sc (14)
Round 4 :
1 inc, 13 sc (15)
Round 5 :
8 sc, 1 inc, 3 sc, 1 inc, 2 sc (17)
Round 7 :
5 sc, 1 inc, 4 sc, 1 dec, 5 sc (17)
Round 9 :
1 dec, 9 sc, 1 inc, 5 sc (17)
Round 10 :
9 sc, 1 dec, 6 sc (16)
Round 11 :
12 sc, 1 dec, 2 sc (15)
Round 12 :
4 sc, 1 dec, 3 sc, 1 dec, 4 sc (13)
Round 13 :
1 dec, 6 sc, 1 dec, 3 sc (11)
Round 14 :
Work 4 dec, 1 sc, 1 dec (6)
Info :
Make two. Stuff lightly and close the gap.
— 5. Arms :
Round 1 :
Work 5 sc in a mr (5)
Round 2 :
Repeat (1 inc, 1 sc) twice, then 1 inc (8)
Round 3 :
3 sc, 1 inc, 4 sc (9)
Partial Row 4 :
pr 2: 2 sc, 1 inc, 3 sc (7)
Partial Row 5 :
pr 2: 5 sc (5)
Partial Row 6 :
pr 2: 3 sc (3)
Step 7 :
Work a clean edge of 10 sc around the entire opening (10)
Info :
Make two. Stuff with Poly-fil before attaching.
— 6. Hair Poof :
Round 1 :
Work 6 sc in a mr (6)
Round 2 :
Repeat (1 inc) five times, then 1 sc (11)
Round 3 :
Repeat (1 sc, 1 sc, 1 inc) three times, 1 sc, 1 inc (15)
Round 4 :
3 sc, 1 inc, 7 sc, 1 inc, 3 sc (17)
Round 5 :
8 sc, 1 dec, 7 sc (16)
Round 6 :
1 dec, 3 sc, 1 dec, 4 sc, 1 dec, 3 sc (13)
Round 7 :
1 dec, 1 sc, 1 dec, 1 dec, 1 sc, 1 dec, 1 sc, 1 dec (8)
Partial Row 8 :
pr 3: 1 inc, 2 sc, 1 inc (6)
Partial Row 10 :
pr 4: 5 sc (5)
Round 11 :
Work 10 sc (10)
Round 12 :
4 sc, 1 inc, 5 sc (11)
Round 13 :
1 inc, 10 sc (12)
Partial Row 14 :
pr 6: 6 sc (6)
Round 15 :
3 sc, 1 inc, 5 sc, 1 inc (14)
Partial Row 16 :
pr 7: 7 sc (7)
Round 17 :
1 sc, 1 inc, 6 sc, 1 inc, 5 sc (16)
Round 18 :
6 sc, 1 inc, 6 sc, 1 inc, 1 sc (18)
Round 19 :
3 sc, 1 inc, 8 sc, 1 inc, 5 sc (20)
New Strand 20 :
pr 3: 18 sc (18)
New Strand 21 :
pr 1: 8 sc, 1 inc, 9 sc (19)
New Strand 22 :
pr 1: 4 sc, 1 inc, 14 sc (20)
New Strand 23-25 :
pr 1: 20 sc (20)
New Strand 26 :
pr 1: 8 sc, 1 dec, 10 sc (19)
New Strand 27 :
pr 1: 12 sc, 1 dec, 5 sc (18)
New Strand 28 :
pr 1: 5 sc, 1 dec, 11 sc (17)
New Strand 29 :
pr 1: 4 sc, 1 dec, 5 sc, 1 dec, 4 sc (15)
New Strand 30 :
pr 1: 6 sc, 1 dec, 7 sc (14)
New Strand 31 :
pr 1: 8 sc, 1 dec, 4 sc (13)
New Strand 32 :
pr 1: 3 sc, 1 dec, 3 sc, 1 dec, 3 sc (11)
New Strand 33 :
pr 1: 5 sc, 1 dec, 4 sc (10)
New Strand 34 :
pr 1: 2 sc, 1 dec, 2 sc, 1 dec, 2 sc (8)
Step 35 :
Work a clean sc edge around the unfinished opening and fasten off.
You've done it! Your very own Jigglypuff is ready to take center stage. This pattern is such a fun way to play with amigurumi architecture, especially that curly hair poof. I hope you enjoyed the process as much as I do. Whether she's sitting on your shelf or being gifted to a fellow trainer, she's sure to bring a smile to anyone's face. Don't forget to share your photos — I'd love to see your finished creation! Happy crafting! 🧶 ✨