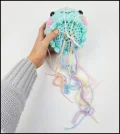
๐Ÿงถ Beautiful โœจ Detailed ๐Ÿ’ Adorable

Jolly Jellyfish Amigurumi Pattern

Jolly Jellyfish Amigurumi Pattern
4.4โ˜…Rating
3-5 HoursTime Needed
3.3KMade This
โœ‚๏ธ

Intermediate Level

Ideal for those with basic crocheting experience, featuring slightly more advanced stitches and techniques to expand your skills.

โฑ๏ธ

Quick Craft

Fits nicely into a free afternoon โ€” 2 to 5 hours of focused, enjoyable crocheting.

๐Ÿฐ

Whimsical Buddy

Playful characters full of personality, designed to spark imagination and become cherished playtime favorites.

About This Jolly Jellyfish Amigurumi Pattern

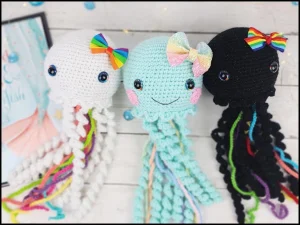
Jolly Jellyfish Amigurumi Pattern crochet pattern - detailed view

This pattern makes a beautiful handmade gift โ€” thoughtful enough for someone special, but quick enough to make a few before the holidays. It works perfectly as a nursery mobile or a playful shelf companion.

Why You'll Love This Jolly Jellyfish Amigurumi Pattern

I honestly couldn't stop playing with the tentacles once I finished mine! The way they bounce back is so satisfying. Plus, the head is worked in one piece, so there's less sewing than you might expect for a project this size, which is always a win in my book.

Jolly Jellyfish Amigurumi Pattern step 1 Jolly Jellyfish Amigurumi Pattern step 2 Jolly Jellyfish Amigurumi Pattern step 3 Jolly Jellyfish Amigurumi Pattern step 4

Switch Things Up

I remember the first time I made a jellyfish amigurumi; I was absolutely obsessed with how the tentacles turned out! There is something incredibly meditative about crocheting those long chains and then watching them naturally spiral as you work your way back down. It is like magic happening right in your hands. For this specific pattern, I really recommend playing around with color. I once made a version using a variegated yarn for the curly tentacles and a solid pastel for the head, and it looked like something straight out of a tropical reef!

Another little tip from my craft desk: when you are embroidering the smile, try to keep your tension light. If you pull too hard, the 'cheeks' of the jellyfish might pucker, and we want him to look as happy and relaxed as possible. This project is a fantastic stash-buster too. You can use all those leftover scraps of yarn for the chain tentacles to create a colorful, scrap-happy sea friend. It is such a rewarding project because even though it looks intricate with all those moving parts, the construction is very straightforward. I hope this jellyfish brings a little splash of joy to your hook today!

Common Mistakes & How to Fix Them

โœ— Missing the BLO instruction on Round 26 will leave you without the front loops needed to attach the decorative ridge later on.โœ— If you don't pull the magic ring tight enough at the very start of the head, stuffing might peek through the top as the toy stretches.โœ— Spacing the eyes too close together can make the jellyfish look a bit cramped; try to stick to that 11-stitch gap for the cutest expression.โœ— Twisting the long starting chain for the tentacles will make it hard to work your stitches back across, so keep that foundation chain straight.

Jolly Jellyfish Amigurumi Pattern

This sweet little sea dweller is such a joy to work up! I love how the bouncy, curly tentacles give it so much personality and movement. You'll find yourself wanting to make a whole rainbow of these to brighten up any room or to give as the perfect handmade gift. It is a wonderful project for practicing your shaping and adding decorative details.

Intermediate 3-5 Hours

Materials Needed for Jolly Jellyfish Amigurumi Pattern

โ€” Main Fabric

  • 01
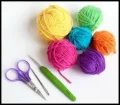
    Approximately 100g of worsted weight yarn in a main color for the head and curly tentacles
  • 02
    Roughly 50-75g of accent colors in worsted weight for the secondary chain tentacles
  • 03
    A small amount of pink worsted weight yarn for the blushing cheeks
  • 04
    Black embroidery thread for stitching the mouth details

โ€” Tools Required

  • 01
    3.25 mm (D) crochet hook
  • 02
    18 mm safety eyes
  • 03
    Polyester fiberfill stuffing
  • 04
    Yarn needle for assembly and embroidery
  • 05
    Stitch markers
  • 06
    Sharp scissors

Progress Tracker

0% Complete

โ€” 1. Head :

Round 1 :

Create a mr and work 6 sc into it (6)

Round 2 :

Work 1 inc into every stitch around (12)

Round 3 :

Work (1 sc, 1 inc) and repeat this sequence 6 times (18)

Round 4 :

Work (2 sc, 1 inc) and repeat this sequence 6 times (24)

Round 5 :

Work (3 sc, 1 inc) and repeat this sequence 6 times (30)

Round 6 :

Work (4 sc, 1 inc) and repeat this sequence 6 times (36)

Round 7 :

Work (5 sc, 1 inc) and repeat this sequence 6 times (42)

Round 8 :

Work (6 sc, 1 inc) and repeat this sequence 6 times (48)

Round 9 :

Work (7 sc, 1 inc) and repeat this sequence 6 times (54)

Round 10 :

Work (8 sc, 1 inc) and repeat this sequence 6 times (60)

Round 11 :

Work 1 sc in each stitch around (60)

Round 12 :

Work 1 sc in each stitch around (60)

Round 13 :

Work 1 sc in each stitch around (60)

Round 14 :

Work 1 sc in each stitch around (60)

Round 15 :

Work 1 sc in each stitch around (60)

Round 16 :

Work 1 sc in each stitch around (60)

Round 17 :

Work 1 sc in each stitch around (60)

Round 18 :

Work 1 sc in each stitch around (60)

Round 19 :

Work 1 sc in each stitch around (60)

Round 20 :

Work 1 sc in each stitch around (60)

Round 21 :

Work 1 sc in each stitch around (60)

Info :

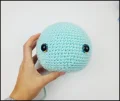
Position your safety eyes in the space between Round 17 and Round 18, making sure there is a gap of 11 stitches between the two eyes.

Round 22 :

Work (8 sc, 1 dec) and repeat this sequence 6 times (54)

Round 23 :

Work (7 sc, 1 dec) and repeat this sequence 6 times (48)

Round 24 :

Work (6 sc, 1 dec) and repeat this sequence 6 times (42)

Round 25 :

Work (5 sc, 1 dec) and repeat this sequence 6 times (36)

Round 26 :

Working in BLO only, work (4 sc, 1 dec) and repeat this sequence 6 times (30)

Info :

Begin stuffing the head firmly with fiberfill now.

Round 27 :

Work (3 sc, 1 dec) and repeat this sequence 6 times (24)

Round 28 :

Work (2 sc, 1 dec) and repeat this sequence 6 times (18)

Round 29 :

Work (1 sc, 1 dec) and repeat this sequence 6 times (12)

Round 30 :

Work 6 dec (6)

F/O :

Fasten off and use a needle to sew the remaining hole closed.

โ€” 2. Ridge on Head :

Info :

Join your main color yarn to the front loops left over from Round 26 of the head.

Round 1 :

Repeat this sequence all the way around: in one stitch work (1 hdc, 1 dc, 1 tr, 1 dc, 1 hdc), then sl st into the next 2 stitches.

F/O :

Cut the yarn and weave in all loose ends.

โ€” 3. Curly Tentacles (Make 7) :

Row 1 :

ch 71

Row 2 :

Starting in the second chain from the hook, work 1 sc, then work 1 inc in the next stitch. Continue this (1 sc, 1 inc) pattern across the entire chain.

F/O :

Fasten off, ensuring you leave a long tail for attaching to the head.

โ€” 4. Chain Tentacles (Make 5) :

Row 1 :

ch 75 using your chosen accent colors.

Row 2 :

Starting in the second chain from the hook, work 1 sl st into every chain across.

F/O :

Fasten off and leave a long tail for sewing.

โ€” 5. Cheeks (Make 2) :

Round 1 :

Using pink yarn, work 6 sc into a mr (6)

Round 2 :

Work 1 inc into every stitch around (12)

F/O :

Fasten off and leave a long tail for sewing.

Assembly Instructions

  • Position the safety eyes between Rounds 17 and 18, ensuring there are 11 stitches between them before securing the backs.
  • Use black embroidery thread to stitch a wide smile between Rounds 21 and 22, catching the thread in the middle to create a soft curve.
  • Pin the pink cheeks directly next to the outer edges of the eyes and sew them firmly into place.
  • Arrange the five chain tentacles in a small circular cluster at the very center of the bottom of the jellyfish head.
  • Sew the chain tentacles into place, making sure they are securely attached to the stuffed base.
  • Place the seven curly tentacles in a larger circle surrounding the chain tentacles and sew them onto the head.
  • Double-check all attachments for durability and weave in any remaining yarn tails inside the body.

Important Notes

  • ๐Ÿ’กWork in a continuous spiral without joining your rounds to avoid a visible seam running down the side of the head.
  • ๐Ÿ’กAlways place a stitch marker in the first stitch of every round so you can easily track your progress.
  • ๐Ÿ’กStuff the head firmly as you go, especially as you reach the final decrease rounds, to maintain a smooth shape.
  • ๐Ÿ’กThe curly tentacles get their shape from the increases; don't worry if they look twisted while you are working them.
  • ๐Ÿ’กIf you want a more colorful look, use a different accent color for each of the five chain tentacles.

I hope you enjoy making this little ocean friend as much as I did! There's something so peaceful about working on those long, rhythmic tentacles. Whether you're making a soft white one or a bright, neon version, I'm sure it will turn out absolutely adorable. Don't forget to take a moment to admire that cute little face once you've finished the embroidery. It really brings the whole character to life. Happy stitching, and I can't wait to see your finished jellyfish! ๐Ÿงถ โœจ

You ask,

we answer.

FAQs

Can I use a larger hook and thicker yarn for this project?

Absolutely! Using a bulky yarn and a larger hook will result in a much bigger, squishier jellyfish. Just remember that you will need more yarn and should size up your safety eyes accordingly.

My tentacles aren't curling very well, what should I do?

Check your stitch count in the curly tentacle section. The curl is created by the 'sc, inc' pattern. If you miss those increases, the tentacle will stay flat rather than spiraling.

Is the ridge on the head optional?

Yes, the jellyfish looks perfectly cute without it! The ridge just adds a bit of extra 'under the sea' flair and covers the transition where the head starts to narrow.

How do I make the smile look symmetrical?

I recommend using pins to mark the corners of the mouth first. Once you are happy with how it looks, use your embroidery thread to follow those marks for a perfect grin.